tutorial

KNIT ALONG || HOW TO DO THE I-CORD CAST OFF TUTORIAL WITH GUEST POM POM QUARTERLY!

KNIT ALONG || HOW TO DO THE I-CORD CAST OFF TUTORIAL WITH GUEST POM POM QUARTERLY!

I'm so excited that the fabulous ladies behind Pom Pom Quarterly are back again with another fabulous tutorial for our Tops, Tanks & Tees Knit Along! I love having them guest post! They always come up with great ideas for new things to teach all of you! Best part is some of their guest posts include FREE printable downloads (see these and more on our Tips + Techniques Page) and today's post is no exception! Read below to get your copy and learn how to do the I-Cord Cast Of! It's a fun and lovely way to finish a summer garment that they've used on some of the patterns in their new Summer 2016 Issue!

Read More

SEWING || MODERN QUILTED COASTER SEWING TUTORIAL

Modern Quilted Coasters Tutorial ||| VeryShannon.com #coaster #quilted #sewing #tutorial
Quilted Coasters Tutorial ||| VeryShannon.com #coaster #quilted #sewing #tutorial

One of my favorite go-to handmade gifts are coasters. Everyone loves a pretty coaster. 

I think they can brighten up a table or a room and bring a smile to your face when reaching for your drink. And when you think how many times a day we use a coaster and pick up and put down a drink that equates to a lot of smiles. The more people smile, the more the world is a happier place. Smiling is healthy and feels good. Just like sewing.

Quilted Coasters Tutorial ||| VeryShannon.com #coaster #quilted #sewing #tutorial

The best thing about making handmade coasters is the freedom. It’s a no pressure, no stress kind of project that is great for using scraps and bits of your favorite leftovers from your stash! You can’t go wrong with that! You can practice new techniques or perfect old ones, try out a new stitch on your machine, or go bold/simple playing with solids!

Quilted Coasters Tutorial ||| VeryShannon.com #coaster #quilted #sewing #tutorial

Been scared to start quilting but dying to try? This is a great way to jump in and get your toes wet! Whichever way you choose to make them it’s up to you! So whip up the coaster tutorials below as is or use them as a jumping off point to add your own flair and personality! Just remember to smile and have fun with them!

Quilted Coasters Tutorial ||| VeryShannon.com #coaster #quilted #sewing #tutorial

QUILTED COASTERS TUTORIAL

MATERIALS
Fabric for coasters cut to 4.5" x 4.5" or charm pack squares
- Coaster #1 & #2 requires 2 pieces at 4.5" x 4.5"
- Coaster #3 requires 1 piece at 4.5" x 4.5" and 2 pieces at 2.75" x 4.5"
- Coaster #4 requires 2 pieces at 2.5" x 4.5" and 4 pieces at 1.5" x 5"
4 pieces of batting cut into 4.5" x 4.5"
Co-ordinating thread
Rotary cutter & mat and/or scissors
Pins
Removable fabric marker
Iron

Helpful tip: You can measure out your squares as you cut or you can also cut out a cardboard template that is 4.5" x 4.5" to use when cutting out the fabric for your coasters.
Quilted Coasters Tutorial ||| VeryShannon.com #coaster #quilted #sewing #tutorial

COASTER #1 & #2


You will need the following pieces to make two coasters:
2 fronts - piece A, 2 backs - piece B, 1 batting - piece C

Quilted Coasters Tutorial ||| VeryShannon.com #coaster #quilted #sewing #tutorial

DIRECTIONS

Coaster #1 and #2 are made the same:

Press all fabrics before cutting.

STEP ONE /// ASSEMBLING YOUR COASTERS

Quilted Coasters Tutorial ||| VeryShannon.com #coaster #quilted #sewing #tutorial

With your front (piece A) and back (piece B) right sides facing each other, lay down your batting on top. You will have a stack that is back, front and then batting. Pin your coaster along the edges. *See diagram above.

Sew along all 4 edges of your coaster with a 1/4" seam allowance making sure to leave a 2-3" opening to turn your coaster right side through.

STEP TWO /// QUILTING & FINISHING YOUR COASTERS

Trim your corners close to the sewing line but not too close to cut through your stitching. Turn coaster right side out. Make sure your corners are all nicely out and pointed. Press your coaster.

Get ready to quilt! Yay! This is where you can get creative with your coasters! Feel free to simply sew a line around the entire coaster close to the edge or make 3! Do shapes, a pattern or a design!

Quilted Coasters Tutorial ||| VeryShannon.com #coaster #quilted #sewing #tutorial

COASTER #1 QUILTING
I chose to play up on the triangles of the fabric of Coaster #1. I first stitched around the border of the coaster 3 times (close to each other). I then stitched a triangle shape on the center of the coaster and then repeated this triangle inside and outside of it with my sewing machine. If you are nervous about winging the triangle, simply draw all your triangles with a removable fabric marker and stitch over your design. *See diagram above.

COASTER #2 QUILTING
On Coaster #2 I played up the chevron zig-zag repeat the pattern makes on my fabric. I first stitched a simple border around the coaster. I then followed the line of the pattern in the center of the coaster. next I stitched a line on either side of this line. I then repeated this pattern moving over 3/4" from where the last one was stitched. Repeat this design until your coaster is full. If you don't have fabric with a chevron design, simply draw one on your coaster with a removable fabric marker and sew over it - easy and fun! *See diagram above.

Press your coasters once again.

Quilted Coasters Tutorial ||| VeryShannon.com #coaster #quilted #sewing #tutorial Helpful Tip: Once you master the coasters above have some fun with scraps and shapes! You can piece together your front and backs or use different quilt block techniques too! The tutorials for Coaster #3 and #4 are a fun introduction into piecing your fabric!

COASTER #3


You will need the following pieces of fabric:
2 pieces for front - piece A & B, 1 piece for the back - piece C, 1 piece batting - piece D

Quilted Coasters Tutorial ||| VeryShannon.com #coaster #quilted #sewing #tutorial

DIRECTIONS

Press all fabrics before cutting.

STEP ONE /// ASSEMBLING YOUR COASTERS

Quilted Coasters Tutorial ||| VeryShannon.com #coaster #quilted #sewing #tutorial

With pieces A and B right sides facing each other sew with a 1/4" seam allowance along one edge. Trim your seam allowance and press your seam towards the darker fabric.

Place piece C and your A/B right sides facing each other and sew with a 1/4" seam allowance. Trim your seam allowance and press your seam towards the darker fabric.

You can choose to topstitch along your seams here or leave unsewn.

Quilted Coasters Tutorial ||| VeryShannon.com #coaster #quilted #sewing #tutorial


With your front and back right side facing each other, lay down your batting on top. You will have a stack that is back, front and then batting. Pin your coaster along the edges. *See diagram above.

Sew along all 4 edges of your coaster with a 1/4" seam allowance making sure to leave a 2-3" opening to turn your coaster right side through.

STEP TWO /// QUILTING AND FINISHING YOUR COASTERS

Trim your corners close to the sewing line but not too close to cut through your stitching. Turn coaster right side out. Make sure your corners are all nicely out and pointed. Press your coaster.

Quilted Coasters Tutorial ||| VeryShannon.com #coaster #quilted #sewing #tutorial

Quilt in desired pattern. I chose to do 1 simple border around the coaster close to the edge. I then did 2 lines down the center of where my front 2 pieces were sewn together. I also did a pairing of 2 lines close to the side edges of the coaster stitching border you already sewed. Simple horizontal pairings of lines to play up with the piecing are lots of fun! *See diagram above.

Press your coaster once again.

COASTER #4


You will need the following pieces of fabric:
3 pieces for front - piece A, B & C, 3 pieces for back - piece D, E & F, 1 piece batting - piece G

Quilted Coasters Tutorial ||| VeryShannon.com #coaster #quilted #sewing #tutorial

DIRECTIONS

Press all fabrics before cutting.

STEP ONE /// ASSEMBLING YOUR COASTERS

Quilted Coasters Tutorial ||| VeryShannon.com #coaster #quilted #sewing #tutorial
With piece A and B right sides facing each other, sew with a 1/4" seam allowance along one edge. Next sew piece C to piece B. Trim your seam allowances and press your seams towards the darker fabric.

Repeat the steps above, this time using pieces D, E & F. Again, trim your seam allowance and press your seams towards the darker fabric.

Quilted Coasters Tutorial ||| VeryShannon.com #coaster #quilted #sewing #tutorial

With your front and backs right sides facing each other, lay down your batting on top. You will have a stack that is back, front and then batting. Pin your coaster along the edges. *See diagram above.

Sew along all 4 edges of your coaster with a 1/4" seam allowance making sure to leave a 2-3" opening to turn your coaster right side through.

STEP TWO /// QUILTING AND FINISHING YOUR COASTERS

Trim your corners close to the sewing line but not too close to cut through your stitching. Turn coaster right side out. Make sure your corners are all nicely out and pointed. Press your coaster.

Quilted Coasters Tutorial ||| VeryShannon.com #coaster #quilted #sewing #tutorial

Quilt in desired pattern. I quilted mine to play up on the 3 pieces we stitched together and replicated a grid pattern. I did a simple border around the whole square and then topstitched close to my 2 seam lines for the front and back on both sides of the center piece of the coaster. I then did 3 sets comprised of 3 stitch lines (close together) going horizontally down the coaster as well to form a grid like design. Press your coaster again. *See diagram above.

Helpful Tip: Once you are done all your coasters, bundle them up all pretty and give them as a lovely gift or treat yourself! These coasters make a great starter project to ease into quilting and practice your sewing skills!

Quilted Coasters Tutorial ||| VeryShannon.com #coaster #quilted #sewing #tutorial

I hope you enjoy the coasters!!! There are so many options and fun prints to play with out there! I'd love to see the coasters you make too! Use hashtag #QCoaster on social media so we can see your lovelies!

Happy sewing from my home to yours!!

Looking for more fun projects? You can find all of our other tutorials HERE and patterns HERE.

SUMMER SWEATER KNIT ALONG || WEAVING IN ENDS WITH GUEST JANE RICHMOND

Weaving in ends with guest Jane Richmond || VeryShannon.com #sskal14 #knitting
I'm so excited to have my bestie and business partner - Jane Richmond here as our guest today!

Our Summer Sweater Knit Along would not be complete without a guest post from Jane! I think she's been in all of them so far! I love her to bits and could gush about her fabulousness all day but I'll spare you for now...lol. You all know how much of a fan I am of her work and her technique posts are some of our most popular for our knit alongs! 

Today Jane's here to chat with you all about weaving in those ends! I know a ton of us hate this task but trust me - it's worth every minute. When spending all that time to knit your gorgeous new garment it's so important to take the extra steps for a beautiful finish and a lovely inside for your garment as well as the outside. You guys ready to get weaving in those ends?
1. Grace 2. Inland 3. Beacon Hill
Let's hear from Jane...


Thanks for having me back on the blog Shan! Your SSKALs are always so much fun, I'm excited to be a part of it even if I can't participate with a knitting project!

For my post I would like to share with you my two favorite methods of weaving in ends. Each serves it's own purpose depending on who I am knitting for. The first is an invisible method perfect for gift knitting or projects that I know don't need to be altered after finishing. The second is the method I use most and leaves ends secure but visible and easy to pull out in case adjustments need to be made!

Both methods are illustrated first using a contrasting yarn so that each step is easier to see, and then followed by images using matching yarn to demonstrate how invisible/visible each method is. You'll find instruction for weaving in ends on both the knit and purl sides of Stockinette fabric.

PURL SIDE /// contrasting yarn
In the demonstration below I've used a contrasting yarn to make the steps more visible.
Weaving in ends with guest Jane Richmond || VeryShannon.com #sskal14 #knitting

Weaving in ends with guest Jane Richmond || VeryShannon.com #sskal14 #knitting
PURL SIDE /// matching yarn
Below I've demonstrated the same method using the same yarn as the swatch to demonstrate how invisible the results are.
Weaving in ends with guest Jane Richmond || VeryShannon.com #sskal14 #knitting
KNIT SIDE /// contrasting yarn
The first picture tutorial was demonstrating how to use this method on the purl side of a Stockinette fabric. Below is the same method only on the knit side of the fabric. This is also the same method used to create a duplicate stitch on a knit fabric to embellish a finished project.
Weaving in ends with guest Jane Richmond || VeryShannon.com #sskal14 #knitting
KNIT SIDE /// matching yarn
This is what it looks like using the same yarn as the swatch. The duplicate stitches blend right in.

Weaving in ends with guest Jane Richmond || VeryShannon.com #sskal14 #knitting
PURL SIDE /// contrasting yarn
Weaving in ends with guest Jane Richmond || VeryShannon.com #sskal14 #knitting
PURL SIDE /// matching yarn
Weaving in ends with guest Jane Richmond || VeryShannon.com #sskal14 #knitting
KNIT SIDE /// contrasting yarn
I weave in the ends on the knit side a little differently. As you can see they are still very visible and this method is very easy to pull out.
Weaving in ends with guest Jane Richmond || VeryShannon.com #sskal14 #knitting
KNIT SIDE /// matching yarn
Weaving in ends with guest Jane Richmond || VeryShannon.com #sskal14 #knitting
Happy Knitting!!!

Thanks for joining in today Jane! Love this tutorial! So handy! I hope you all enjoy it and find it helpful when finishing your new sweaters! You can always find all of our guest tutorials on our Tips & Techniques page HERE and all of our Summer Sweater Knit Along posts HERE.

You can find more Jane Richmond below:


THIS POST IS PROUDLY SPONSORED BY

WWW.brooklyntweed.com


SUMMER SWEATER KNIT ALONG || PROVISIONAL BIND OFF TUTORIAL WITH GUEST BRISTOL IVY

Provisional Bind Off Tutorial with Guest Bristol Ivy || VeryShannon.com #sskal14

We've got another fabulous guest tutorial today for the Summer Sweater Knit Along 2014 from one of my fave designers - the lovely Bristol Ivy!

Bristol's designs speak to my texture loving soul. I love her unique constructions, creative lines and overall aesthetic of her work as a designer. She's a huge source of inspiration for me as a designer and I've been a fan of hers since she started so I'm just over the moon to have Bristol here for our Summer Sweater Knit Along 2014! I knew you would all be just as excited as I am!

Bristol has a written a tutorial for us that is for one of those garment knitting situations that you're always wondering if there was a better way to handle. You know that happy place in a top down sweater that you reach when you get to separate for sleeves? Yep, that wonderful knitting haven where you think "it looks like a sweater" and "now I can try it on" time. You know those stitches you have to put on waste yarn - well Bristol is showing us how to do the Provisional Bind Off in place of just putting those lovely stitches on a scrap yarn to get all distorted. Genius. No distorted stitches and it's much easier to try your garment on. I seriously live for these kinds of things. I'm always researching and trying to learn as a knitter and learning something new like this is food for the soul for me. I encourage you to give it a try! Don't be scared of the word "provisional". It's got a bad rap in the knitting world as being hard and it's really not. Promise.

Provisional Bind Off Tutorial with Guest Bristol Ivy || VeryShannon.com #sskal14
Before we jump in the lovely Bristol's birthday is this week! Happy birthday Bristol! In honor of her bday she has a lovely Birthday Sale! Bundle on! Use coupon code "29on28" to get 29% off the patterns listed in the bundle until August 31st.


And now here's Bristol...

Provisional Bind Off Tutorial with Guest Bristol Ivy || VeryShannon.com #sskal14

Knitting a top-down sweater can be a fabulous way to get acquainted with sweater knitting.

Seamless, easy to try on and refine the fit of as you go, and a great way to eke out every last inch of your favorite yarn.  What’s not to like? But I’ll admit there was one part of the process that I didn’t love--putting the sleeves on waste yarn after the yoke was complete.  Either my waste yarn was too short and I couldn’t get my arms through, or it was too long and my stitches got distorted.  And what was going on with the stitches at the beginning and ends of each sleeve? It’s like they completely disappear, any extra slack in them getting absorbed into the body stitches on either side.  And, to be completely honest, a huge stumbling block? Hunting down a tapestry needle so I could thread the yarn through in the first place.

The biggest thing that bugged me about this, though, was how badly my sleeve stitches got distorted while they were on their holder.  I never felt like I got an accurate idea of how my sleeves fit, and finessing them back to the original gauge was always such a headache.  With these annoyances in mind, I started brainstorming other ways you could hold the sleeve stitches--something that would still be easy, prevent distortion, protect the integrity of the stitches at each edge, and wouldn’t need a tapestry needle.  Here’s what I came up with: the Provisional Bind-Off!

Just like the Provisional Cast-On Tutorial that Hilary showed you a couple weeks ago, the Provisional Bind-Off holds your stitches ready to work for whenever you need them.  Here, I’m demonstrating on half of a basic top-down raglan shape, worked in Brooklyn Tweed Shelter in Nest (special thanks to my friend Aimee for being a willing hand model!), but this is relevant to any place where you might hold stitches: underarms, henley plackets, back necks, et cetera.

Provisional Bind Off Tutorial with Guest Bristol Ivy || VeryShannon.com #sskal14

STEP ONE \\ With your working yarn, work in pattern as established to the stitches that need to be held.

Provisional Bind Off Tutorial with Guest Bristol Ivy || VeryShannon.com #sskal14

STEP TWO \\ Drop your working yarn and pick up your waste yarn (either a spare ball or a length approximately 4 times as long as the fabric being held). (Image 1)

STEP THREE \\ With waste yarn, bind off knitwise all stitches to be held. (Images 2, 3 & 4)

Provisional Bind Off Tutorial with Guest Bristol Ivy || VeryShannon.com #sskal14

STEP FOUR \\ After knitting the final stitch, elongate it by pulling more yarn through, then break the waste yarn (you can leave this stitch live as Hilary’s done at the end of her Provisional Cast-On, but I tend to get it caught on things.  Try it and see!). (Image 1)

STEP FIVE \\ When you reach the end of the stitches that need to be held, fold the bound off fabric onto itself to close the gap between the stitches previously worked in your working yarn and the next stitches, and continue on with the next set of pattern instructions in the working yarn, whether that’s casting on stitches to cover the gap, or just continuing directly to the next set of stitches.  In my example, I am working directly with the next set of stitches. (Images 2 & 3)

The Provisional Bind-Off is complete! 

Here you can see the body of my sweater sample is started and the sleeve stitches are held with the Provisional Bind-Off, ready to be unzipped and worked. (Image 4)

Provisional Bind Off Tutorial with Guest Bristol Ivy || VeryShannon.com #sskal14

STEP SIX \\ When you’re ready to work the held stitches, slide the tail of the waste yarn back through the previous stitch and through the first live working stitch (shown from the wrong side).

Provisional Bind Off Tutorial with Guest Bristol Ivy || VeryShannon.com #sskal14

STEP SEVEN \\ Unzip the bind-off stitch by stitch, replacing the stitches on the needle.  You can then proceed with the pattern instructions as written as show above and below.

Provisional Bind Off Tutorial with Guest Bristol Ivy || VeryShannon.com #sskal14Provisional Bind Off Tutorial with Guest Bristol Ivy || VeryShannon.com #sskal14

A couple tips: make sure to use relatively smooth, non-toothy waste yarn.  

For the example shown, to pair with the Brooklyn Tweed Shelter I used Quince & Co.’s Lark, a smooth, worsted-spun 100% wool that I knew wouldn’t grab onto the stitches it held and make it difficult to unravel.  Fibers or yarn types to avoid would be mohair, alpaca, cashmere, boucle, novelty yarn, or anything with a halo that could get tangled in the stitches of the working yarn and make it hard to unravel.

Additionally, be mindful of your bind-off.  

If you know you typically go up or down a needle size when binding off to match your working gauge, do so here as well.

Once you’ve taken these steps to provisionally bind off your stitches to be held, you can try the sweater on and proceed as usual, without worrying about any of your stitches distorting the structure of the bind off.  This will hold your stitches in place and match your working gauge, giving you a much better idea of how the sleeves will fit.  It will also make it easier to recover and work those stitches when you’re ready.  Plus, as a huge bonus, no hunting down that elusive tapestry needle!

So there you have it: the Provisional Bind-Off.  Give it a try next time you have to hold some stitches!


Thanks so much for being on the blog today Bristol! You can find all things Bristol below...


What do you think? Have you tried this method before? Do you adore the Provisional Cast on and Bind off too? 

THIS POST IS PROUDLY SPONSORED BY

WWW.BROOKLYNTWEED.COM

SUMMER SWEATER KNIT ALONG || PROVISIONAL CAST-ON TUTORIAL

Provisional Cast On Tutorial with Guest Hilary Smith Callis of The Yarniad for Summer Sweater Knit Along 2014 on VeryShannon.com #sskal14 #knitting

We've got one of my fave knitting pals here on the blog today to kick off our "Tips & Techniques" portion of the Summer Sweater Knit Along!!!  

Hilary Smith Callis of The Yarniad is an incredibly talented knitwear designer as well as a blogger and she's also one of our SSKAL14 sponsors! She's sweet, funny and just all around awesome. I adore her to bits and I think it's safe to say we both love a good cast-on.  I was super excited when she decided to write you all up a great tutorial on the infamous Provisional Cast-On! Don't fear the Provisional anymore! Give it a try! I promise it's not hard! So show Hilary some love - pin it, share it, tweet it and try it!


Here's Hilary..... 

One of my favorite knitting techniques is the Provisional Cast On. A Provisional Cast On is a temporary cast on -- stitches are cast on in such a way that you can pick them up live later on and work them however you'd like. Say you're knitting a sweater from the bottom up, but you don't know how long you want it, or you haven't decided if you want ribbing or garter stitch at the hem, or maybe you really want to make it longer than the pattern calls for but you don't know if you are going to have enough yarn. The Provisional CO allows you to cast on without commitment and make all of those decisions later! As a designer, I love the flexibility this gives me.

There are a few different ways to do a Provisional CO, but today I'm going to show you my preferred method, which involves making a little crochet chain and picking up stitches from it. If you're not experienced with crochet or have never made a chain before, do not fear! I am the world's worst crocheter, and even I can do this.

For this technique you're going to need a long length of scrap yarn close in weight to the yarn you'll ultimately be working with and, ideally, a crochet hook. If you don't have a crochet hook, don't worry about it. You can actually fudge things using a knitting needle, as I have done many times. It's just a little easier with the hook.

To start things off, make a slip knot around your crochet hook (or knitting needle) as you usually would to cast on.


To chain one, wrap your yarn around the hook from back to front as shown below, then pull that yarn down through the loop currently on your hook. (If you're using a knitting needle, you can do the exact same thing by wrapping your yarn around your needle in the same manner, then pulling the yarn down through the existing loop with the tip. You may need to help things along with your fingers, but it will work.)


Keep repeating the step above until you have chained several more stitches than you ultimately want to cast on. For this tutorial, I will cast on 10 stitches, so I chained about 20.


When you're done chaining, break your yarn but don't pull it through and fasten it off. Pull one gigantic loop through, tighten it, and leave it like that. We will be "unzipping" the chain later on, and leaving a big ol' loop like this makes that step easier.


One side of your chain will look like this:


And the opposite side will be a series of little bumps. When viewed from the side, the bumps look like this:


You will now be picking up and knitting stitches from those bumps with your working yarn. To begin, insert your needle into a bump a few bumps in from the end of the chain closest to the slip-knot (NOT the end closest to the big ol' loop -- you want to pick up stitches moving towards the big ol' loop)...


...then pull a knit stitch through using your working yarn (the pink).


Keep picking up and knitting stitches from the chain's bumps until you have picked up the number of stitches you want to cast on (10 for me). Congratulations! You've completed your Provisional Cast On!


Then follow your pattern as it's written, pretending you don't have a crochet chain hanging from the bottom of your work. I knit a little swatch of Stockinette Stitch flat, but there's no reason you couldn't do fancy stitches or join to work in the round either.


When you've finished your knitting and it comes time to get rid of that crochet chain and put your cast-on stitches back on the needles, flip it over so the crochet chain is on top. You will be work from right to left with the RS of your work facing you and the "big ol' loop" end of the crochet chain will be at the right.

The first stitch you put back on your knitting needle will be a funny little loop; a nub of a stitch. It won't look like a real stitch, but if you ignore it, you will end up with one less stitch than you want. Before you do anything with the crochet chain, insert your needle through this "stitch" from the back...


...then from the back through the next real-looking stitch to its left.


Now, pull on the cut end of your scrap/chain yarn to undo the big ol' loop...


...and keep pulling gently until you've "unzipped", or undone, the chains inside the two stitches on your knitting needle.


Place the next stitch on your knitting needle from the back, and unzip one more chain...


...and keep repeating that last step until all of the stitches you originally cast on are on your knitting needle.


From here, the possibilities are endless! If this is the bottom of a sweater we're talking about, you can add some extra length, create a pretty hem or a fancy edging, or perhaps you simply want to knit a few rows in garter stitch and bind off. If you Provisionally Cast On the neckline stitches of a top-down sweater, you can now add the collar you want. It's up to you!


Thanks so much for being on the blog today Hilary! Luv ya hun! You can find all things Hilary Smith Callis HERE on her website The Yarniad.

You can find more tutorials, tips & techniques HERE on our website! We hope you're enjoying the Summer Sweater Knit Along so far! Make sure to tag your work with hashtag #sskal14 and if you blog about the KAL share the link in the comments below.

THIS POST IS PROUDLY SPONSORED BY

www.brooklyntweed.com

SEWING || FOLDED TRIANGLE FAT QUARTER BAG TUTORIAL

SEWING || FOLDED TRIANGLE FAT QUARTER BAG TUTORIAL

Learn how to sew a fun folded triangle bag using only 3 fat quarters of fabric with the free tutorial below!!!!

Read More

SEWING || FREE BONNIE DRAWSTRING PROJECT BAG TUTORIAL!

Bonnie Drawstring Project Bag Tutorial // VeryShannon.com

If you're like me, you always need as many project bags as possible. One is never enough. There are always more projects and I love it that way!

While I already have tutorials for our fun Reversible Sock Knitting Project Bag, Indie Project Bag, as well as our fun Brigitte Needles & Notions Zippered Pouch, I figured it was about time to whip one up for some of you beginner sewers that's a classic! A lot of my knitting readers are just getting into sewing and I thought that the Bonnie Drawstring Project Bag would make a great intro to sewing project for them that isn't boring, is fun to make but that also makes a great gift too! And more experienced sewers can play with fabric choices, add personal touches and customize to their hearts content!

You all know my personal motto is to get knitters sewing and sewers knitting! I live by that! So why not tempt the knitters to the dark side by getting them to make their own project bags that they all love? I know how much my friends and I adore our project bags and no matter how many I have I always add more. It's fun...what can I say!

When I spotted the new line "Sweet as Honey" from the uber talented Bonnie Christine a few months ago I was instantly in love. The colors, the patterns, the mixtures of designs - they were truly reflective of the style we love from Bonnie on her fab blog "Going Home to Roost"! I loved that she stayed true to her addicting aesthetic! The fabrics are as lovely as all of her work. And to top it off her line is available from Art Gallery Fabrics - one of my fave fabric lines. Their pima cotton is to die for soft and drapes beautifully!

When Bonnie asked me to join in on her Sweet as Honey Blog Tour I was thrilled! The only problem I had was deciding which fat quarters to use!!! I had already gotten my hands on some of the fat quarters so I luckily was able to mix and match for my project today! I highly recommend the prints in this line. They are so cheerful and beautiful and I find myself so drawn to them during the rainy season we are just putting behind us here.

Bonnie Drawstring Project Bag Tutorial // VeryShannon.comBonnie Drawstring Project Bag Tutorial // VeryShannon.com
Would you like to learn how to make our Bonnie Drawstring Project Bag? Let's get sewing! Read below to find out how!

BONNIE DRAWSTRING PROJECT BAG TUTORIAL

*Copyright 2014 VeryShannon.com. All rights reserved.  Email askveryshannon@gmail.com if you have questions.

MATERIALS

*NOTE: I made my project bag using 2 fat quarters that measured 19 x 22". The main portion of the bag is a 12.5"W fat quarter folded in half height wise. I have given instructions/dimensions for the fat quarter pieces below but will also list below the dimensions if you would like to use a different piece of fabric.

1 Fat quarter of main fabric cut to 12.5"W (19"H)
1 Fat quarter of accent fabric cut to 2 pieces 12.5"W x 6"H
OR
1 piece at 12.5"W x 19"H of main fabric (or 2 pieces at 9.75"H sewn together with a 1/4 SA with edges finished)
2 pieces at 12.5"W x 6"H of accent fabric
2 pieces of 1/2" twill tape at 32" - 35"L (or drawstring material of your choice..ex ribbon, fabric)
Removable fabric marker
Coordinating thread
Scissors or rotary cutter w/mat


INSTRUCTIONS

*ALL SEAM ALLOWANCES ARE 1/4" UNLESS OTHERWISE NOTED.

STEP ONE: PIECING TOGETHER YOUR BAG

*NOTE: I made my project bag using 2 fat quarters. I will give instructions/dimensions for the fat quarter pieces but will also list below the dimensions if you would like to use a different piece of fabric.

TIP: If you have sewn two pieces of fabric together to form your main fabric for the bag you may skip the step above.

Take your main fabric piece that is 12.5"W x 19"H and fold in half with right sides facing each other and press along fold. The fold will be the bottom of your bag.

With your main and accent fabric right sides together sew your accent fabric to both the top and bottom of your main fabric using either a serger or on your sewing machine. If using your sewing machine finish your seam allowance with a zig zag stitch or other appropriate stitch. Press your seam allowance towards your main fabric. *See diagram to the left.


STEP TWO: FINISH SEAMS
Using a serger (or a sewing machine) finish the side seams of the whole bag neatly right along the edge.

Measure and mark 3" down from the top of your bag. This will be where our opening for our drawstring will be. *See diagram below.

TIP: You can finish the seams using your sewing machine by using either a zig zag stitch, a mock coverstitch (or other appropriate stitch on your machine) or by using pinking shears.

STEP THREE: SEWING YOUR BAG
With right sides facing each other sew both side seams with a 1/4" seam allowance (if serging sew right along your inner serged edge) starting from the mark you just made. *See diagram below.


STEP FOUR: CREATING YOUR CHANNEL
We are now going to make the channel for your drawstring. You are almost there! Press your seam allowance open and towards the wrong side of your fabric carefully. Now fold down and press the top of your fabric down 1/2". Then press and fold again 1". Make sure your seam allowance is fully enclosed in your fold. We don't want this show from the outside of the bag. Pin along the entire top perimeter of your bag. Topstitch along this fold close to the inner edge of your fold neatly and precisely. Press well. *See diagram below.


STEP FIVE: PUTTING IN YOUR DRAWSTRING


Attach your safety pin to one end of your twill tape and pull the twill tape through the opening on your front left side and out through the front right side. Then pull it back into the right side of the other side of the bag (the back) and back out the left side forming a loop. Tie a half knot with both ends together. Repeat this step but this time entering in the channel from the front left side. *See diagram above and below.

I like to finish the ends of my drawstring off by serging and then pressing over 1/4" or so and stitching it down. This is optional though. Feel free to use or make whatever you'd love to have as your drawstring.


You did it! Yay! Great job! This is a great time to add your label or any finishing touches you may want! Personalize and customize to your heart's content! That's what makes these bags fun!!!!

Bonnie Drawstring Project Bag Tutorial // VeryShannon.com

Make sure you share your pics! Add them to our flickr group, share them on our facebook page, or comment with a link below! I love seeing your project pics!

You also do not want to miss all the stops on the Sweet as Honey Blog Tour! Thanks again for having me Bonnie! There have been some amazing projects!!!! Tomorrow the tour will be stopping to visit Heidi at Hands Occupied and yesterday a lovely table runner was made by Mel at Missouri Mel.

P.s. - if you love the basket in the shots above as much as I love mine it's from Tolt Yarn and Wool. I adore it! Plus you can wet it and reshape it!


Sweet as Honey Blog Tour // veryshannon.com

SEWING || BRIGITTE NEEDLES & NOTIONS ZIPPERED POUCH TUTORIAL


Do not fear the zipper. 

Do not deny yourself of a bevvy of adorable zippered pouches. Trust me on this one folks. I spent years sewing avoiding sewing zippers. Now that I conquered my fear of zips I've been having so much fun with them! They are honestly just like what everyone says - scarier than they look and wayyyy easier than you think to sew. Once you do a few you will be a pro at them! I prefer zippers over sewing buttonholes any day!!

Now like most knitters I take knitting with me most places I go. The other day I found myself needing to pack multiple needles but didn't want to lose them in my knitting bag. So I started thinking there must be an easier way to keep my spares organized, without a huge case, that's easy to access and doesn't take up much room. I then thought - can I put them in my zippered pouch? Nope, not enough room (I carry a lot in mine). Then, better yet, why can't I have a separate section for my circulars on my pouch? Yesssss! I could do that! And 
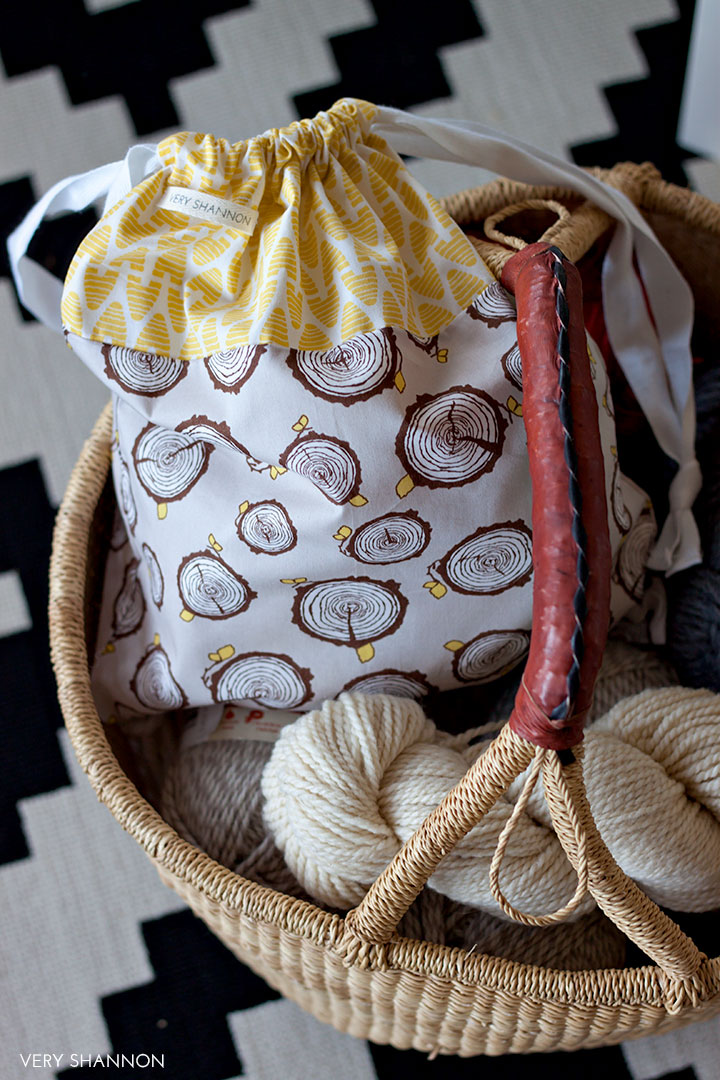
The Brigitte Needles & Notions Zippered Pouch was born!

Brigitte Needles & Notions Zippered Pouch Tutorial // VeryShannon.com

When I got my hands on some of Pat Bravo's new line "Rapture" from Art Gallery Fabrics I knew they would make a lovely and pretty zippered pouch. I used the following prints for my pouch...


The Delicate Femme Apricot is my fave from the whole collection. So gorgeous! I want to make a dress in it this year! You can read more about my review of this pretty new line here.

Now don't be scared of making this pouch. I promise it's not hard! Really. It's a basic zippered pouch with a zipper insertion that I think isn't the standard way to do them but a way that I really like. It's super duper easy and you can get right close to the zipper teeth so you get a clean finish. But feel free to put your zipper in any way you'd like to. And adding the pouch portion is a breeze. If you can sew straight lines you can make Brigitte! Trust me.

You ready? Let's get those needles and notions organized! You deserve a pretty new pouch for spring!


BRIGITTE NEEDLES & NOTIONS ZIPPERED POUCH TUTORIAL

*Copyright 2014 VeryShannon.com. All rights reserved. This tutorial is for personal use only unless prior permission has been given. Email askveryshannon@gmail.com if you have questions.

Brigitte Needles & Notions Zippered Pouch Tutorial // VeryShannon.com

FINISHED MEASUREMENTS
8" W x 4.5" H (Front & Back)
6.5" W x 2.25" H (Pocket)

MATERIALS
4 @ 8.5" W x 5.25" H ( 2 for Outer Pouch and 2 for Inner Pouch)
2 @ 2.75" H x 4.5" W (Pocket Flap)
2 @ 7" H x 5.25" W (Pocket)
Interfacing - I use & love 931TD Pellon Fusible Interfacing cut to the sizes/quantity below:
2 @ 8.5" W x 5.25" H Light to Medium Weight Fusible Interfacing
1 @ 4.5" W x 2.75"H Light to Medium Weight Fusible Interfacing
1 @ 5.25" W x 7"H Light to Medium Weight Fusible Interfacing
1 9" zipper
Zipper foot for your machine
Coordinating Thread
1 Snap
Rotary Cutter w/mat or scissors
Pins

INSTRUCTIONS
*All seam allowances 1/4" unless otherwise noted.
STEP ONE: PREP POUCH FOR SEWING
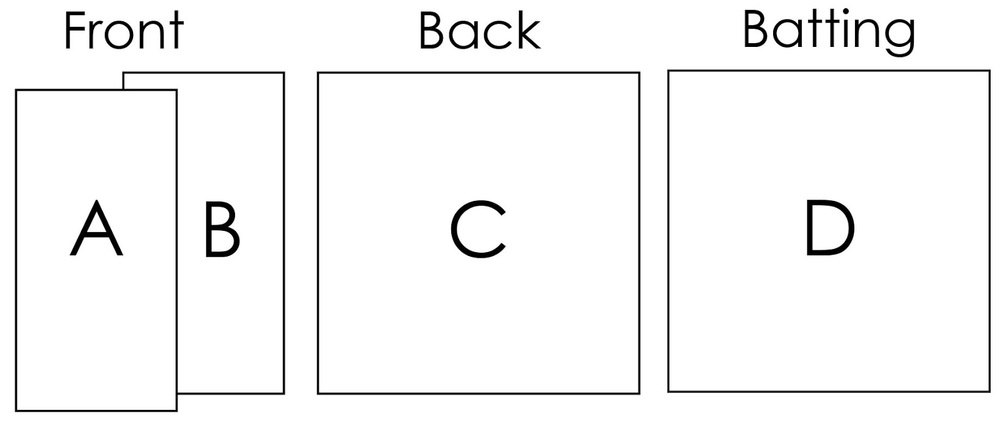
Cut out all fabric and interfacing pieces as per the measurements listed in the "Materials" section. Set aside your 2 pieces that will be your "Outer Pouch" pieces, 1 of your "Pocket Flap", and 1 of your "Pocket". Iron your fusible interfacing to the wrong sides of these pieces. 
Brigitte Needles & Notions Zippered Pouch Tutorial // VeryShannon.com
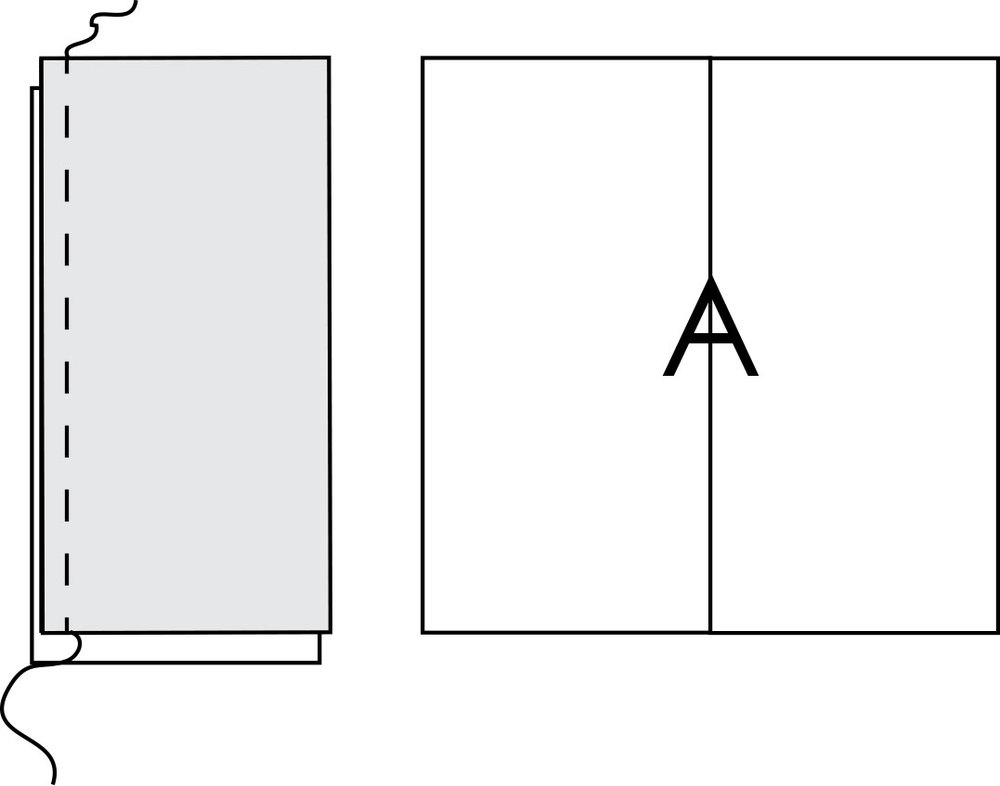
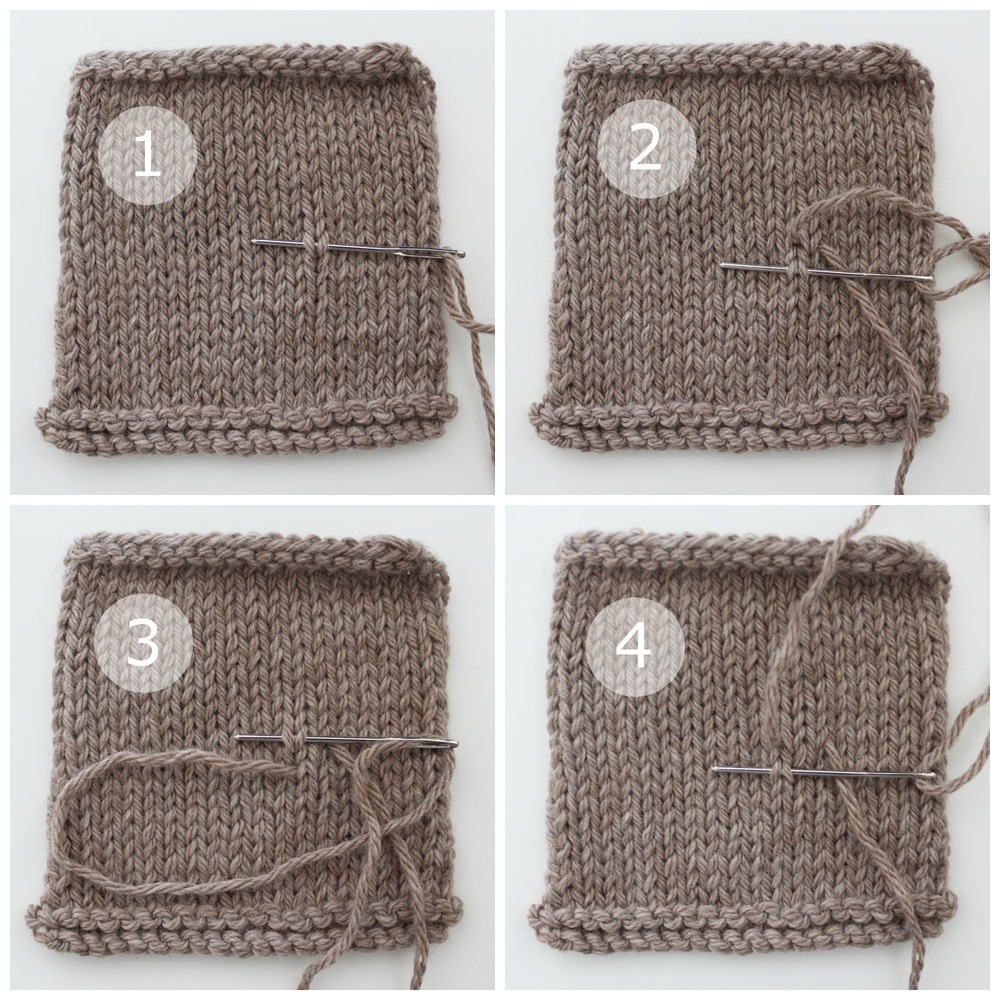
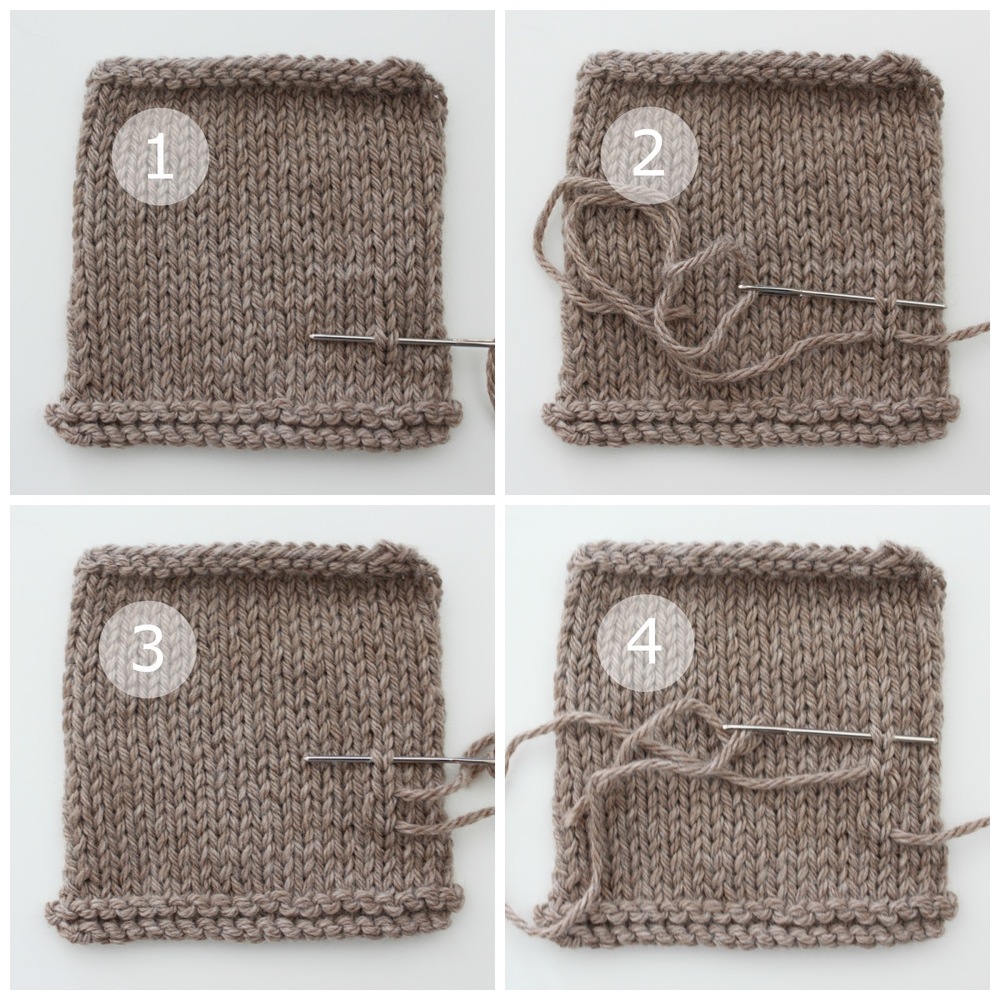
Now take your 2 Pocket Pieces and place them right sides facing each other. Sew along one of the short edges ONLY with a 1/4" seam allowance. Turn right side out and press. *See diagram above.
Brigitte Needles & Notions Zippered Pouch Tutorial // VeryShannon.com

Next with right sides facing each other, sew 3 sides of your pocket flap, leaving one long edge unsewn. Clip your corners and turn right side out and press. *See diagram above.

STEP TWO: ASSEMBLE POCKET
Brigitte Needles & Notions Zippered Pouch Tutorial // VeryShannon.com
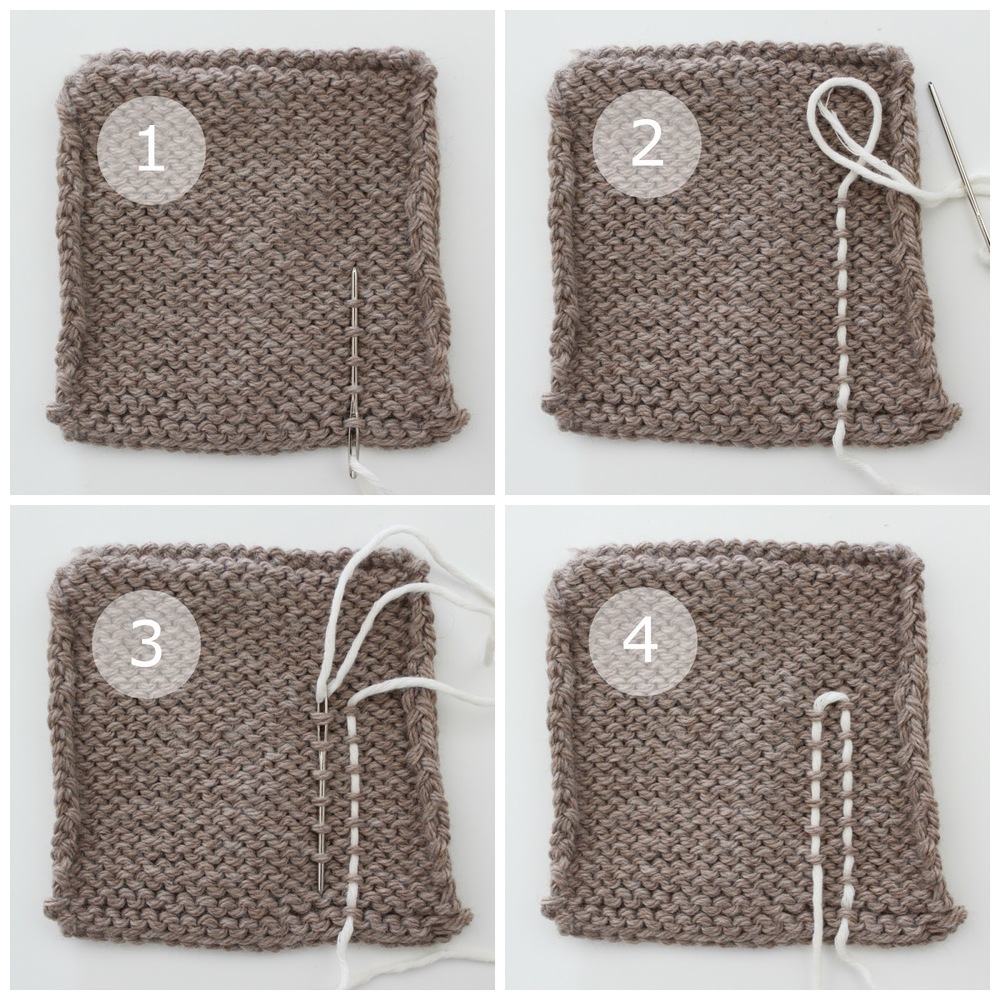
Place your Pocket Piece (right side facing up) on top of the right side of one of your Outer Pouch Pieces aligning both short ends together on the right edge. Pin your pocket down and baste close to the edge along the right short edge and along the bottom edge of your Outer Pouch Piece ONLY. This will keep your pocket piece from moving around too much when we assemble the pouch. *See diagram above.

Brigitte Needles & Notions Zippered Pouch Tutorial // VeryShannon.com

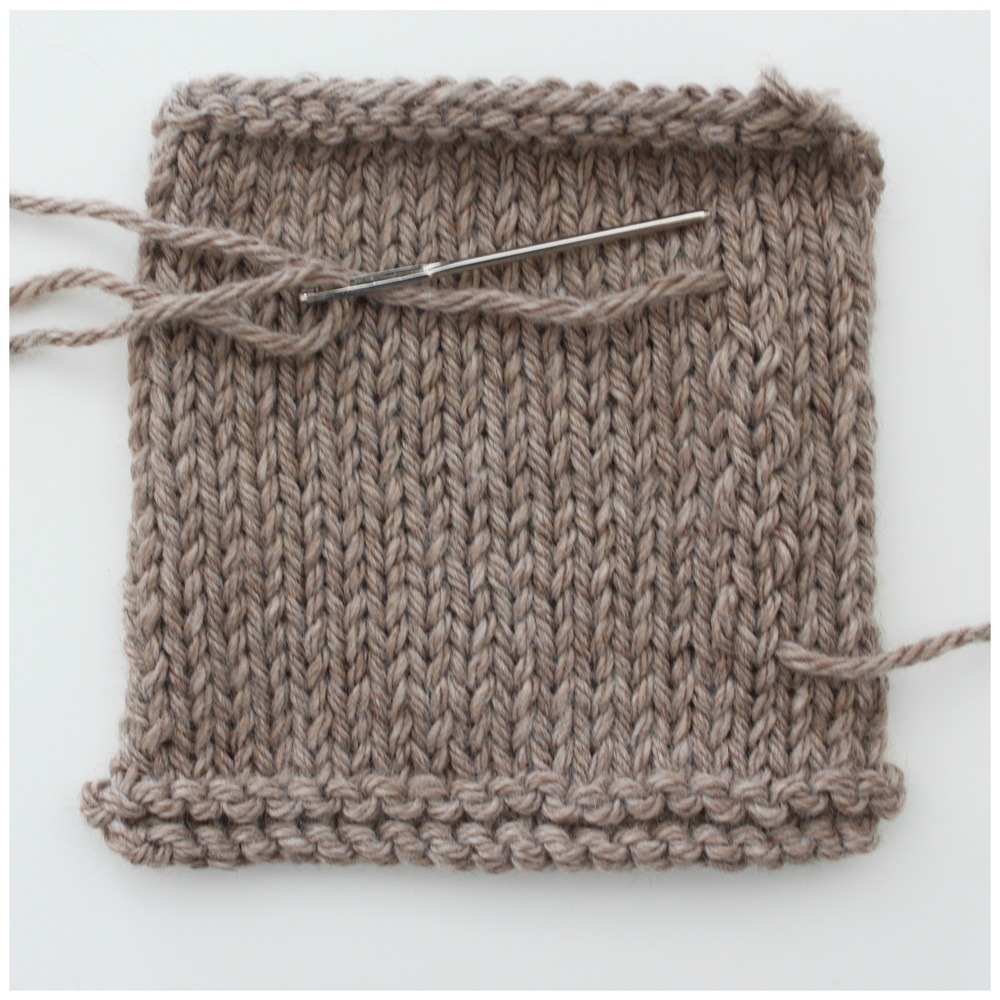
Now fold down 1/2" and press along one long edge of all of your Outer Pouch and Inner Pouch Pieces. *See image above.

Brigitte Needles & Notions Zippered Pouch Tutorial // VeryShannon.com

Next place your Flap Piece right side facing up on top of the same Outer Pouch Piece you just sewed your pocket to (right side up) and pin it down 1/2" away from the bottom of your pouch aligned with the left hand side of the pouch. Baste along this side seam close to the edge. *See image above.

STEP THREE: ATTACH ZIPPER (Lining)
Do not be scared. I feared zippers for almost 3 years and never sewed one. I was freaked right out by them and then when I finally got the courage to sew one my whole world changed. It wasn't hard. It was just my mind thinking it was. I now loooooove sewing zippers. The girl in me who loves top stitching just goes gaga over zippers. My words of wisdom? Go slow, steady and take your time and always, always, always read the instructions more than twice. I sometimes even "pretend do the steps" before really sewing just to make sure I'm not making any boo boos. The nice thing about zippers is you can rip it out if you make a mistake. With a buttonhole...once it's cut you are down for the count. See...already less scary right?

Now this method of sewing a zipper in a pouch isn't the only way to do it. There are lots of different methods but this is a personal fave of mine. It gives such a neat finish and I find it the least scary and stressful way to attach a zipper. Please feel free to use any other method though if you would like to. If you do a search on google there are a ton of great free tutorials and instructions on this as well as just a few other free zippered pouch tutorials below showing you how to put a zipper in using a different method than what I show.

// Helpful Links
- How to Sew Zippers on Kollabora
- Zippered Pouch on Noodlehead
- Easy zippered pouch on Design Mom
- Zippered Pouch Roundup on The Sewing Loft

Brigitte Needles & Notions Zippered Pouch Tutorial // VeryShannon.com

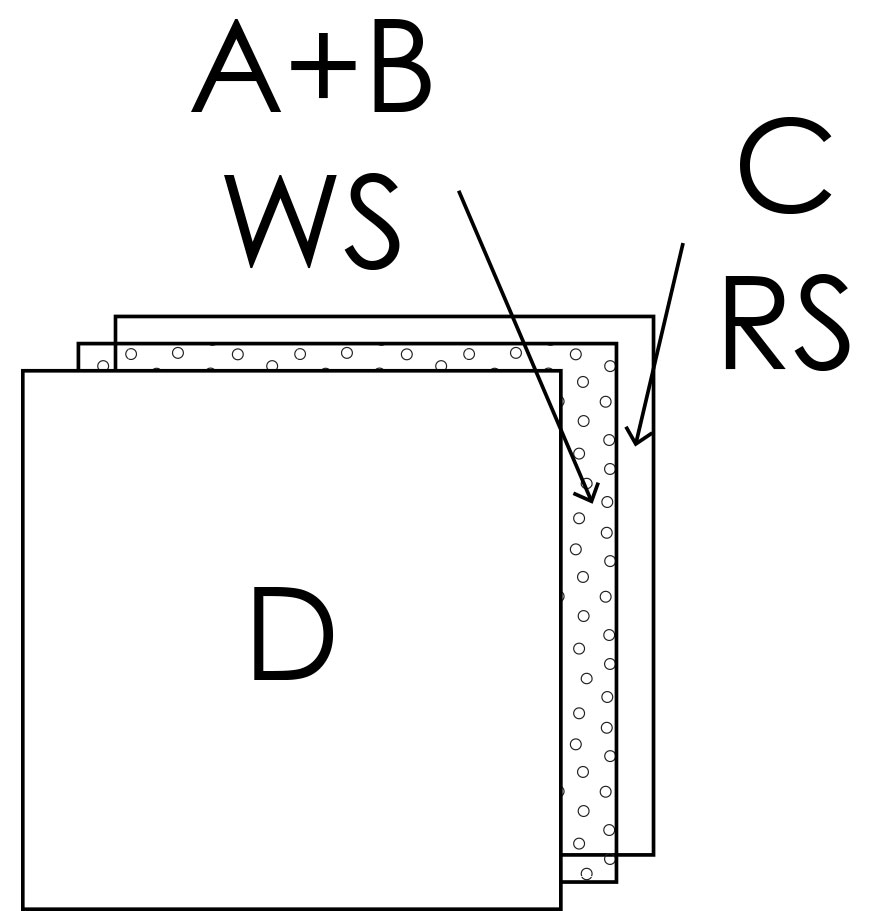
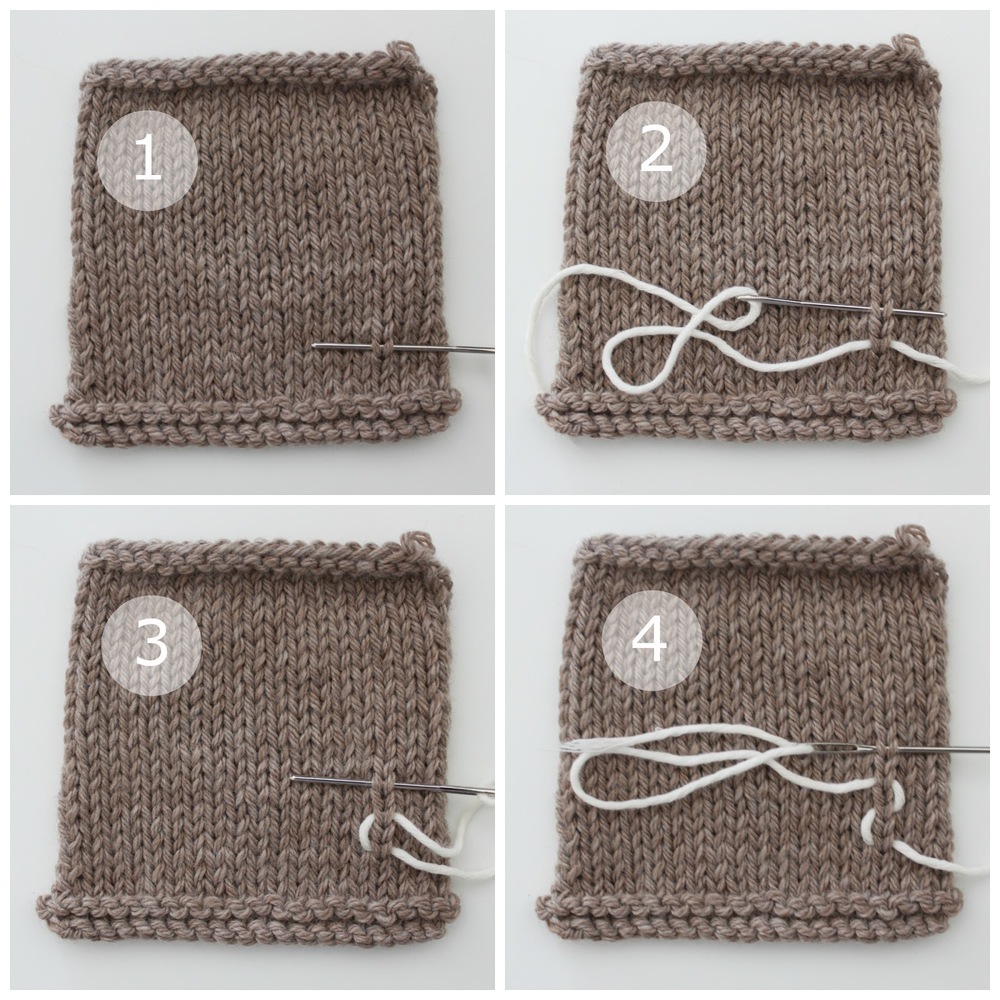
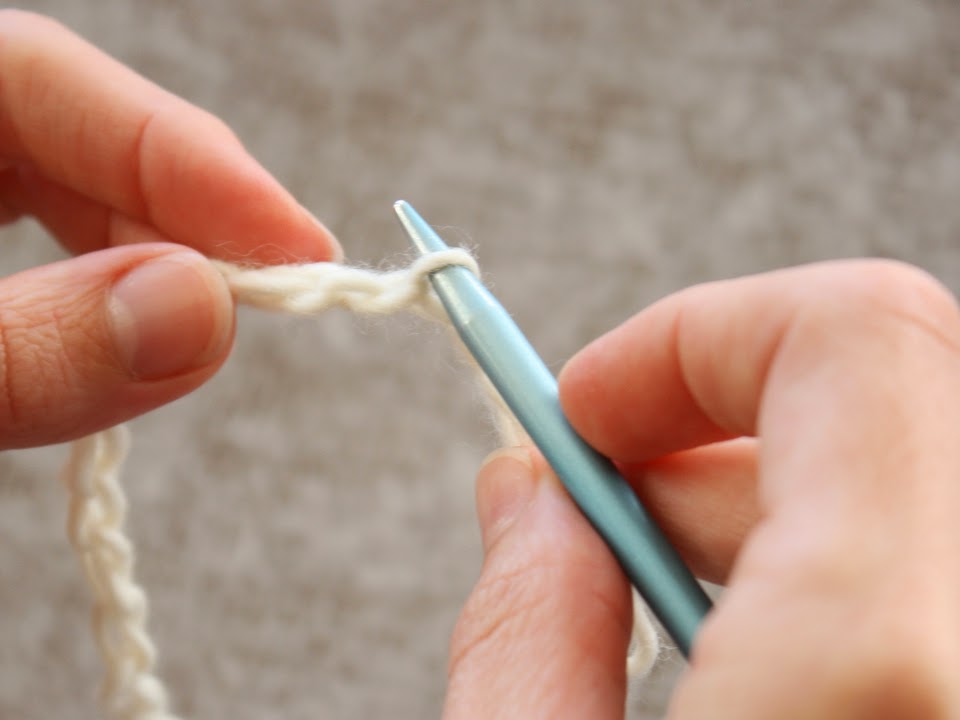
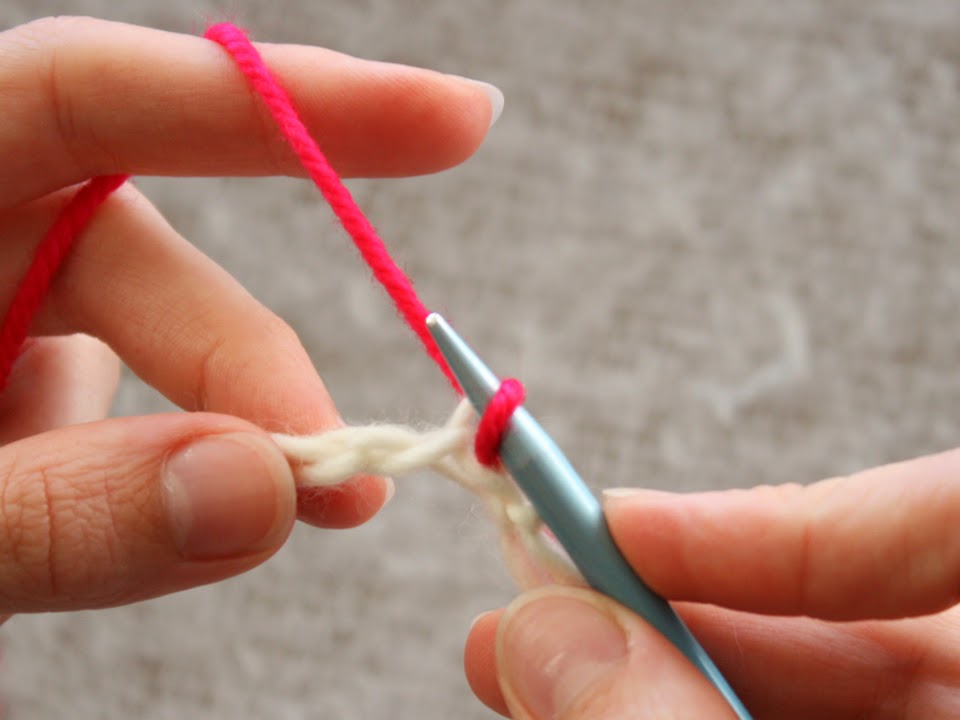
Attach your zipper foot to your machine. Lay your zipper (right side facing down) pull side down with the zipper pull on the left and then lay your Inner Pouch piece right side facing up on the zipper. You can choose to pin or not pin here. Sew fabric to zipper using your zipper foot sewing close to, but not on, the zipper teeth.  Remember - go slow, and take your time. *See image above.

Brigitte Needles & Notions Zippered Pouch Tutorial // VeryShannon.com

Next take your other Inner Pouch Piece and repeat the above step maneuvering the zipper pull as needed as you sew. Press your fabric nicely.

// HINT
If you would like to put in a lovely label for your pouch now is the time!

 
STEP FOUR: ATTACH ZIPPER (Outer)
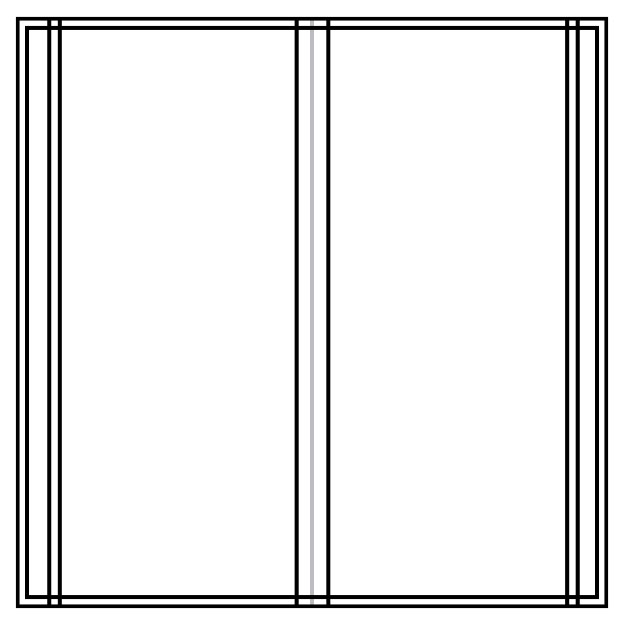
Lay your Inner Pouch right sides facing down (your zipper will be right side facing up now) and pin your Outer Pouch Pieces down along your zipper making sure your zipper pull (start) are on the left side (same side as your pocket flap). My pic shows a different angle so careful to check this before sewing. Sew along your top edge as close to the zipper teeth as possible (don't sew on the teeth). You want a nice and tidy finish. As you sew you can maneuver and move the zipper pull out of the way. That's it! You did it! You see...it wasn't so bad! Awesome job!

Brigitte Needles & Notions Zippered Pouch Tutorial // VeryShannon.com

Next repeat the above step for your other Outer Pouch Piece. When you are done pull your zipper down a few inches. You will need the zipper open so you can pull the pouch right side out after we are done sewing it together.

Brigitte Needles & Notions Zippered Pouch Tutorial // VeryShannon.com

STEP FIVE: SEWING POUCH
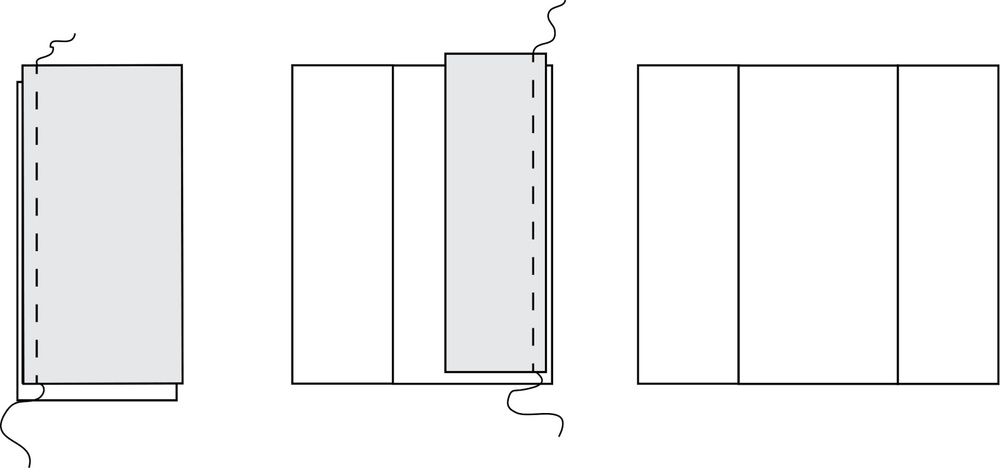
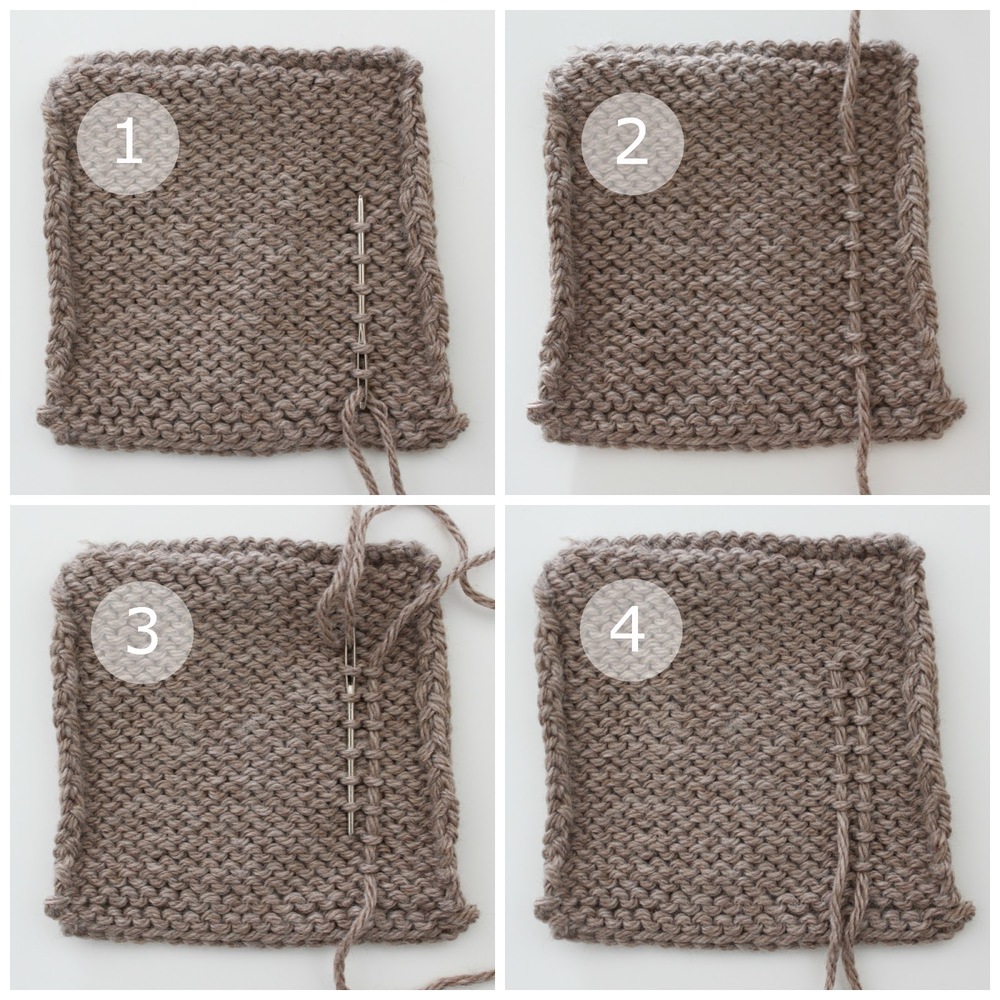
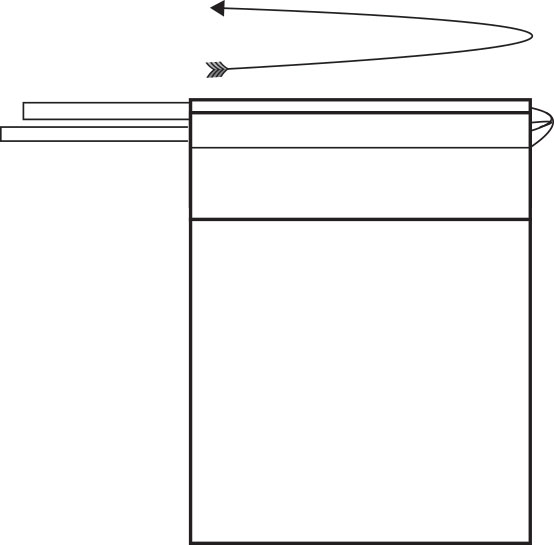
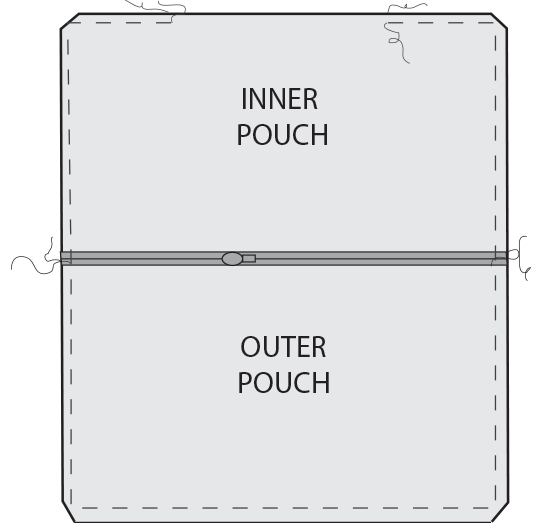
Now we are going to finish sewing up the pouch. We are going to separate the Inner Pouch from the Outer Pouch here. So match your Outer Pouch right sides facing each other and pin around (leaving the Inner Pouch pieces free. Make sure that as you pin your zipper tops are even and lined up. *See diagram below.

Brigitte Needles & Notions Zippered Pouch Tutorial // VeryShannon.com

Sew along your 3 edges of your Outer Pouch ONLY with a 1/4" seam allowance going slowly and carefully. *See left diagram above. Now trim your corners to get rid of extra bulk. *See diagram to the right above.

Next do the same steps but this time using your Inner Pouch Pieces (again lining everything up and pinning) but leave an opening that is 4-5" wide to turn your pouch through. Trim your corners. *See diagram below.

Brigitte Needles & Notions Zippered Pouch Tutorial // VeryShannon.com

Now pull your pouch right side out through the unsewn opening in your Inner Pouch. It is going to look weird and wonky but don't worry - all will be lovely soon. Once it's right side out put your Inner Pouch inside of your Outer Pouch and check to make sure all looks good. Check your pocket and flap to make sure it's laying nicely. If it does pull your Inner Pouch back out and either press and sew shut on your machine with a top stitch enclosing your unsewn opening or hand stitch the opening closed with an invisible stitch for a clean finish.

Put your Inner Pouch back in your Outer Pouch and press that bad boy really really well.

STEP SIX: FINISHING TOUCHES

Brigitte Needles & Notions Zippered Pouch Tutorial // VeryShannon.com

 All we have left is to sew on your snap! Find the center of your pocket flap and draw a dot 3/4" up from the bottom of your flap. Sew the female part of your snap here (or the part of the snap that has the opening (not the prong). Now find the center and mark the corresponding spot on the top of your pocket and sew down the male part of your snap (the one with the prong).

*Copyright 2014 VeryShannon.com. All rights reserved. This tutorial is for personal use only unless prior permission has been given. Email askveryshannon@gmail.com if you have questions.

Brigitte Needles & Notions Zippered Pouch Tutorial // VeryShannon.com

And you're done!!!! You did amazing and seriously....how cute is this pouch! I can't wait to make more! I can use these for so many things. They also make fabulous gifts! Mother's Day will be here before we know it!

What fabric would you use for your pouch? Do you carry spares with you for your knitting too? Wouldn't this be great for makeup and brushes as well? Thanks for sewing with me!

P.S. Make sure to add your projects to our Flickr Group so we can see your finished Brigitte's and link them in the comments too! I love to hear from you!