mommyhood repurposing

ikea hacker

i ran across this adorable and creative play kitchen today and had to post about it. i adore this and i know mackenzie would go crazy for it. where to buy it? you can't. but you can make it! it's constructed from a simple piece of ikea furniture and you can find the steps here.
the original piece she bought from ikea

the finished product has shelves filled with food and the oven lights up!

while reading about this project i came across a fun, hour waster of a site called ikea hacker. it's filled with, yep you guessed it, ikea furniture that people have have altered (or hacked) and submitted to this site. it has how-to's and lots of great inspirations. i know i have some ikea stuff sitting around that could be gussied up.

glass jars frames galore


glass jar frames! whowouldathunkit? do you have a bunch of glass jars kicking around like me? i can never bear to recycle them and i end up using those pretty little things for so many different functions in our house and turning them into a frame, now that's one i had not thought of. if you feel the urge to make some of these check out photojojo's tutorial.

recycled plastic bag croheted tote

my mom gave me the head's up on this great project. if you are like me and sometimes forget your cloth bags for the grocery store and end up skulking out embarrassed about the bad thing you just did for the environment this is the answer. we reuse our grocery bags for garbage bags in our house but wouldn't this fun crocheted tote be much more stylish?

the details on how to make the bags above can be found here at canadian living.

this great wool stasher above can be found here at diy network.

i love any excuse that makes me actually use my crocheting skills. making a blanket here and there just isn't enough to keep me going when it comes to crochet. this project looks like great fun and an easy way to put your creativity to the task. they are also waterproof and i think it would make a chic beach bag or swimming pool carryall. summer is on it's way, or I like to tell myself it is, especially seeing as i got hailed on today in some freak 10 minute storm for the second time in 2 weeks. what are the odds???

i finally found it (or it found me)

i have been hunting for weeks on used victoria for a small desk for me to use for sewing, crafting, art and all other goodness i get up to when not busy being a mommy/wife.
i had found one i fell in love with but the seller wouldn't respond. i am assuming either it was sold, or she just thought it was weird that i was stalking her via email over an old, broken down desk. i will never know...haha.
my luck changed on sunday though. we headed out to metchosin to see jer's grandma and family for the day. during our visit jer mentioned he thought he had found me a sewing table. he brought me downstairs to see what is now my "new baby". it was almost identical to the one i was stalking some girl over. now that's what i call fate! it needs some massive tlc, but i am just the momma to give it to. thanks so much grandma joan!
jer's dad helped me get a new top for the desk due to the current one being broken and all busted up. we are going to replace the top, sand her down and paint her up all nice. to top off how elated i was over the desk, there were even vintage sewing patterns and gorgeous buttons inside the drawers! i am over the moon!
i will do another post about the desk when it's all done. i can't wait to whip out the paint brush!

the old top that we are replacing

purse size tissue holder

it was a friends bday yesterday and it was just the excuse i needed to try out this purse size tissue holder tutorial from skip to my lou. it's simple, easy and a great stash buster to make. my sister wants one now and so do i.

i used some material i had left over from mackenzie's chair cushion covers that were originally a pillow cover from the dollar store and then lined the inside with material from some cute pajama bottoms.

i love repurposing objects and i am finding it more and more addicting the more projects i do. (that was a little "more" love fest) it's a creative challenge but a fun and exhilarating one. why throw out or donate something when you can repurpose it and use it to make something you will love. you loved it enough to buy it once before so why not keep the love alive?

speaking about love, this weekend we are enamoured by:

the kooks album - konk
(go ahead and check out the 2 disc special edition, it's sooo worth it)

i can't seem to listen to this album enough. it came out last spring, but it is one of my fave groups to listen to while in the midst of my crafting madness. i love sewing up a storm to these guys.

and while i am it i might as well throw in some:


i hope you are all having a wonderful weekend. i am gonna go get back to mine :)

sick of my fuse box

i hate where the fuse box is in our apartment.as soon as you walk in the door - it's literally directly above the console table. a giant eyesore! it's one of the first things you see.

jeremy and i have been toying with what to do to cover it since we moved in way back in august 08. i was tempted to slap on some material or funky wrapping paper and kind of frame it out, but just never found what i was looking for.

then one week, months ago, i found an old cupboard door at the bottom of someones driveway waiting to go out with the trash. i took it. yep. i grabbed that sucker and brought it home with me.

i cleaned it, scrubbed it, wiped it and shined that puppy up. the colors of the door are the exact color of our paint on the walls, the exact size of our fuse box & the light blue was the perfect match for our dining room. i knew it was fate. it called out to me when i walked by and i just can't seem to resist things that i get "that feeling" about.

at first i was tempted to take the hinges off the sides, but once hanging i decided to leave them on. (also they looked like a damn pain in the a** to remove) it has taken me a while to figure out how to hang it over the fuse box without it sticking out to far from the wall. but i managed to root through my tool/hardware bag and found some short, thick hook and eye screws and whammed those puppies on and hung the door.

i like it. i may still change it up if i find a wrapping paper design i love along the way, but i will still keep that door. i wish the photos were better, but there is literally no light over there to show it's true colors.

funny thing is, after all that work, jeremy still hasn't noticed it is on the wall....hahaha, that's men for ya. (sorry babe)

the seat cushions are finally done

i fought a battle last night.

in between conquering my hubby's ironing and trying to sew up some pillows for mackenzie's chairs i feel like i fought a battle.

the chair cushions turned out alright, i do wish i had used a pattern though. i don't think trying to wing it when tired was such a good idea...haha. i used a pillowcase i had found at the dollar store for the cushions. those things have kept me sewing like crazy. i love that i pay a dollar and get to add to my stash! i did have to do some fix it's in the end and tried to hide my mistakes. overall i think they turned out useable and in jer's words - if i make some more i know what to change next time.

yesterday i did have a shining moment of happiness though. i bought some great amy butler fabric on ebay for a steal! the mailman cannot come soon enough!!!!

keep those little hands warm

so i haven't finished sewing the mittens yet. oh well. i have an excuse, i have been sick. due to the fact of my excused laziness i started yet another project.

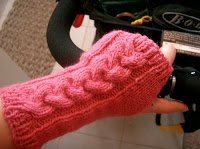
i have been obsessing on ravelry looking for a new hat patterm for little mackie and just can't seem to decide which one to make for her. i got fed up with choosing, so while laying in bed watching damages i decided to make cute fingerless mitts for her in a light pink color of course! now she will have some just like momma's stroller fingerless mitts made from the pattern emanelle by nancy ricci!

sucky thumb mitt pattern you can also view it on my ravelry page.

i have been madly trying to find a nice, easy pattern to work on when i finally get to attend the local knitting group here in victoria. it is the number one thing on my new year's resolutions list to do. with all of jeremy's overtime last year and the wedding i just never made it and i am dying to go. they are called "the bitchy bees" and this group kicks some serious knitter butt. they have monthly beer knit nights at pubs in town!!! come on now, how can i not want to go? knitting, beer, a great group of people, oh and no baby? i am in. they have been so nice in letting me lurk in there ravlery group for a year even though i have never attended a meeting - thanks guys!

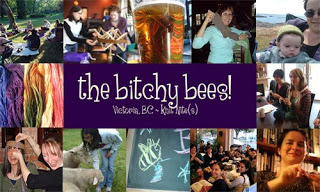
if you live in town and are interested in attending here is some info from there ravelry group page:

Twice a week we invade the serenity of Khona Cafe and wreak havoc and knitting mayhem upon its staff and customers. We love knitting almost as much as we love being obnoxious! Come sit, stitch, socialize and swap stories and ideas with us. It’s as simple as that, nothing pretentious at all. We are a boisterous and passionate group of knitters, and despite the name, we’re really nice :-P
–Women and men, beginners and experts, bohemians and professionals, young and old, knitters, crocheters and other textile crafters – all are welcome!

Don’t know how to knit or crochet? Just bring needles and yarn with you and one of us will be happy to help you get started.
The only cost involved is the food or drink you order. We recommend a one beverage minimum. (They are running a business after all!)
So if you’re interested in meeting up for a fun night of knitting, drop by! We love meeting new people :-)

When?Where?
Khona Cafe/Coffee Bar (corner of Fort & Cook)
Victoria BC Canada
Tuesday and Friday Evenings
6pm to 8pm

**Check out the bitchybees website!**

i have a feeling that i will end up finishing the mitts by tuesday....ahhhh, then i really will have to decide on a new hat for mack.

will they end up wearable?

on monday i started to sew the baby a new pair of mitts after searching for a pair around town that we like and her losing every pair i find.
i couldn't find a pattern (for free) online that i loved so decided to wing it. brave of me, i know. stupid? yep.

oh well. i figure the best way to learn sometimes is by trial and error. plus i have never been one to follow patterns well and tend to like to look at an object and go - aha!, i know what to make with that.

so after scrounging through the bag of clothes (to be repurposed) and scrap material i decided to make mackenzie's mitts from a pair of much loved pj pants of mine, an old receiving blanket and a stained tshirt of hers.

i used the pj's for the outer layer, the receiving blanket for the inner layer and the pieces from the stained shirt for in between for warmth and softness. i had no fleece laying around so decided to make do with what i had.

1) i sewed the blanket to the shirt pieces and then sewed that piece to the pj material. 2) after that step i sewed a hem (open ended) to each piece (that would be 4 pieces) to allow for me to later string the ribbon from my pj's through to secure the mitts to the babies wrist. 3) once you are done the hem i then sewed the mitts together resulting in a pair. don't sew all the way up to the top of the hem because you won't be able to string the ribbon in after.

i have run into a bad pin issue with the stringing part. my safety pin decided to break and get stuck in my hem thus resulting in me being very angry at my mitt and having to take about an hour to get the stupid thing out. i have now got the string in both and am just in the process of hand stitching up the the two hem sides to finish off the opening where the ribbon is and closing the side stitch of the hem (taking care not to sew through to the ribbon).

i will post pics of them when they are finished. but after last night's battle with the pin i may not pick them up again for a day or two when frustration has warn off...haha.