
our next fabulously talented guest blogger is katie from the "blue eyed freckle". now if you are a reader of my blog you all know i love, love, love katie's headbands. in fact, i am addicted to them. but you know what else is great about katie? her blog. yep, this girl is super talented and a sweetheart to boot. she not only has a kick ass accessories shop, but she also sews, creates artwork, has addicting tutorials and still finds time to be a mom. so go check katie out at her blog and her etsy shop and show some love!
now let's hear from katie......
When I was preparing for the birth of my daughter Olivia (who is now 9 months), I made every single thing I could think of for her bedroom and layette. In all my reading I learned that babies enjoyed high contrasts, and that initially they could only see in black and white. Being an artist (and at the time a high school art teacher) I wanted to fill the room with original art and objects that were in black and white for her enjoyment and stimulation.
Soooo... in addition to the artwork on the wall, I decided to create a black and white mobile to hang over the crib. And I am sharing the tutorial with you all today because let me tell you, she LOVES it. she loved looking at it when she was small, and I still find her gazing at it now. The accordion circles spin around too, which she likes. And she gets giddy when we let her touch it as we pull her out of the crib. So here you go!

BLUE-EYED FRECKLE BABY MOBILE TUTORIAL
Materials:
branches
paper (mine were 5 1/2" by 8 1/2")
sharpies (different widths)
hot glue
thread
branches
spray paint (or reg. house paint)
twine
screw hooks (to hang it up)
1. draw simple shapes on your 5 1/2" by 8 1/2" paper. I did 9 different designs.

2. Photo copy each design as many times as you like. Keep in mind that to create 1 circle, it takes 4 pieces of paper (when you photocopy them, just cut off the excess white around the design).
3. After cutting out all of your pieces, hot glue (or elmers, spray adhesive, etc) two pieces together. They can be the same design or different.


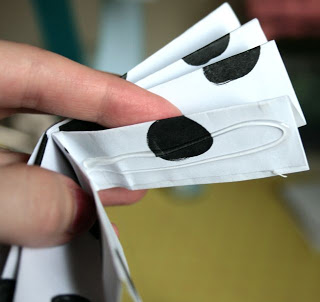
6. Hot glue down the bottom part too, just to make it more secure.

7. Hot glue 2 sections together down the long end.

8. cut 1- 2 ft lengths of string (so that you can cut it to the right size later), and insert them into a crevice between two folds and apply hot glue.

(Leave the long end of the string hanging)
9.Spray paint your branches, turning them to get all sides. You can also just paint them with house paint like I did with my original mobile.
 ( Here is a photo of all my designs and the branches after I have spray painted them.)
10. After the branches are dry, take a long length of twin and wrap it around the bundle one time and tie a knot. Then continue to wrap it around, under and over all the branches in order to make it a tight hold. You wouldn't want a branch to come loose, esp. if you are hanging it over a crib!!. Also, break off any little branch pieces that you think could be dangerous if for some horrible reason this thing fell (I have never had a problem).

11.Attach 2 pieces of twine on two areas of the branch bundle. Then, put the screw hooks into your ceiling, right where you want the mobile to hang. Our hooks were about 10 in. apart.

12. Create a secure loop at the end of each piece of twine and put them on the hooks.

13. Standing on a ladder, ( I had my husband do this part while I stood back and told him how high or low to go) attach each piece of string, by looping it around a branch and tying it off. Cut the tails.
I tried to vary the height of each accordion and the spacing of them as well.

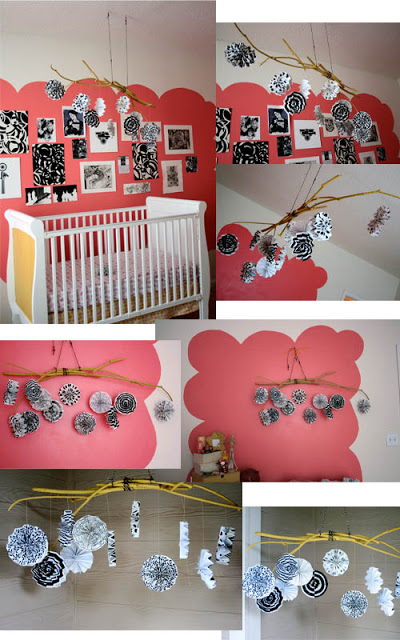
This is a unisex mobile (don't be confused by the coral walls behind it...). and really, even if you don't have a baby, this could be used anywhere in the home!
NOTE: The accordions on my mobile are not double-sided unfortunately. Your mobile will look better, because you are gluing two sheets together. I didn't think about doing that until after I had already hung mine!
thanks so much katie! this looks so fun and there are so many fun ways to personalize it as well. i can't wait to try it out! thanks for being part of the bonanza!
and don't you all forget we've got more goodies to come your way! the bonanza is going till the end of june so keep on dropping by! lots more fabulous bloggers & tutorials to come! you can find our button on the sidebar on the left if you would like to show your luv!
all images copyright blue eyed freckle