mommyhood tutorials

the ruffled needlecase tutorial!!!


hi everyone!  you can find me over on the fabulous blog - "see kate sew" today joining in for her super fun "ruffles 2012" with a new tutorial for my ruffled needlecase tutorial!  there's a whole lotta ruffles going on over there!  a whole month of ruffles in fact!  new FREE patterns/tutorials from 20 guest bloggers and kate herself, sew alongs, giveaways and link ups galore! fun! fun! fun! you can find all the info, links and deets to join in here.


so why did i make a needlecase?  well you guys all know that i  love little handmade treasures that are fun to make, interesting in construction, easy to personalize and add a big pop of pizazz to your sewing notion repertoire!  anytime i can pretty up my notions and supplies i'm in!  add a ruffle to it and i'm sold.  i've got a thing for needlecases and i thought i would show you all how to ruffle up the style of needlecase that i use.  i've noticed lately that the booklet style has become very popular but there is something about the size, shape and construction of this one that i just adore.  it's one of my fave go to gifts for special little pressies and also a good project for beginners to work on there topstitching and hand sewing.


so pop on over to see kate sew today to find out how to make one too!   i hope to see ya over there :) make sure to check out all the rest of the goodies on kate's blog too.  i first noticed her mad sewing skills during the last round of project run and play and have been hooked on her blog ever since.  this super stylish, crafty momma is adorable and so inspiring. i <3 her and think you all will too.  thanks again for having me kate!


now go....


and join in the fun!!!!  i can't wait to see your needlecases!!!

are you planning on ruffling it up this month?  what's your favorite thing to sew with ruffles? any tips/patterns you want to share?

PATTERN || COMMUTER COWL SEWING PATTERN!

The COMMUTER COWL pattern is here!!!!! You guys I am so excited!!!! This cowl has been in the works for a while now and it's very close to my heart.  After releasing the twisted slouch hat tutorial I just knew the next item in my little sketchbook of goodies had to be my first sewing pattern.  


The drawings in this sketchbook all have one thing in common...a theme inspired by the leafless and twisted trees that form a halo around our island city.  They always remind me of knitted cables (which I adore) and I really have been enjoying the idea of manipulating and altering the construction of fabrics and thinking of new ways to twist, knot and move fabric to change it's appearance all while keeping it simple in it's sewing but fun on construction.  I hope you all enjoy it as well.


THE COMMUTER COWL PATTERN FEATURES:


: : digitally drafted & professionally designed tutorial

: : 12 page full color pdf pattern complete with clear & easy to understand step by step instructions with bright photos and digitally drafted diagrams

: : instructions for a professionally finished accessory featuring 2 ways & 2 sizes to make/wear your cowl

: : fabric requirements, notions, and sewing tips/glossary to ensure a great finished product

: : a fun sewing experience :)

The Commuter Cowl Pattern is available for purchase at the following:

ETSY 

GO TO PATTERNS

VERY SHANNON SHOP


The Commuter Cowl Pattern can be worn 2 ways and sewn in 2 different sizes.


the commuter cowl pattern is a stylish, lightweight and versatile cowl that is fun in construction and high on style! This is a great project for beginners to advanced sewers & is made all in one piece from ½ of a yard or 3/4 of a yard of fabric with little waste leftover. 

Show off your fave print and add some flair to any outfit throughout the whole year. The idea of movement inspired from the fabric line used paired with the knots reminiscent of the leafless branches of the tress on the island I live helped to create what is now the commuter cowl.

In the commuter cowl pattern you will find clear photographs throughout this sewing tutorial as well as easy to read instructions to help make sewing the commuter cowl an enjoyable & fun experience.  So grab your fave fabric crush and come sew along with me!  


OPTION A

Made from a 1/2 yard, worn as a necklace style cowl (top) or as a more structural cowl (middle).

OPTION B -

Made out of 3/4 of a yard of fabric that can also be worn 2 ways as shown above.  The 3/4 yard cowl gives you an extra dose of loft, pouf, and the movement that's reminiscent of a knit cowl.  


Besides our lovely winter tress the main inspiration for the name, styling and overall appearance of this cowl was the awesome line "commute" from birch fabrics by jay-cyn.  LOVE it!  Something about those bikes, transportation and the color palette struck me as the perfect fabric to pair with this cowl for those daily commutes. 

Who says we all can't add a bit of whimsy to our daily commutes?  Even if we're biking, driving, walking or busing we might as well look stylish right?  Plus it will keep us warm on cool days and cool on warm days :)  That's right...that's how we roll here <3  I'm a gemini - what can i say..lol.


You all know how I love options! I love giving you all a great base that you can customize and wear the way that suits your style and personality!  Heck you could even adjust the size down on this cowl and whip one up for your kidlet! I plan on making one for mackenzie really soon. 

I want to give a huge thank you to all my friends/family who supported me when deciding to take the plunge into selling a sewn pattern. It's been a crazy ride and i just started...lol.  You guys are the best.  I'd also like to thank all my lovely pattern testers who helped me out tons! I couldn't have done it without your help (thanks mom!).  A special thank you to Anna from noodlehead for her invaluable help and eye :) And how could I not thank my gorgeous and talented friend jane richmond for modeling for me and also for being a constant sounding board for all my crazy ideas - thank you for all of your support Jane - I luv ya girl. A thank you to Cynthia of fabricworm & birch fabrics for her awesome designs and generous use of her rockin' fabrics!


So are you all ready to sew with me?  Hop on over to my brand new etsy shop and pick up a copy of your own!  I can't wait to see what you all create!!!!  Don't forget to add your cowl pictures to our flickr group!

So we can all see how lovely you look in your commuter cowls!   What fabric line are you going to make yours in? Stay tuned for tomorrow when I'll be doing a fabric review on the Birch Fabrics I used today. Happy sewing everyone!


FABRICS USED IN THIS POST:

From commute by jay-cyn for birch fabrics - by bike, bike it, and pool ride can be purchased at fabricworm

From lark  by amy butler - chinese lanterns grass can be purchased at stitch simple

SEWING || THE KEATON COAT PATTERN


aw shucks, you guys know i'm a softie for simple patterns where i can just go wild with my fabric choices.  i have a big soft spot for colors and modern prints and love to cover my kids in them :)  the other week i was part of "new year's resewlutions" over on "me sew crazy" where we were to guest post about one of our sewing resolutions and mine was the buttonhole.  my post was initially intended to be a coat tutorial but i had an overwhelming feeling to write a post called "how to conquer your sewing fears" instead and the tutorial that was supposed to go up is today's keaton coat.


this was my first buttonhole peeps! can you believe it! took me long enough right?  i did a butthonhole and my very first zipper in one week.  it was stressful but oh so rewarding.  i had been daydreaming about a fun little spring coat for harper for a few weeks and knew that i wanted something that was simple and quick to make that allowed me to go wild with fabric or choose to simplify it with a solid without losing style. the coat is lined throughout the body but not the sleeves - so nope, it's not reversible.  i decided to keep it nice and easy for you all.  sometimes i think it's fun to just sew something with a basic shape and construction and let my mind go wild with the print and button combo. i spent days pondering that one and changed my mind more than a few times due to loving too many of my fabrics at the moment.  then the button...oh the button...i have a thing for buttons and it takes me eons to choose the right one for any garment.  i actually found the yellow button before deciding on my print and knew that this amy butler print - midwest modern martini from my sponsor stitch simple was the perfect companion to that funky yellow button. 


the keaton coat features topstitching throughout for a more professional finish (i heart topstitching) and a slightly gathered sleeve for a touch of feminine detail.  the inner corners of the fronts are curved also playing with the idea of feminine softness with a mod vibe :) the keaton coat is also easy for our wee ones and for us parents to get on/off squirmy little ones and my girlie just loves hers!


this project would also give you a great base to work with if you are a more advanced sewer allowing you to customize and add some personal flair to your keaton coat.  add more buttons, shorten the sleeves, add some trim - just have fun with it!


now let's get sewing!  you ready? yippee!

The Keaton Coat Pattern - Size 2-3yrs
*Copyright 2011 www.luvinthemommyhood.com  All rights reserved. For personal use only. Please do not sell items made from this tutorial unless permission has been given.


Materials:
- one yard fabric (I used quilting cotton)for outer
- button (med-large size)
- 3/4 yard fabric (I used quilting cotton) for inner
- sewing machine
- fabric marker (optional)

Instructions:
*Please note that all seam allowances are 1/4" unless otherwise stated.
1) Print out and cut your pattern pieces.  You can print/download the pattern by clicking on the link below:
2) Using your pattern pieces cut out your fabric for your outer coat and inner coat fronts and back.  Your front pattern piece is used to cut out both fronts.  Simply flip the pattern piece over (take care that your fabric print is still going in the right direction to match the rest of your coat) to cut out the opposite side of the front jacket piece.  You will cut out the following pieces:
Back - 1 Outer & 1 Lining
Front - 2 Outer (Left and Right) & 2 Lining (Left & Right)
Sleeves - 2 Outer
Separate your outer pieces and your inner lining pieces into 2 different piles.  Starting with your outer pieces lay your back right side facing up and pin your left front and right front sides to the back with right sides facing down.  Sew your side seams up with a 1/4" seam allowance.  Press.  Finish your seams by either pinking, zig zag stitching or using a serger. Repeat these steps for your lining coat as well.


3) Pin the shoulder seams together on your outer coat and sew.  Repeat for the inner coat. Press your seams and finish off your seams for both jackets. Place your outer jacket laying down right side facing you and lay the inner jacket on top wrong side facing you (so both right sides are facing each other).  Pin the outer to the inner.  Starting at the top left front stitch down the jacket across the bottom and back up the right front ending at the top of the right front.  Pin down the neckline.  Do the same for the entire neckline.  Press.  Finish off your seams then turn jacket right side out pulling through armhole and press entire jacket.  Topstitch the entire perimeter of the jacket excluding the armholes but including the neckline. Nice work ladies!


4. Grab your sleeves.  With your machine set to do a basting stitch baste-sew along the top part of sleeve from one marking to the next.  Slightly ruffle the sleeve by pulling on your bobbin thread gently.


5.  Fold cuff of sleeve under 1/4" towards the wrong side of fabric and press, fold over another 1/2" and press again.  Topstitch along the hem to form your cuff.  Turn sleeve wrong side out and match long sides together. Pin along long seam and sew.  Finish seams and press.


6.  With jacket wrong side out and sleeve right side out place the sleeve inside the armhole with the sleeve inside the jacket and the armholes aligned.  Pin sleeve to armhole and tighten/loosen gathers to fit armhole.  Making sure to start sewing from your underarm seam so both the sleeve and side seam match up sew armhole to sleeve.  Finish seam.  Turn jacket right side out and press.


7. Try the jacket on the child if possible and mark where your preferred location for the buttonhole/button would be on the jacket with your fabric marker.  Following your machine instructions make your buttonhole.  *I tried a few practice buttonholes on some scrap pieces of fabric before making my buttonhole.  This helped me out a lot to get it just right. Don't be scared..you can do it!  After the first time it's really not that hard. I promise :)  Close jacket and double check where to sew your button.  Stitch your button to your jacket.


8.  Put that adorable coat on your wee one and have some fun in the warm spring sunshine that will hopefully be heading our way sooner than later :)


happy sewing everyone! and make sure you add your project pics to our flickr group so we can all see your lovely work!  i'm planning on making a few more of these for harper and may even make some for mack as well so a size 4/5T may be in the works :)  i hope you all like it!  what fabric would you use to make yours?

twisted slouch hat pattern

a big hello to all of you coming over from the kniterviews & knits stretch yourself series over on made by rae! such a great series!  we love sewing with knits over here on luvinthemommyhood so when the fabulous rae asked me to join in i just knew i had to get a slouch hat idea that i had been working on since xmas finished.  i am a die hard knitter and love to mix elements & techniques, so for this hat i wanted to replicate the movement and texture that i love out of my knitted slouch hats and incorporate them into an actual sewn hat.  i also wanted a hat to wear during the warmer and cooler months.  a lightweight, stylish slouch that has a bit of flair and personality. my favorite part of this hat is the construction. i made test hat after test hat to get this just right for you folks.  it's super easy, fast, and simple to customize and even more fabulous to wear!!  it's also awesome when you can get one of your pals, who happens to be a super awesome knitting designer (janerichmond.com) to model/photograph the hat for you too!  thanks jane!!!!  you're the best hun!
the best part of this hat is that it is made all in one piece!  what?!  yep, that's right - just one pattern piece!  there is literally only two side seams to sew and a topstitch around the hat.  how awesome is that?  the rest is some fun hand stitching and customization done to your taste!  the twisted cable is actually part of the hat and not an additional piece that is sewn on! i hate bulky ends to hat and the construction of this hat allows for a softer drape for a sewn garment without the weight and bulk from seam construction.  the small side bows add a feminine and whimsical touch that slim the cheekbones draw your eye up and away for a slimming effect instead of adding bulk and width to the face.  if you've never been able to wear a bulky slouch hat before this may be the time for you try out the slouch style without the added bulk.  made with a soft, thin stretch it's light weight, soft and comfortable to wear! 
the twisted slouch hat is also a great way for you to practice your sewing with knits skills.  using a lighter weight stretch can sometimes be challenging but the look of this hat changes quickly if you add too much sturdiness to the fabric.  i would stick with a soft drape to retain the feel of the hat.  make sure to read your machines manual for sewing with stretch and if your machine isn't set up with stretch stitches whip up a practice swatch...trust me :)  just like with knitting it's always handy to do a test swatch to double check the drape and look of your sewn garment.  practice the right stitch, machine settings and needle for your machine to get the best look for your hat.  i recommend ball point needles and/or using a zig zag or sometimes even a triple straight stitch works great for sewing with stretch.  it's all about your machine though and matching it to the fabric you are using.
this hat is a great beginner stretch project as your twist going down the side could hide any uneven stitches or "oopsies" if you do have an issue.  the only place your machine sewing shows is along your brim.  if you aren't looking for a zig zag stitch here set your machine to the right straight stitch to use for stretch and pull the hat stretched as you sew to get the right diameter to give your head room to stretch the head out without breaking the seam of the hat.  i promise it's easier than it all sounds and once you jump into sewing with knits you'll wonder what all the fuss was about and why it took you so long.  there's no seams to finish and it's fast and fun to sew with!  you ready to get sewing?  woot woot! let's go ladies!  happy sewing!

Twisted Slouch Hat Pattern
Copyright 2012 www.luvinthemommyhood.com All rights reserved.  For personal use only.  Please do not sell any items made from this pattern unless permission has been given.

Materials:
- ½ yard of stretch fabric of your choice (i recommend a light weight drape stretch) - coordinating thread  - sewing machine  - suitable needle for sewing machine for sewing with stretch  - hand sewing needle  - scissors  - fabric marker  - pins


Instructions:
*All seam allowances are 1/2" unless otherwise stated.
1. Download & print out hat pattern with no automatic sizing/no scaling selected.


2. Fold fabric in half with main stretch going left to right right sides acing out.  Then fold in half again from left to right.  


3. Place hat pattern piece on top of fabric with top of hat on first fold of fabric and side of hat on 2nd fold of fabric.  The pattern piece is the size of half of the hat so after you are done cutting when you open up your fold it will be full size and you will be left with an actual fold still at the top of your hat.

4. Weight down pattern piece and cut hat out taking care not to pull or stretch out your fabric.

5. Measure in 1.5” from the outer edge of your hat.  Taking your fabric marker and using the existing hat as a guideline draw out another hat but this time 1.5” in from the outer edge *taking care to stop ¼” from the top of the hat on either side of the hat.  Please note I have a smaller sized head and if you are concerned you may have a larger sized head circumference please pin the sides up on the hat as if you were cutting and try hat on to check the sizing.  If you need more room cut the into the sides at a smaller amount..for ex. 1" instead of 1 1/2".  *See illustrations above.

  6. Turn fabric inside out (right sides facing each other).  Carefully pull your dangling edge on one side insde the two pieces of your hat as straight and flat to the opposite direction as possible without pulling the hat form.  Use your finger and feel if the strand is out of your sewing path.  Pin down along the side of the hat.  Sew down this side of the hat with a ½” seam allowance starting from the top stitching downwards.  Note: my head is on the smaller size if you have a larger head use a 1/4" seam allowance.  *See illustration to the left.

7. Repeat step 6 but on the opposite side again taking care to make sure your strand is flat and out of the way of your stitching.  

8. Turn hat right side out and try on.  Fold the bottom of the hat under approximately 2 inches or desired size (make sure to leave your strands out of the brim).  Using a pin or fabric marker mark where you would like your brim to end if you need to make any changes to fit the size of your head and desired amount of slouch for your hat.


9. Turn hat inside out again (right sides facing) and pim your soon to be brim down properly.  Stitch down using a straight stitch set for sewing knits on your machine.  I found this looks the best but not all machines will be able to do this.  Since you aren't top stitching (you could if you would like to though) make sure your bobbin color is the color you want showing on the right side of your hat :)  Mine works fine if I stretch the fabric out as I go while stitching on a good tension for sewing with knits but it’s totally up to you the style you would like for your hat.  If a zig zag or a different seam work best for knits on your machine and it's the look you are going for than go try it out.

10. Turn hat right side out again.  We're going to cut into those funky strands now.  Simply cut the strand in half all the way up until almost the top.  Once you are done cutting them you can simply twist them in your preferable style.  I wanted to replicate a cable that you would knit on a hat so I did a simple layered twist alternating which strand was on top and kept it loose and wide.  Once you are done twisting, pin the strand down over your side seams of your hat.  Bye, bye ugly seam - hello fun cable!

 
11. Hand stitch your twisted strands down onto your hat using an invisible stitch until you reach about ¼” above the start of your brim.  Tie your strands into a knot then simply fold each end under in the shape of a bow and pin.  Hand stitch the bow down.  Repeat for the other side of your hat.


12. Put that hat on and go rock it all year round! The breathable light weight stretch will be stylish for the warmer weather without overheating your head but still warm enough to wear in the winter as well.  Say good by to those bad hair days!


happy hat making ladies!  have fun and i cannot wait to see you all sporting your twisted slouch hats! so awesome!  make sure you add your project pics to our flickr group so we can all see your lovely work!  i've got at least 2 more of these in the works in some other colors. can't wait to add them to my wardrobe :)


a big thank you to rae for having me on the blog - luv ya hun!  make sure you all check out the rest of  "the kniterview series and the knits stretch yourself"  on made by rae for lots of tips, tricks, how to's, tutorials and interviews! it's awesome!  so get trying sewing with knits! i promise it's fun & very addiciting!

the mallory cowl pattern - adult version!

yarn: cascade 220 heathers in colorway 7803

the mallory cowl pattern for adults is here!  oh my gosh you guys...i am so super excited to write this post!  i was so surprised by how many of you have loved the mallory cowl i originally made for my daughter and requested an adult sized one!  so awesome!  i'm just so glad you all enjoyed it!  i have to tell you that more than a few times i had looked at mackenzie's mallory and thought to myself that i need one of those too.  now i can make one and the best part is so can you!


this cowl is so squishy, springy, and fun to wear!  it's versatile for all seasons and a great knit for beginners and advanced knitters.  it's got a bounce that i wish my hair had!  mallory is knit with your yarn held double on large needles so it knits up fast and is super cozy!  i couldn't resist whipping this one up in a gorgeous magenta for the winner of our giveaway who requested jewel tones.  then i conned my pal rebecca into modelling it for me :)  i know...i'm mean..lol...but she just looked so purdy in it and i was soooo not in the mood to do my hair :P


i've worked really hard to get the stitches to have just the right amount of loft and the cowl to be a great length and for you ladies to have a proper gauge to go off of so you can swap out your yarns and needles at your leisure.  so after a lot of thought and some major handholding and hurrahing from my knitting pals i've decided to release this as a pattern for sale!


 you guys can now make your very own mallory cowls for only $1.99!  i'm scared, nervous but also super excited about it! 

click below on the "buy now" to purchase a copy of "the mallory cowl".   

*2 patterns for 1!!! This pattern also comes with the child version of the Mallory Cowl! Now you and your wee one can rock your cowls together!


the pattern is for sale through ravelry and you can find the all the details (& purchase the pattern) here on the mallory cowl ravelry pattern page!  i can't wait to see all the gorgeous cowls you talented ladies are going to whip up! i can only imagine the colors and the yarns you will be using!  if any of you have any troubles purchasing the pattern please email me at luvinthemommyhood@yahoo.ca and i will help you out or figure out an alternative way for you to purchase the pattern.  this is my first pattern for sale so bear with me...i'm still learning here :)


i heart this cowl so much i think that i'm going to need one in every color!  the mallory cowl is one of those accessories that you can wear with so many outfits through so many seasons!  i'm dreaming of a fun green one at the moment!


i want to extend a big thank you to my knitting pals for encouraging me to get this made up and for all you lovely readers for suggesting it!  you guys rock!  i hope you enjoy the pattern and i appreciate all of your support!  make sure to join our luvinthemommyhood ravelry group and also to share your lovely handmade pics in our flickr group!


so what do you guys think?  you likey?  what color would you make yours in?  what's on your needles at the moment?  i hope you all had a great weekend!  let's chat!

mustache cup cozy tutorial


would you like some 'stache with your coffee?  a little mustache luv to dress up your coffee cup?  remember movember and the mustache that invaded my home for a month? yep, that's right...the giant caterpillar like one that greeted me every morning and night on my hubbies cute face, well...it was so fun to tease my hubby in our house about the 'stache that i decided to gift him a little pressie at christmas so that we can always remember "the 'stache".
 

i had pinned a cup cozy with a mustache on it months ago and finally got around to making one.  so no, this isn't my idea..but i couldn't really find a tutorial that i liked to make one so i figured i would share a little template and mini-how to make a mustache cup cozy of your very own! 


you ready to rock the 'stache?  keep those hands toasty warm in style! let's get making!

||  WHAT I USED  ||
Yarn: Patons Classic Wool (worsted weight/10ply) in colorway 240 (green)
Brown Felt & brown embroidery floss

||  MATERIALS  ||
felt in color desired for mustache (approx. 5"w x 4"h depending on desired size of mustache)
embroidery floss
sewing needle
scissors
yarn
knitting needles

||  INSTRUCTIONS  ||
1. Following the "mug hug tutorial" (from one of my besties rebecca) or any knit/sewn cup cozy pattern of your choice, knit up your lovely cup cozy using your desired yarn color - I personally think bright colors look much more fun for this kind of cup cozy :P  I used a thicker worsted weight yarn for mine.  This is the fun part where you can let your creativity go wild! Go handlebar, or curly or do a caterpillar style like mine!

2. Print out this template for the 'stache (don't scale the image) I used or sketch out a mustache of your choice.  Cut out your felt and fold your piece of felt in half lengthwise.  Cut the paper mustache out and pin to your felt along the center line shown on the template.  Cut the mustache out of your felt.  I used brown floss for my mustache.


3. Using 3 strands of embroidery floss held together stitch the mustache onto the center top area of your mug hug using a running stitch (or any other decorative stitch you may desire).  Trim your ends stick that bad boy on your starbucks and admire your handiwork!  This cup cozy is a guaranteed conversation starter...so much fun!  Best part is the hubby can still sport his 'stache....just not on his face :P


don't knit?  don't worry...check out this post from my pal buffy on how to paint a 'stache right onto your coffee mug! so cute!  or you could simply use the felt mustache and attach to a sewn cup cozy of your liking.  whatcha think?  you likie?  i think i'm gonna steal it and use it too.  i think a few more are on the horizon at our house :)  i think mine should be pink though...lol.

happy knitting and stitching!!!  i can't wait to see if you guys make any!  please add your pics to our flickr group so i can get a looksie at your wonderful handiwork!  any questions just shoot me an email at luvinthemommyhood@yahoo.ca

Fabric Christmas Tree Ornament Tutorial


are you guys getting in the festive spirit yet?  we are!  with the hubs finally done his exam we crammed all the xmas goodness we could into our weekend.  it was lots of fun and pics of our adventures are coming.  in the meantime i thought i would share this fun fabric christmas tree ornament tutorial with you all.  i wanted to put together a cute ornament using some amy butler scraps along with some button love and hand stitching - thus the tree was born.  we had a lot of fun in our house making a few of these and we plan on making a few more!

you ready to get making some ornaments?  grab the kids and jump into your fabric scrap stash...i love digging around in mind looking for treasures and so do the kidlets!  let's get making!

Fabric Christmas Tree Ornament Tutorial:

Materials:
- scraps of fabric
- batting
- glue gun w/glue
- brown felt for stump (approx 3"high & 1"wide)
- button for top of tree (optional)
- embroidery floss
- sewing needle
- pinking shears (optional)

Instructions:
*Please note I will be giving you directions to make "1" tree.
1. On a piece of paper draw and cut out 3 triangles in 3 different graduating sizes going from large to small to form the tree.  Play around with your sizes.  My tree was about 5" or so high not counting the stump when finished.  You don't want it too big if you're putting it on the tree or it will be too heavy. I do think a large one would look cool on a door as a hanger or on the wall as well.  Have some fun with it or even better get the kids to draw the triangles for you!

2. Get out your fabric scraps and fold them in half so they are equal to or more of the height of the triangle.  Once you have your triangle templates cut out place them on your fabric scraps (you could also make this tree out of felt as well).  Place the bottom of the triangle on the fold of your fabric so that way you only have to sew up two sides of the triangle after stuffing them (hint: your triangle will look like sort of like a diamond when you open it up).  We're all about fast here :) Cut out your triangles.  I pinked along the edges of mine with pinking shears so they didn't unravel and also because it reminded me of a tree but this is optional.  You will be cutting out 3 triangle pieces only.  Each triangle you cut will fold to form a 3 dimensional triangle.

3. Get your brown felt out (or whatever material you choose to use) for the stump.  You will cut out a rectangle that is 3"high by 1"wide.  This will be attached later.

4. Grab your embroidery floss in a co-ordinating or contrasting color and using three strands held together start to sew the largest triangle shut (right sides facing out - wrong sides facing each other) using the running stitch or whichever decorative stitch you desire that will hold the triangle closed.  I am a crappy hand sewer but I like doing it so mine is not perfect, don't worry about perfection here - it's supposed to look handmade! Once you get to about half way done the last side get your batting and stuff that little triangle.  Not too much though, just enough for it to be softly poofy.  Continue to stitch your triangle closed.  My daughter loves to help stuff crafts so this is her official job in our house :)  Do this step for the middle triangle as well.

5. Now we're going to stitch up the top triangle.  Start stitching the triangle closed along your first side then when you reach the top stop and place in a piece of embroidery floss the size you would like your ornament hanger to be that is folded in half to form a loop.  Place the two ends of the floss inside the top of the triangle and stitch over the top of the triangle (I backstitched a few times here to make sure I secured the floss) and then continue to sew down your other side taking care to stop to stuff this triangle as well - stitch the rest closed.

6.  Now get that glue gun heated up ladies!  I forgot how much I love using a glue gun.  Mine has sadly been ignored for quite some time but my little girl was sure pleased to have seen it!  She thought it was pretty cool.  You're going to take your piece of brown felt and fold it in half gluing the open ends together along the short side (1") ends so it forms a loop of sorts.  Then place a line of glue along the outer side of this same edge and glue to the bottom of the largest triangle. *I chose to have the side where you could see my stitches be the "right side" of my tree as the back of this tree is not as pretty as the front :P

7.  Glue your tree together.  The easiest way to do this I found was to dollop a line of glue along the bottom edge of the medium triangle and stick that puppy on the largest triangle where you would like it.  Wait for this to dry then using the glue gun touch up any spots that are loose or wobbly so that the triangle is very secure.  Next do this for the top triangle and attach it to the middle triangle.

8.  Now it's time to add your button! This is my favorite part.  I looooove me some buttons.  I let Mackenzie have her way through my button jar to pick her faves out for the 2 trees we made.  Once you've found your button simply glue that puppy on to the top of your tree or if you so desire you can sew it on.  I preferred to just hot glue mine though - the kids were getting restless :)  *I hope all the steps make sense..if anyone has any questions send an email my way to luvinthemommyhood@yahoo.ca or let me know if you feel like it would be better to have some illustrations showing you what I did.  My kiddos are both sick with colds today but I can always add them in for you later.


you're all done!  go hang your pretty ornament or tie it on a lovely wrapped gift as a special little pressie!  mine have gone to 2 lovely homes of 2 lovely women :)  i hope they like them as much as we did when were making them.  i'd love to see your trees if you make any -  make sure to add all your crafty goodies you've been whipping up into our flickr group!  happy making!

what is your fave handmade ornament to make?  do you agree that amy butler fabric makes a great pop of color to add to any tree?  which fabric would you use if you were to make one?  hope you all had a wonderful weekend.

Carefree Cowl Knit Along - The Carefree Cowl Tutorial!


this is a bit of a fun post for me today!  i did something i've never done before.  i wrote out a little knitting pattern.  now...first off, i am by no means a knitting designer.  i simply just couldn't find what i was looking for on ravelry after hours of hunting.  i had a skein of the yarn i used for the gap-tastic cowl left over and was dying to whip up another cowl with it.  i wanted something warm, not too long (take flight off the girls..wink wink), but not too short (needed to cover my v-neck top openings) and i wanted texture but a quick knit.  i was also looking for something that had a bit of drape but was also sturdy enough to stand up on it's own.  i sketched out the illustration beside the pattern below and voila, the carefree cowl was born!  i love it and it's rolly polly goodness. my newest cowl was made for our carefree cowl knitalong.


now, none of you may want to make this and that's ok :)  i simply thought hey, i wrote it out while i was knitting it so i could make it again if i liked it and i like it so what's the fun in keeping it to myself...we like to share around the mommyhood here.  so here's the little pattern if you would like to make one for yourself.  i also named it the carefree cowl because i was feeling very carefree when i wrote up the pattern.  it's something i've never done before and i just winged it and boy was it fun!  i hope you guys have fun with it!


Carefree Cowl Pattern

***Copyright 2011 www.luvinthemommyhood.com
All rights reserved. For personal use only. Please do not sell items made from this tutorial unless permission has been given.

* Download pdf now.  Pattern notes and more can be found on the ravelry pattern page here.


Yarn: 1 Skein Lion Brand Wool-Ease Thick & Quick, 108yds/170grams
Needle: 6.00mm 24"Circular
Gauge:  8sts=4inches
This cowl could be made at more than one gauge.  Switch up the yarn and the needle size, add on more stitches to make a longer cowl that could be worn wrapped as well just take care to make sure you cast on an even number.  I think the stitch pattern could look lovely on all sorts of weights of yarn and needle size.  So get carefree and whip one up to suit your stash and drape preferences.
Finished Measurement: 8.5"H x 27"W (full loop unstretched)
Abbreviations:  YO=Yarn Over K2TOG=Knit 2 stitches together knitwise.

 Cast on  loosely 64sts using the long tail cast on method. Join in the round being careful not to twist stitches.  Place a stitch marker to mark the beginning of your round.
Rounds1-4: Knit.
Round 5: Purl.
Rounds 6-8: Knit
Round 9: Purl
Rounds 10-12: Knit
Round 13: Purl
Rounds 14 & 15: Knit
Round 16: YO, K2TOG* repeat to end of round ending with a K2TOG.
Rounds 17 & 18: Knit
Round 19: Purl
Rounds 20-22: Knit
Round 23: Purl
Rounds 24-26: Knit
Round 27: Purl
Rounds 28-30: Knit
Round 31: Purl
Bind off very loosely. Weave in ends and sport your cowl!


so exciting and fun!  i'm having such a wonderful time with this kal and you guys are AHHHHMAZING!  i cannot believe how gorgeous all of your cowls are and how supportive and helpful you have all been to each other.  so much so that a lot of you are on your 3rd and 4th cowls too!  you guys rock!!!!  i'm definitely going to be doing a post showing off all your handiwork on the blog very soon.


for those of you who are wanting to join in our carefree cowl knit along and haven't yet there is still time!  you can join in anytime before the deadline which is november the 9th.  sign up here:


and you can follow along with all things "carefree cowl knit along" here:


feel free to add any pics you like to the flickr group and the ravelry thread.  we love seeing your progress, yarn pics and finished items! it's been so exciting watching all your lovely cowls being made! happy knitting my dears :)  make sure you head over to my partner in crime - rebecca's blog "nook" to check out her fabulous bandana cowl! so pretty!


and don't forget to pop over and show some love to our carefree cowl knit along sponsor:
jen geigley is the stylish designer behind the "gap-tastic cowl" pattern so many of us love!

and yep, i'm sporting another bun in the pics above...this mama's got bad hair happening daily right now and that's why she's headed to the hairdressers tonight to get fixed up.  i mean, dirty, grown out, filled with baby food hair is just not cool..lol...no matter how you try to style it.  how have your cowls been coming along?  are any of you non knitters out there thinking about joining in?  a cowl is a great beginner project to start with! show off your cowls and link up below!

the delaney dress tutorial - celebrate color!


ohhhhhh, i've caught the fall bug big time folks!  i've fallen head first into those wonderful tones of orange, purple, pink and green and who better to feed my fabric cravings for these yummy tones than amy butler!  i used disco flower in tangerine from our sponsor stitchsimple.com for this dress. love!  today's tutorial is part of the fabulous "celebrate color"!  it's been so much fun being a part of this wonderful event & helping to organize it and i hope you've all been getting your entries in for this month as there are some awesome prizes to be won!


for my tutorial for october i couldn't resist continuing along with the same retro flair as my september's tute - the autumn tunic.  i wanted something simple, classic yet modern and fun.  i'm totally crushing on the full skirt, double stitched bias tape trim and belt and the sleeves....love the sleeves.  harper just melts my heart in this little frock.


and guess what?  you can make one too!  i kept it nice and easy for you all.  a great base for you to start with if you are just learning to sew and one for more advanced sewers to add their own personal flair.  there's no zippers, buttons or tricky detail work.  it's simple, fast to make and oh so fun to see your wee one wear!


i mean how cute is this for fall??? 


it was so hard to resist jumping in the leaves and rolling around with her.  i can just feel the cozy fall  sunshine radiating off that dress.  want to make one of your own?  let's get ready!


***Copyright 2011 www.luvinthemommyhood.com
All rights reserved. For personal use only. Please do not sell items made from this tutorial unless permission has been given.

The Delaney Dress Tutorial - Approximately Size 1-2yrs

Materials:

- 1 yard fabric (I used quilting cotton) pre-washed and dried. trust me.  you want to do this :)
- co-ordinating thread
- 1 package co-ordinating double fold bias tape or handmade bias tape in the distance to suit the size of your dress.
- sewing machine
- pinking shears (*optional)
- iron
- fabric marker

Pattern pieces:

You can print out the following pattern pieces by simply clicking on the link below.  Make sure when printing the image is at 100% with no shrinking or resizing.

Bodice Back
Bodice Front
Sleeve

Instructions:

*All seams have a 1/2" seam allowance unless otherwise stated.

1. Print out the pattern pieces above on standard size paper with no shrinking or resizing.  Cut them out.  Place on your fabric taking care that if you have a print that they are all going in the correct direction and that you are cutting with your fabric give going from left to right (you can check this by pulling the fabric to see which direction gives the most ease or stretch) and cut.  Set aside.

2.  Cut out two pieces of fabric 12"L by  25"W for the skirt.  Place skirt pieces right sides facing together and pin sides.  Sew together your side seams with a 1/2" seam allowance.  Press.  Finish seam with a zig zag stitch or clip with pinking shears.
3.  It's time to ruffle that pretty skirt up!  There are many ways to ruffle a skirt and because I am still learning the best one on my machine I still do it the more involved way.  Simply stitch along the entire top of the skirt using a basting stitch with a 1/4" seam allowance taking care not to backstitch at all.  when done simply pull the bottom thread (bobbin thread) of your seam to ruffle the fabric. don't pull too hard though - you don't want to break it & don't ruffle it too much, we need to fit it to the bodice later.


4. Grab your bodice pieces.  Place fabrics right sides facing together and pin.  Sew together your sides seams with a 1/2" seam allowance.  Press.  Finish seam with a zig zag stitch or clip with pinking shears.

5.  Pin straps of bodice together with right sides still facing each other.  This is a good time to try the dress on your little one to make sure the sizing is going to work with your toddler.  If any adjustments need to be made to the bodice width now is the time to do it.  If all is good your next step is to sew both straps with a 1/2" seam allowance or size to fit your child's body.  Press.  Finish seam with a zig zag stitch or clip with pinking shears.

6.  Fold your bodice in half marking the center point of the bodice back with a fabric pen or pin.  Measure down 3 inches and make another mark.  Cut a straight line from one mark to another.  This will later form your "v" neck back opening.
6.  Grab your cute sleeves.  Take the outer edge and fold in 1/4" and press, then fold 1/4" again and press pinning the last fold down as you go.  Now you're ready to stitch that lovely hem down.  Sew your sleeve edging close to the inner edge of your fold.  Press.

7.  Fold sleeve pieces in half making a finger press fold and mark where your center is with a fabric pen or pin.  With bodice wrong side out (wrong side showing, right side inside) and sleeve right side out (right side facing and wrong side inside) place sleeve inside the opening for the sleeve matching center point of sleeve to center top of sleeve opening.  Bottom points of sleeve should be overlapping for a clean finish.  Sew with a 1/2" seam allowance. Press and finish seam with a zig zag stitch or clip with pinking shears.  Do this for both sleeves.

8. Time to put that skirt with the bodice!  Take your ruffled skirt - wrong side out, and your bodice - right side out and place bodice inside the skirt matching the bottom of bodice to top of skirt.  Pin down making sure the ruffling of your skirt matches up evenly around the bodice.  You don't want some areas more ruffly than others.  Sew the skirt to the bodice with a 1/2" seam allowance.  Press and finish seam with a zig zag stitch or clip with pinking shears.


9.  Hem your dress to your preferred length.  I folded mine 1/4", pressed, then folded 1/2" and pressed.  I stitched down close to the inner side of the folded edge then pressed again.  I then topstitched close to my hem line for a double stitch finish to match the bias tape finish you will be doing soon.  Add a label if you are using one and voila!


10. Next we are going to finish off the neck.  We're almost done!  Taking your bias tape, starting at the top of one shoulder, pin down along the entire neck and back opening taking care to fold properly at tops of back opening and bottom of  "v" opening in back.  (It would take me a whole post to explain the sewing of bias tape so I'll just direct you over to Dana from Made's handy post here for making your own and here for sewing it).  Next sew down your bias tape close to the edge taking care to catch the underside of your bias tape. When stitching the "V" opening I sort of folded the bias in on itself to form a v point at the bottom and stitched it down (see picture above).  Press.  Stitch along the entire neckline again but this time close to the opposite edge. Purdy!


11.  It's time to add the tie!  Cut bias tape the length you would like making sure to be able to tie a bow in the back.  Mine was 64" long.  Fold bias tape in half and mark center point.  Pin center of bias tape to corresponding center of dress.  Pin bias tape down with the joining seam of the bodice/skirt in the center of your bias tape.  Pin from left side seam straight over to right side seam.  Stitch close to left edge from this side to the other. Backstitch.  Start again on the bottom right seam and sew over to the bottom of the left seam. Backstitch again.  Another pretty finish!  Now the next step is up to you.  You could continue the same two stitch lines along the entire bias tape ends that will be tied in a bow but I got lazy and didn't cause I actually prefer to not sew bias tape.  We have a love/hate relationship so I left mine unfinished....for now :)


12.  Press your dress and stand back and admire your hard work!  Great job!!!  Now go take a fab photo of your new frock and post it in our flickr group so we can admire your sewing skills!  And don't forget to leave me a comment too so I can see how it turned out!  Also, feel free to email if you have any questions or problems - luvinthemommyhood@yahoo.ca

***Copyright 2011 www.luvinthemommyhood.com
All rights reserved. For personal use only. Please do not sell items made from this tutorial unless permission has been given.


i hope you have lots of fun with this dress!  delaney was one of the names i had loved for harper that didn't make it past the hubby test so i had been saving it to use :)  i can't wait to see the fabric combos, buttons, custom bias tape and all sorts of trim goodies you guys come up with to rock the delaney dress out with!  go have fun and don't forget to celebrate color in style!!!
what are your favorite colors to sew in for fall?  do you have a favorite dress to make for the cooler months?  what do you guys think?  do you likey?  make sure to leave me a comment below if you make one so i can see your pretty dresses :)

The Autumn Tunic Tutorial - Celebrate Color!


It's time for some Celebrate Color fun!  I'm joining in on all the celebrate color excitement over on the lovely Rachel's blog - "Stitched in Color" by doing a fall inspired tunic tutorial for your wee ones today called the Autumn Tunic!  I heart this top and want one for myself too!  Have you all gotten your projects added to the linky party?  (You can add them here.)  I heart autumn and love this rich season filled with leaves and blooms left from summer.  The color palette for this tunic was inspired by Stanley Park in Vancouver, BC.  My ol'stomping grounds.  I have very vivid memories of  Mackenzie's first autumn there when we did a mini photo shoot of her romping in the leaves.  The colors still stick out in my mind and they are still, to this day, some of my favorite photographs.


It makes me get all teary eyed to look at those pics now.  A bad case of where has the time gone.....


I always have good memories of autumn.  The rain hasn't started pouring in buckets for 6 months straight, the weather is still warm enough to go without a coat/sweater (sometimes), the sun peeks it's head out and man does it feel good.  Nothing can bring me down on those days filled with crisp orange, red & yellow leaves....trees adorned with golden jewels, sitting and basking in the warm breezes, flowers still soaking up every last drop of sunshine just the same way we do.  Mackenzie and I still love to stop and stare at those yummy moments of autumn just the way we did when she was a wee one and we hope Harper will be just as enamored as we are with autumn.


So keep those parkas at bay a bit longer...pull some leggings or jeans on your wee one, pack a sweater and add an Autumn Tunic and go soak in those autumn rays...I promise it warms the soul :) 


Note: This pattern fits my almost 4 1/2 year old daughter.  She is small/short for her age.  Make adjustments accordingly for your child's size/age by simply decreasing/increasing the width/length of the top pattern (taking care to leave enough room to do your box pleats across the bodice, you will need to add the width of fabric for her size to the width of fabric needed to make the box pleats), length of armhole line and size of sleeve (again, making sure to leave enough width to make your inverted box pleat).  All of these can be adjusted quite simply by resizing.  I made a pattern using freezer paper and can usually eyeball her sizing by wrapping it on her and by also using other garments that she owns for calculations to match up to the measurements of her body.  Measure a fave top of your child's to see the distance between the top of the shoulder to the armpit join or measure your child.  Lay both pieces of fabric rectangles on top of each other and mark this distance on your fabric the same as you would in Step 2 of the tutorial below.  For any other help resizing feel free to send an email my way to luvinthemommyhood@yahoo.ca, I'd be more than happy to help you out.  

***Copyright 2011 www.luvinthemommyhood.com
All rights reserved. For personal use only. Please do not sell items made from this tutorial unless permission has been given.

Materials:

- one yard fabric             - fabric marker
- coordinating thread      - pinking shears (optional)
- 2 buttons
- iron
- sewing machine
- hand sewing needle

Pattern piece for sleeve:

you can download/print the pattern piece here or simply click on the image below so it's full size and print from there.  I'm also fiddling around with using google docs for my pattern pieces now but don't trust what I did...lol...so you can find that version here if you prefer it.  *When printing do not shrink or resize the picture. Print it out as is. 


Instructions:

1) Prep your fabric by pre-washing and drying. I used Buttercups by Amy Butler and I got the fabric I'm using from www.stitchsimple.com and she does all the washing & pressing for ya with unscented & chemical free detergent.  The fabric shows up all ready to go!  Seriously...best thing evah!


2) Cut out your pattern pieces for the sleeves and cut out (2) rectangles 22"W x 17"H (the top will look huge but when you put it on in the end it's almost like butterfly wings when your wee one lifts up her arms. My girl loved it!).   Lay both rectangles on top of each other.  Now we're going to use those sleeve pieces you cut out as templates to get your sleeve holes super accurate instead of doing some fussy measuring and trying to desperately draw a straight angled line..haha.  Take your sleeve pieces and match up the side of the sleeve pieces (the side should be about 7 1/4") where I've shown the dashed lines in the diagram above.  Mark this line with a fabric marker.  Move sleeve piece off and cut along the line you just drew.  Now just barely trim the top of your 2 rectangle pieces (your top - front/back) and the short end of your sleeves (this side is about 5") with pinking shears. Literally just enough to put the etches in..we don't want to lose fabric length here. Or you could choose to zig zag stitch these edges instead.  We're doing this to finish the fabric & prevent fraying for a step later on in the tutorial.


3) Take your sleeve pieces and press a 1/4" seam along the curved edge, fold 1/4" and press again.  Stitch down the hem.

4) With right sides facing each other (WS up) stitch the side seam of the sleeve (the one you used to draw the line in step 2) to the coordinating angle on the side of your top using a 1/2" seam allowance.  Press your seam and finish it with a zig zag stitch or mock overlock.  This gives your garment a nice professional finish.  It is, of course, optional and trimming with pinking shears works just as well. *Note: if you are using a serger you can skip the steps for finishing the seams all throughout the tutorial.

5) With right sides still facing (WS up) match the underarms together of your front/back pieces of top.  Pin along the side seams of your rectangles from the armpit down. Do this for both the left and right side of the top.  Sew this with a 1/2" seam allowance.  Again, press your seams and finish the seams with a zigzag stitch or mock overlock.


6) Mark with fabric pen (or use a pin) the center of both your front and back of your top.  Fold and press (2) 2" box pleats (it takes 4" of fabric to make a 2" box pleat), (this video is helpful if you've never made a box pleat before), to the right and left of your center mark.  Do this for both the front and back of your top making sure the space between the outer edge of your pleat to where the sleeves join the rectangle are equal on both sides (left to right) of the top.


7) Baste (you are going to do this to hold down the pleat when you finish the neckline to avoid shifting of the pleat) down "only" the top of the pleats with the smallest seam allowance you can.

8) With WS facing fold and press entire neckline 1/4" around the top.  Stitch this seam down and press.


9) Find and mark the center point of your sleeve.  Fold in both sides equally to make one inverted pleat (here is a great post showing inverted pleats).  Do this for both sleeves.  Press.

10) Get your 2 buttons out and hand sew your buttons on to each sleeve on the neckline between where your pleat meets up.


11) Try the garment on your child to check the length you would like to hem.  I did a very wide hem so I will have lots of room in this tunic for Mackenzie to grow.  I can take out the sleeve pleat and let down the hem as she gets bigger.  I folded and pressed 2" and then folded and pressed 2" again to equal a 4" hem.  I stitched this down the width of my presser foot in from the inside edge.  I then topstitched 1/4" away from the first row of stitching to almost the edge of the hem.  Press.

12)  Attach your label.  Press/fold your pleats (you can also blind stitch your pleats by hand down a few inches if they don't stay in place..mine were fine but this may change based on the fabric you are using) and go rock your new Autumn Tunic!!! So fun!

***Copyright 2011 www.luvinthemommyhood.com
All rights reserved. For personal use only. Please do not sell items made from this tutorial unless permission has been given.

I would love to see if you make an Autumn Tunic for your child!  Come upload any of your projects to the luvinthemommyhood flickr group so we can all take a looksie!  I hope you have fun with this top and feel free to add your personality to it.  You could add a different fabric border for the hem, leave out the buttons, embroider the neckline..there are lots of ways to customize the tunic for your child.  It's perfect for summer/fall as is and just as adorable with a long sleeve t under for the winter.  So go get some yummy colored fabric and Celebrate Color!  Have you entered yet?  You don't want to miss out on those FABULOUS prizes that Rachel, I and the gang have rounded up!

Do you have a fave autumn picture/memory?  Have you been doing any sewing for fall? What do you think of the tunic?  What print would you make it in?  Let's chat sewing ladies...I'm on my 2nd cup of coffee this morning (eek) and would love your company :)

Sewing with Knits Mondays - The Awesome Amy Cardigan!


it's monday!  i have to admit that monday's have become a pretty fun blog day for me lately.  i've been loving sewing with knits and hope you guys have been too!  when anna and i first decided to do "sewing with knits monday's" i knew i wanted to make a new cardigan.  i knew that i wanted to add something personal to my cardi and thus the "awesome amy cardigan" was born!


made from a soft, light-weight grey stretch i knew i wanted something to curl up in that wasn't too hot for cool summer nights but kept me warm in the winter.  i wanted it to be simple in it's design so you guys could make it too and i knew i wanted you all to be able to customize it.  


what's different about this cardigan?  well it's got a pretty little ruffled detail along the shoulder seams and also some hand stitching all along the border of the cardigan.  do you likey?  i lovey! 


why's this one called amy?  well last week i mentioned that i had been naming my tutorials after some pals from my knit night and this one is named after amy.  she's awesome :)  she blogs over at "the family feedbag".  be careful if you go over....trust me...you will end up cooking.  she knits, she sews, she quilts, she's obsessed with turquoise like me & she's a great pal.  put all these things together and well....she's AWESOME!  she's also a busy momma of 2 gorgeous little boys.


both amy & i love a great drapey cardi.  we are both always sporting our repertoire of them on a weekly basis.  i know my obsession with them lies in the fact that they hide and disguise the "dreaded overhang" and leftover baby belly...yes, i said overhang.  my arch nemesis.  damn that overhang.  if you hear me overhang i'm talking to ya....i'm gonna get ya one of these days but in the meantime i'm going to hide you with this awesome cardigan :)


so get excited!  get ready to have some fun, bond with your sewing machine and learn to embrace the knits!!!  you can do it!  look how excited sewing with stretch makes me!  how fun is it to make your own clothes that actually fit your own body?  want one too?  here ya go....jump right in!


***Copyright 2011 www.luvinthemommyhood.com
All rights reserved. For personal use only. Please do not sell items made from this tutorial unless permission has been given.

Materials:

* 1-2 yards of lightweight stretch/knit fabric. Look for a nice soft drape.
* scissors
* embroidery floss (1 skein)
* embroidery  needle
* sewing machine
* ballpoint needle (for sewing machine - optional
* thread

Instructions: 
1) Find a favorite drapey top, cardigan or tee and use this to trace your pieces to make a basic pattern from (if you made anna's top from last week or mine you could use this as a starting point or also follow katy from no big dill's tutorial for the billy cardi).  *make sure the stretch of your fabric goes left to right, not up and down.  I cut my back and both sleeves on the fold and the two front pieces normally.
2) Once you trace out your pattern pieces (I use freezer paper for mine) I made my overall length longer and also extended and angled out the front sides of my cardigan.  I also increased the width of the front shoulder seam pieces (this is for the ruffling effect if you choose to do this, if not, just leave at normal width) making them a few inches bigger than I traced. See the diagram above for an idea of what i did.  The broken lines represent the original pattern piece of mine i used to trace from.

3) Set your machine to your basting stitch and without backstitching sew along the two front shoulder pieces with a 1/4" seam allowance.  Then stitch another line at a 3/4" seam allowance.  Pull the bobbin threads to ruffle your fronts up to match the width of your back shoulder pieces.  Or you can use your machine to actually do the ruffling for you as shown in this post.
4)  With right sides facing each other (cardigan is inside out) pin your side seams together.  Using the settings for sewing knits on your machine (i like to use a zig zag stitch for these seams) stitch your sides together using a 1/2" seam allowance.

5)  Pin  your front shoulder seams to your back shoulder seams.  Stitch together with a 1/2" seam allowance using a zig zag stitch as well (you will be stitching between your two basting stitch seams).  Take care that your ruching lays flat & drapes nicely.  You can now remove your 2nd basting stitch which was done at a 3/4" seam allowance. 
3)  Get your sleeve pieces.  I'm very picky about my sleeves and how they fit. I'm a busty gal so I don't like my arms to look any bigger than they need to..lol.  So I like to pin my sleeve vertically along the seam and try the sleeve on to get the exact fit I want.  I then use a fabric marker or pins to mark where I want to sew if I have to make any adjustments.  This is the fun part about customizable tutorials!  You get to make it to fit your measurements and dimensions!  So fun!

4)  Make sure that when the sleeve is pinned along the long edge that your sleeve still fits your arm hole.  I'm really picky about this for some reason and always do a trial pin to make sure my underarm seam will match up perfectly to the side seam.  I think it gives more of a professional finish.  After testing out your arm sizing and armhole measurements stitch up your long seam of your sleeve using a 1/2" seam allowance (again, zig zag stitch).
5)  Now we're going to sew in your sleeve.  There are a few ways to do this and the easiest I have found is by keeping your cardigan inside out and your sleeve right side out.  You then pop that sleeve into the hole of the armhole and when you look into the armhole you will see the wrong side or your sleeve.  Pin the sleeve to the armhole taking very good care that your seam for the sleeve and your armhole match up perfectly.  I like to start stitching there to make sure there is no movement or drag later.  Sew this seam again with a 1/2" seam allowance and a zig zag stitch.

6)  Time to finish your sleeve.  I folded back a 1/4" seam and then did a mock overlock the seam to give a nice finish.

7)  Fold your back neckline under 1/4" and finish the same way.


8)  Now comes the fun part!  Time to personalize!!!! Woot woot!  I got 3 strands of white embroidery floss and simply did a loose blanket stitch around the edge of both front sides and the whole bottom of the sweater to create kind of a scallop effect.  Make sure your stitches are even and not pulling your fabric.  You can find out how to do a blanket stitch here or many other places online and on youtube.


9)  Trim your threads and all your inner seams of your cardigan and go rock your new awesome cardi!!!  you go girl!!!

***Copyright 2011 www.luvinthemommyhood.com
All rights reserved. For personal use only. Please do not sell items made from this tutorial unless permission has been given.


that wasn't hard at it all!  it's also a super fast cardigan project to whip together.  so go put that new fab cardigan on and go have a great time!  you look fabulous!  a big giant thank you to the lovely and talented jane richmond who was my photographer for this tutorial & my date to the fibrations festival where we took our pics after oogling over tons of yummy candy colored yarns, knitting in an orchard on the grass under apple trees and sipping yummy americanos.  not a bad way to end a weekend if you ask me - thank you jane!


make sure you check out what fun stuff anna's whipped up over on noodlehead today!  she's the best partner in crime!!  have you been stitching with knits?  make sure to come show off your projects on our "sewing with knits mondays" flickr group or link up in the comments below!  we love to see what you guys are working on :)  happy stitching!

Summertime, and the Living is Thrifty - The BUFF Cuff Tutorial


Hi everyone! I'm super excited to be guest posting over at "on {the laundry} line" today!  i'm posting as part of the "Summertime, and the Living is Thrifty" series!  I adore Laura, and summer, and thriftiness, and sewing...and....well...just about everything that this fun theme month stands for.  Laura is one of my fave bloggy pals.  She's freakin' hilarious and I love chatting with her.  Also, we're both Canadians who cannot live without coffee and chocolate chip cookies so we've bonded for life...sisters from another mother we are now.  Us Canadian gals gotta stick together eh?  LOL.


When Laura told me about her theme month I knew right away what I was going to make for you all.  I've got bags filled with old yoga pants and even a few old bathing suits of the girls and I'm always looking for new ways to refashion them.  The other day I was out shopping (will not name the store) and spotted this cool running cuff designed to hold your key and some change (maybe a bus ticket or something else small like that) and really wanted it.  This thing cost way more than it should have due to it's "brand" and I thought to myself "girl....you could totally make that...don't buy it - just sew it".  That little cuff stuck in my brain and rattled around in there until Laura emailed me and then "poof" the "BUFF Cuff tutorial" was born.


I set out to sketching out the cuff and the best way to make it and then dug through our refashion pile for a 4 way stretch that was breathable and light and away we went.  I love mine.  It's light, fun, fashionable and for me, while running (ok....my boobs are just way too big to run...I jog..and walk..and jog), I don't like to carry anything and want as little as possible to be strapped on me while pushing my giant running stroller with 2 kids in it and the buff cuff passed the test.  The key stayed in, it didn't irritate me to wear it and I think it looks pretty darn cute!  What do you guys think?  You could embellish, applique, & adorn to your hearts content.  I live for projects that you can take a base and go customize the crap out of it to suit your personality.  So here ya go...get those stretch and knit fabrics out...it's time to get BUFF (in shape...not naked...unless, of course, that's your thing..than go work it girl)!


THE BUFF CUFF TUTORIAL
*Copyright 2012 luvinthemommyhood.com All rights reserved.  This tutorial is for personal use only. *

||  MATERIALS  ||

 - 1/4 yard or less of any fabric that is lightweight, breathable and preferably has 4 way stretch.
 - needle and coordinating thread (optional)
– scissors

||  INSTRUCTIONS  ||
 
1) Start by measuring your forearm from the start of your wrist to about 2" from your elbow crease (or desired length).  Note: This is the length that your buff cuff will be so if you want to hold something longer than a key extend your length here.  Mark this measurement down as "A".  Do not add any seam allowances unless you want a more finished edge.

2) Measure the width of the widest part of your forearm where the buff cuff will be worn.  Mark this measurement down as "B".  Do not add any seam allowances.

3) Take your "A" and "B" measurements and cut your fabric.  If your fabric doesn't have 4 way stretch make sure your stretch goes from left to right not up and down.

4) Finish the edge of one of the short sides (B) with either a serger or on my machine I used one of the mock overlock stitches for stretch fabrics.  If you don't have a mock overlock stitch you can choose to zig zag stitch this edge as well using the settings for your machine for stretch fabrics.  You can also choose to just leave this unfinished but it is the edge that holds the key and I preferred to have it be a bit tighter of a fit.

5) Sew the long side seam together right sides facing (A) with a 1/4" seam allowance.  I used the zig zag stitch for stretch on my machine for this.  *Note: I did a trial test for a perfect fit by not back stitching at either end and testing out my sizing.  I had to seam rip out the first one as it was too baggy and I'm picky about those things.  You could also pin your side and then try on the cuff as well.  You want the cuff to be very snug but not too hard to stretch over your hand.  Trim your seam allowance as close as you can get to your stitches without cutting them.  You could also serge or mock overlock this as well instead.

6) Try the cuff on with the right side against your skin...so the wrong side facing out.  Fold up the bottom edge the desired amount that you would like your pocket to be noting that you need to be able to nicely fold the rest of the cuff over to fully cover this.  I think mine was about 2 1/4".  Mark where the fold is or pin without injuring yourself of course :)

7) We're going to stitch the pocket down now.  I simply did a few back stitches at the top of the seam of the folded pocket and and at the bottom.  I didn't want to stitch down the whole seam on the side as I thought it would ruin the look of the cuff from the other side.  You could also hand stitch this very easily as well.

8)  I left the other edge that folds over unfinished to keep it soft because I love the cute little roll you get that just makes the edge soft against your skin.  That's it!  Rock the cuff or customize to your heart's content!  I added a bow with my leftovers on to sass it up a bit.  I simply took a long strip, tied it in a bow and then hand stitched it in place. here's how to wear it.  slide the cuff on opened and inside out.  slip the key in your already pre-folded section and then roll down the top:


kaboom!!!!!!!! 


Use your leftovers and add a bow to increase your supermomma strength!


what crafts have you been making this summer that are thrifty?  do you have a fave workout accessory?  make sure to add all your crafty goodies to the luvinthemommyhood flickr group - i love seeing what you are all making! 

The MODify Dress Tutorial!!


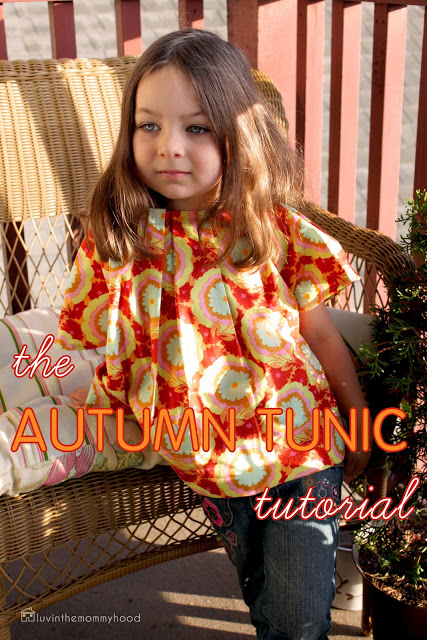
 The MODify dress tutorial is finally available as a free downloadable pdf! I like having pdf's of the patterns/tutorials I make.  I find it easier to follow instructions with my print outs rather than referring over and over again to my computer screen.  I also like to have a copy in case i make it more than once or lose my link.  So for those of you who are like me and dig pdf's here ya go. For those of you who missed this post mid may I was asked to join on "free pattern month" on one of my fave all time blogs "grosgrain".  I was thrilled. It was perfect timing because I had been preparing to do something I haven't done before....make a dress for myself! That's right folks! Something for ourselves. Not for the kidlets. Not sure about you guys but I'm always sewing for my kids or for gifts and I always seem to get put to the wayside. It's scary unknown territory for me to make a dress but I knew i had to do it.

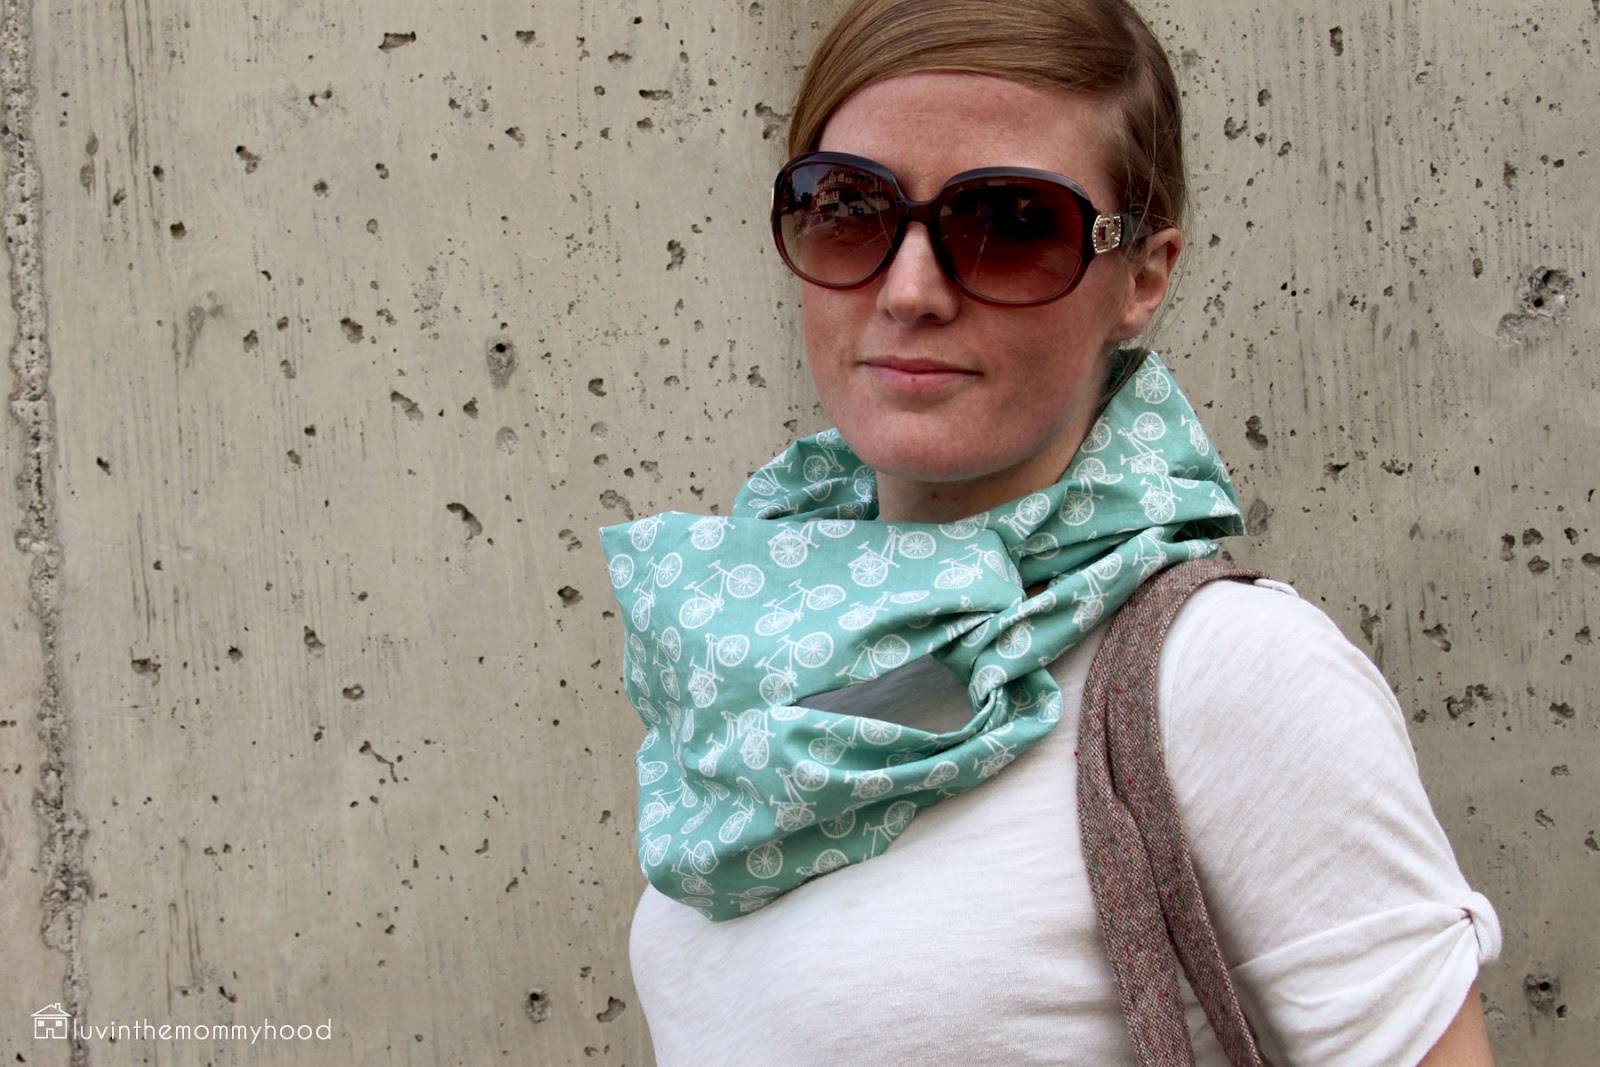
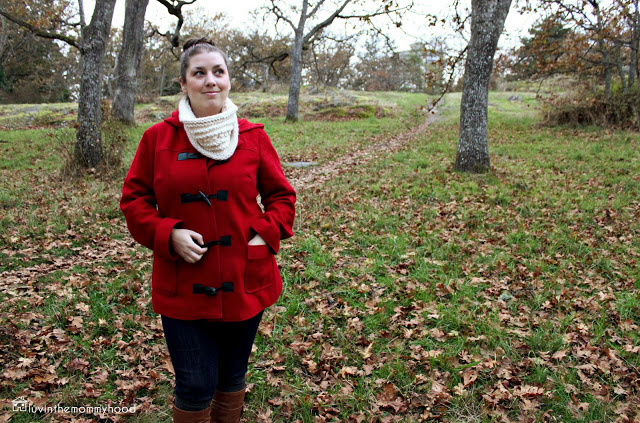
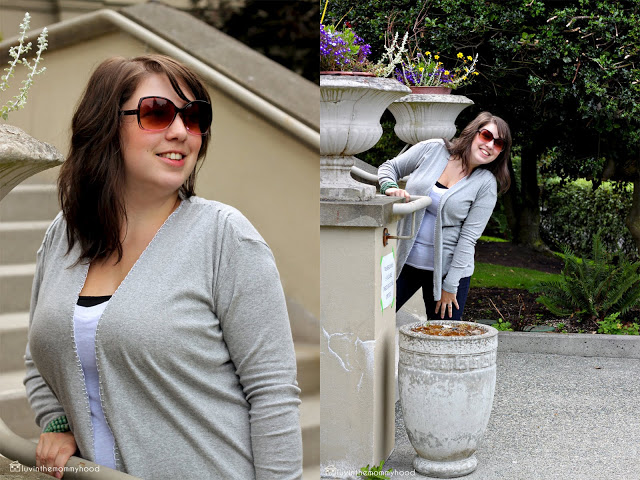
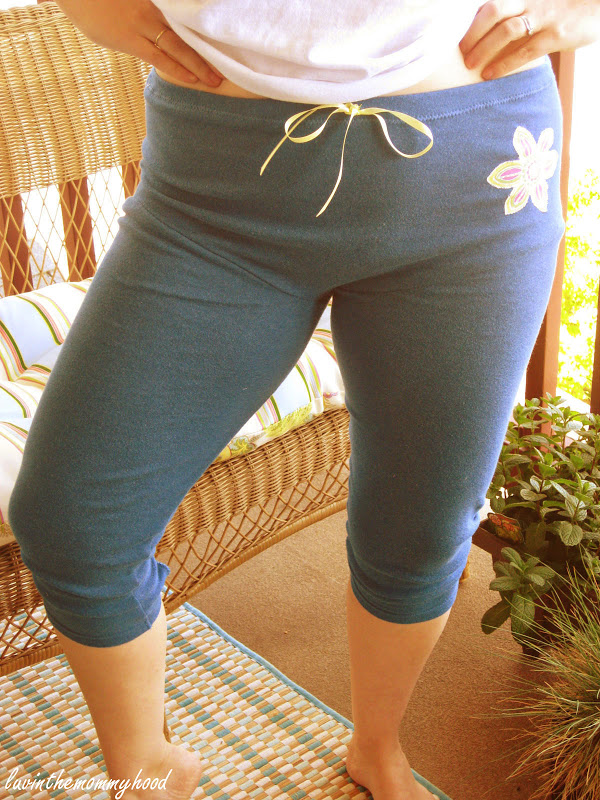
*Please note the model in the pics is my sister who is a few sizes smaller than me. She's modelling the dress that was made for my body so it's a bit big on her :P

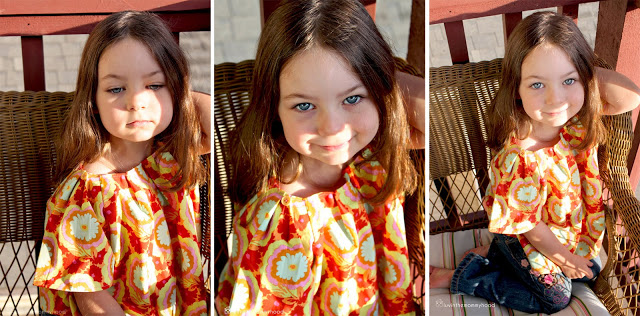
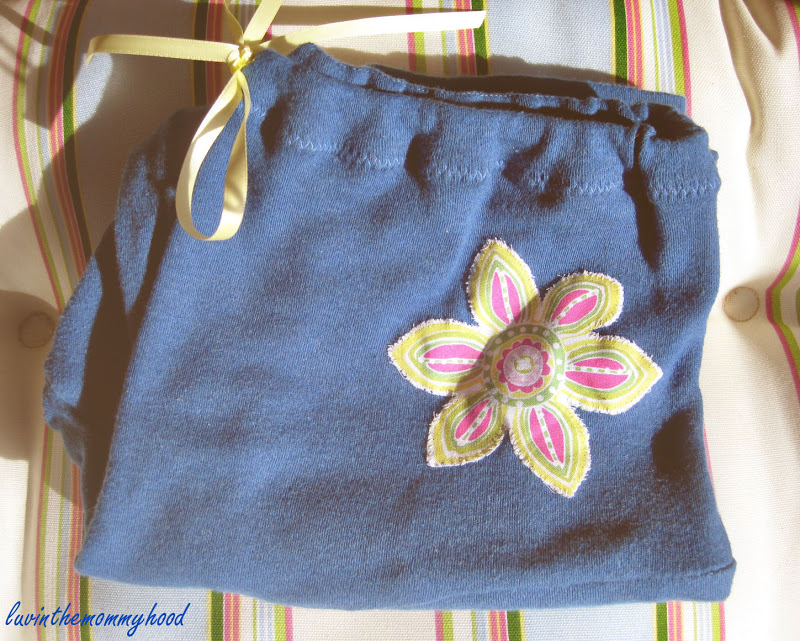
I've been so frustrated dress shopping lately and haven't been able to find anything that fit me right that covered the dreaded post baby bump (hate!). Darn c-section :P So instead of whining and crying to my hubs and anyone else who would listen I decided to just make one. Thus the Modify Dress Tutorial was born!!! I've been feeling so inspired by old movies (mostly from the 60's) lately and wanted a fun, short, mod spring dress that's simple to make and simple to "modify". This dress will give you a great base to personalize, add some pizazz too or keep modern and simple. It's flattering and can be worn a ton of different ways. Lengthen it for fun or shorten it to make a tunic. Sleeves..no sleeves. V-neck or round neck - it's up to you. Add length and width to the front panel and you've got a great maternity dress! And the best part is that there are no pieces to print out, this dress is all customizable to your own body size. So no gaping at the arms, tight boobage, or pulling on the hips. You use your measurements to create the dress that's right for you.


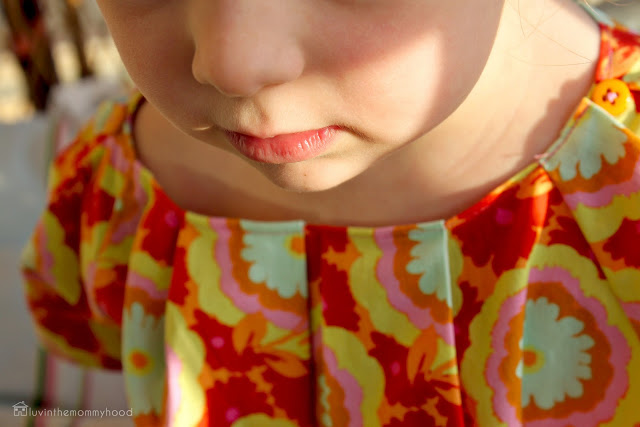
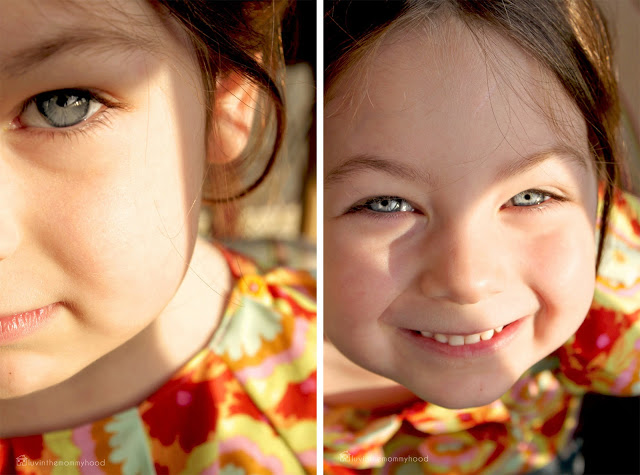
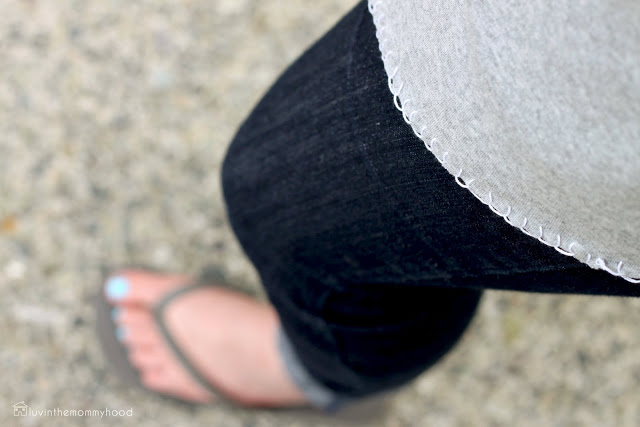
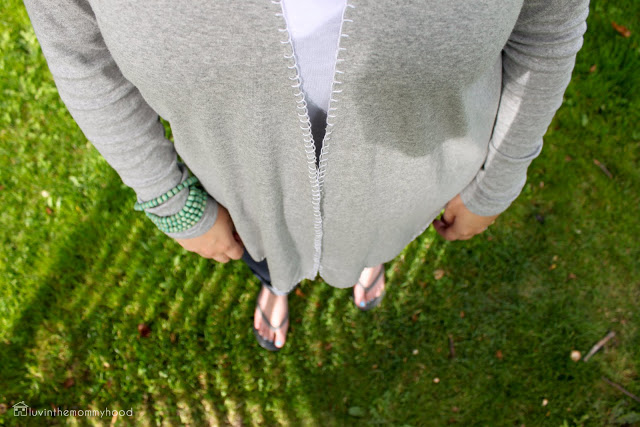
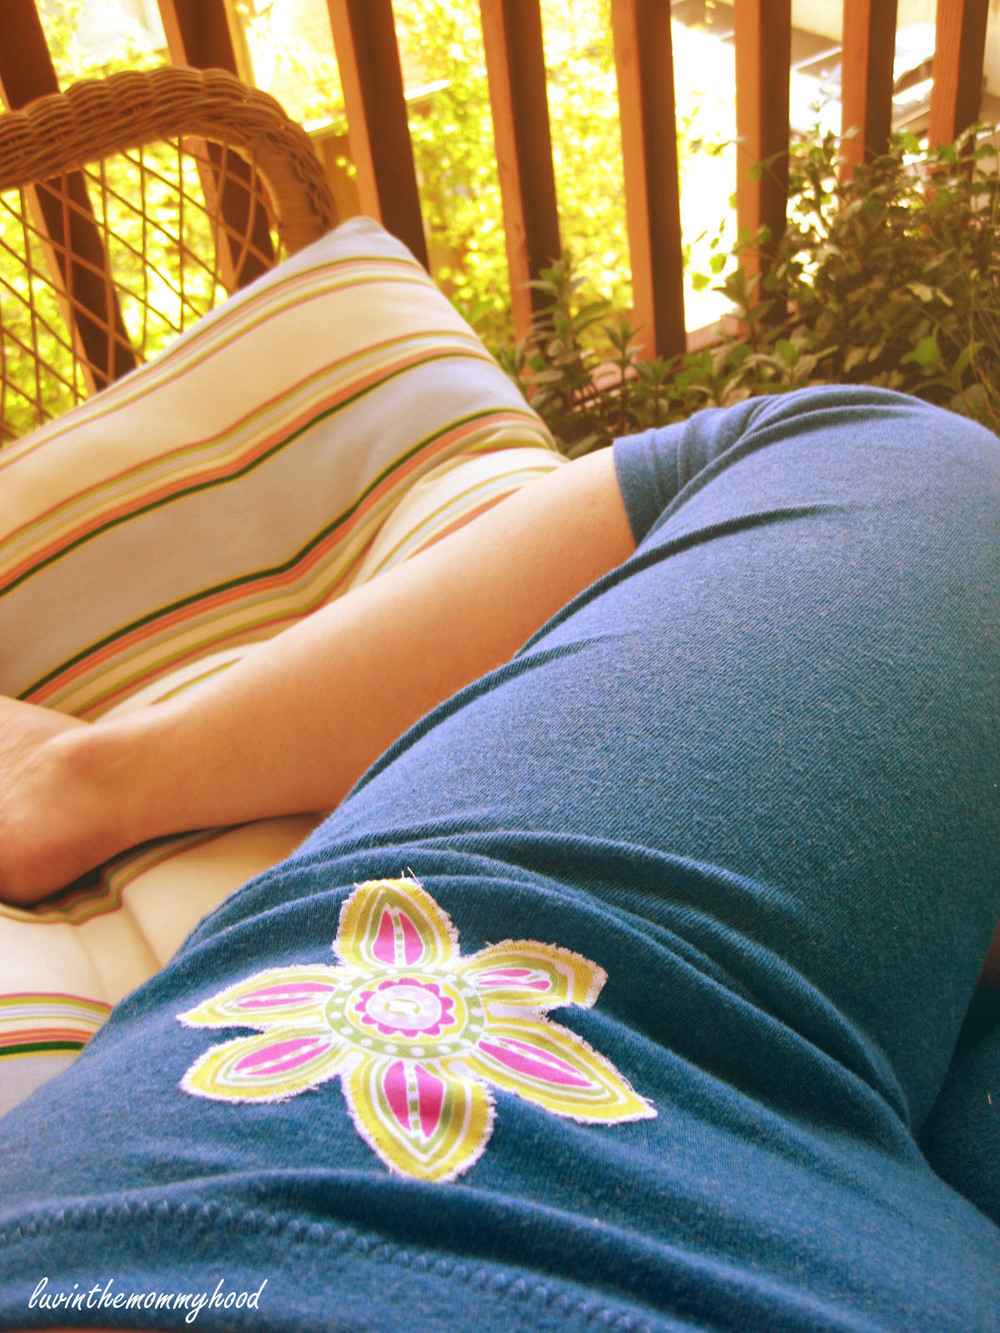
the best dress for those warm sunny breezes...


and for relaxing days.


wherever you plan to wear this dress you'll be comfy, stylish and relaxed.


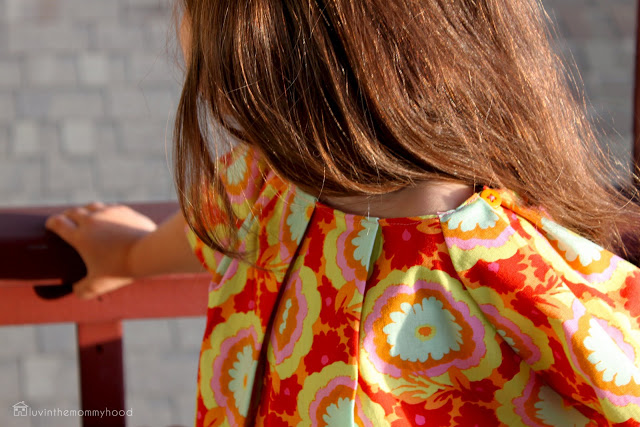
I still consider myself a beginner to intermediate sewer and I'm still learning so this tutorial is written in a way that I find easy to understand. There may be more technical terminology or fancier ways to do things but hey....we all gotta start somewhere right? I also decided to do something different with this tutorial. Instead of photographing every single step (which I usually do) I decided to try drawing some this time. I'm a very visual learner but I sometimes find it hard to see what people are doing in pics and thought it would be fun to mix it up. I love to draw and grew up an art geek so it was nice to get some time with my pen and paper instead of computer.


So get ready to modify, customize and sport a rocking dress and, if you're like me, hide that post baby bump!!!!

The MODify Dress Tutorial 
 (if you just want to print it without downloading click on the link above and it will show you that option in the sidebar on scribd.)

Materials:

- 2 yards (plus depending on your size) of main fabric. I used light weight cotton.
- scraps of contrasting or same fabric for pockets, to cover buttons and to make your own bias tape if you choose to.
- coordinating thread
- sewing machine
- bias tape maker (optional)
- bias tape (optional)
- buttons
- embroidery thread
- sewing needle
- scissors or rotary cutter/mat
- washable/disappearing fabric pen or dressmakers chalk
- 3 buttons that are made to be covered with fabric (& your little kit that came with them)
- drawing paper (Optional)
- Freezer Paper/Pattern Paper (Optional)

Instructions:

(I'll be sewing with a 1/2" seam allowance. These instructions were written for someone with a sewing machine and not a serger. If you have a serger this dress should be super fast for you to whip up.)

This dress is a fun way to take a basic shaped dress and practice customizing and modifying dresses to your own body shape and size. I don't have a dress form so this is how it goes in my house :)

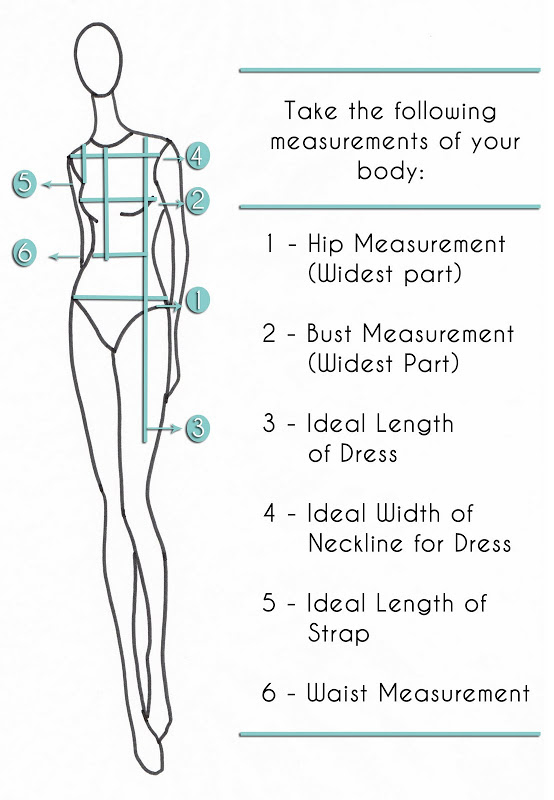
1) Start by taking measurements of your body. This can be a bit tricky sometimes so if you have a pal around to help take advantage of it. Write down the measurements shown in the diagram.
2) Make sure your fabric is washed, dried and pressed before sewing and starting a project. The last thing we want is a dress that shrinks after the first wash :P Fold fabric in half making sure the stretchiness is going left to right instead of top to bottom. Test this by pulling on your cotton to see where the give is.

3) Now we are going to create and cut out our pattern pieces and fabric. There are 3 options to choose from. I did a combo of Option A and Option C.

Your Hip Measurement + 4-5"
Your Bust Measurement + 3-4"
Your Waist Measurement 1/2-1"

Keep in mind these are just a suggestion. You can also search on google information about adding ease to your garment and more in depth information on taking your measurements.

Option A: 
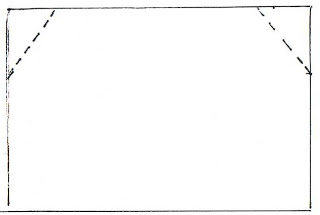
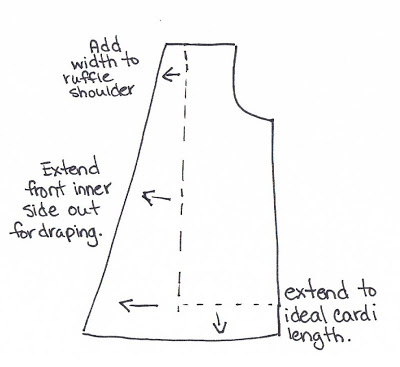
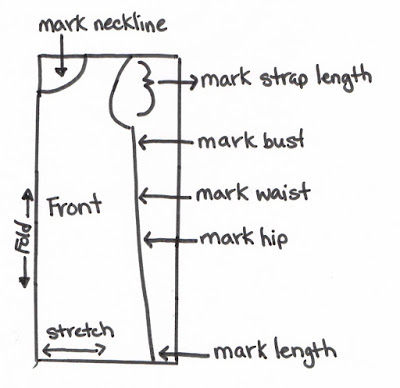
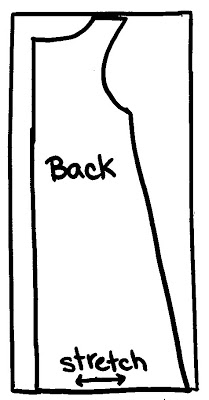
Sketch out your dress. Draw a rectangle on a piece of paper. On this rectangle mark down your measurements. Now we're gonna play some connect the dots. We're going to draw a bit of a triangle to replicate the shape of the dress. This will give you a rough idea of what to draw and cut out of your fabric.

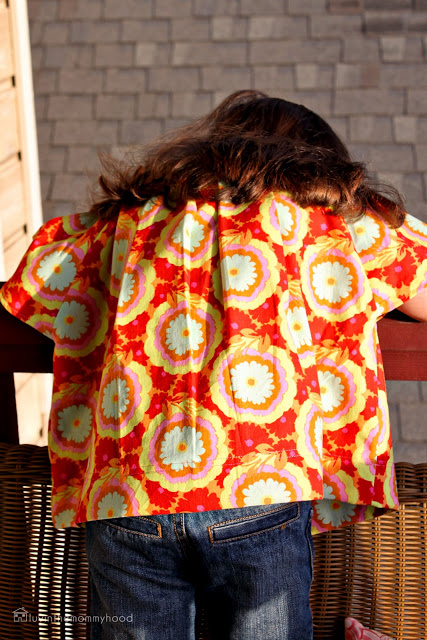
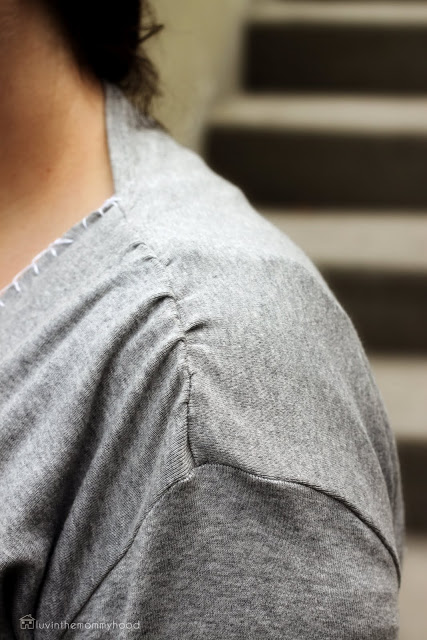
- I'm doing a mod style dress. I drew out a rounded neck that dips lower in the front than in the back (so I don't have to worry about the girls popping out) with wide straps (to cover the bra). I also wanted my dress to be loose (to hide the overhang..you all know what I'm talking about..don't pretend ya don't..haha) and short to show off my gams :P The fun part is that this where you get to play! Do you want a v-neck or round neck? Or maybe a boatneck? Draw it out. Do you want sleeves or no sleeves? What length? A tunic or dress? Now is when you can decide. It's all up to you.

-You can now choose to transfer this to size on freezer paper or other paper you use for pattern tracing and then use this as a pattern to cut out your dress or you can move on to Option C at this point, like I did, or skip this step and move on to Option B.
Option B: Use a dress you already own and like the fit of as a template. Lay the dress down on your fabric (folded and then placed on the fold) and trace around the shape adding your seam allowance and making the modifications to the basic shape of the Modify Dress (I didn't use this option as I currently don't have a dress that I like the fit of). There are a ton of great tutorials online with tips on how to do this option.

Option C: Use the sketch you drew and your measurements to make a mock dress from muslin or other fabric. I used a plain white cotton to make the dress so I could put the tutorial together for you all. I liked the idea of having the mock dress to play with after and change up etc to make another dress and use to trace out on pattern paper to keep for later sewing. This is a great dress to use as a standing off point for your body sizing for a ton of other dress styles. I also find it easier to do this method as a new sewer to get accurate sizing and fit for my body. I find it a fun experience to learn by trial and error how to make the correct adjustments for fit to my body.

a) Draw your pattern onto your "mock dress" fabric using your body measurements and sketch of dress as a guide adding your seam allowance and ease to the drawing.
b) Cut out your pattern pieces taking care to make sure the fabrics give is going the right way.
c) Pin dress and try on.
d) I used a combo of pins and fabric marker to mark any changes I need to make in shape and sizing to my "mock dress".
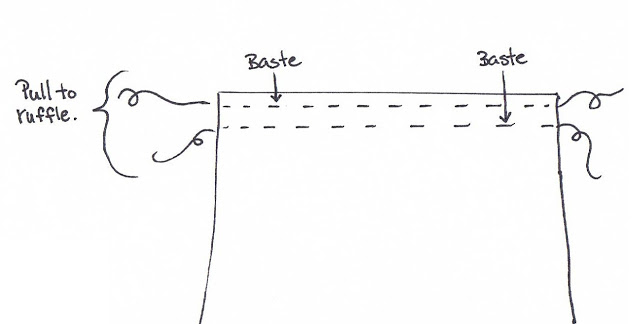
e) Baste the dress. I basted both side seams and the back seam and then the straps trying the dress on as I went making alterations as needed.
f) Cut and trim any excess fabric you may have leaving only the 1/2 seam allowance.
g) Pull basting out, press the pieces and use the front and back pieces as your pattern template.
h) Place mock dress pieces on your dress fabric and get ready to cut.

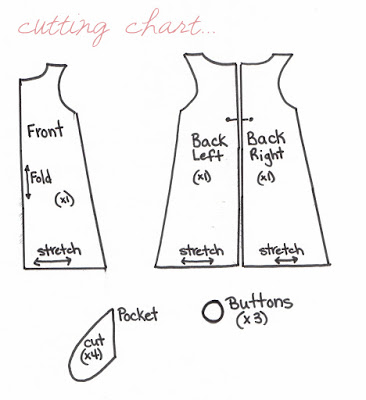
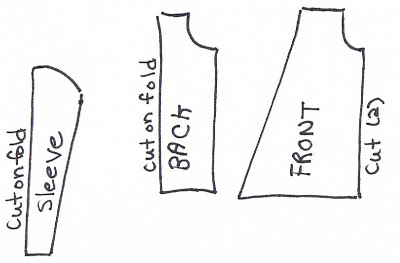
3) Cut out your pieces. You should now cut out the following:

1 - Front piece cut on the fold.
2 - Back pieces. One left and one right.
1 - Scrap piece of fabric big enough to cut out the fabric for your 3 covered buttons.

***Don't cut out or draw your pockets yet. We will do this in step 5.

4) Iron and press all your pieces. You can never iron too much ladies so make sure to best bud it up with your iron. I also love to use some yummy linen spray when I iron to get those stubborn creases out of my fabric.

5) Cut out your pocket pieces. I like this one tutorial from "
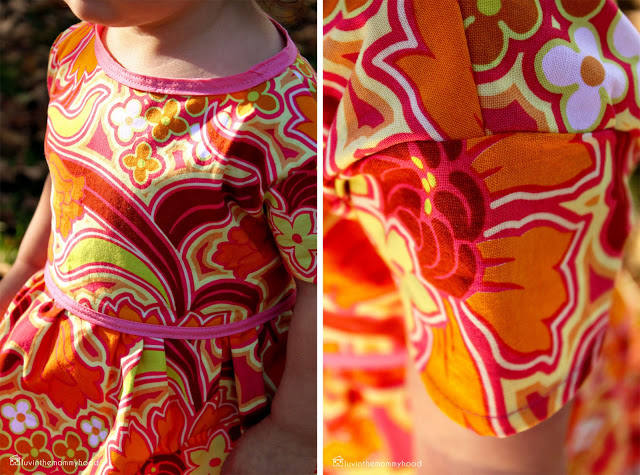
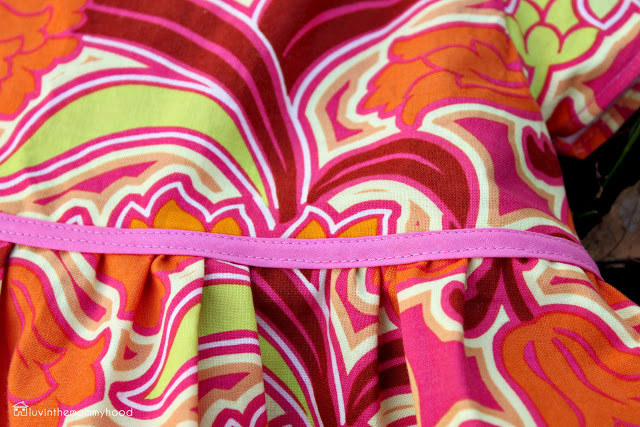
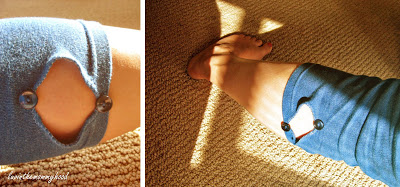
freshly picked" but you can draw your hand out and make your own pocket to your size liking as well. You will have 4 pieces all together. 2 pieces for each pocket. Use a fabric marker and mark placement of where you would like pockets to be placed on your dress on both the front and backs of the dress. Remember this is totally optional. Don't want a pocket? Skip adding it. Want a pocket on the front instead? Go rock it out! It's your dress and your style! I've been digging all the side pocket looks so I knew I wanted to add them to this short, springy dress.


6) Ok, now you've got all your pieces cut out we're ready to....modify...and of course, sew! This is the fun part folks! Lay out your front piece right side up and let's get those pockets sewn on!

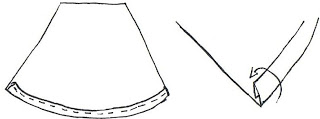
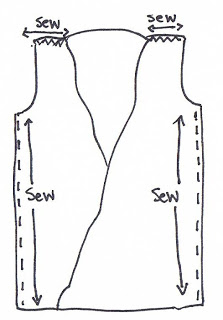
a) Take your pocket pieces and pin right sides facing down (see diagram) to both sides of the front and to the outer sides of both of your back pieces.

b) Sew along the edge of the pocket that matches up with the outer edge of your fabric with a 1/4" seam allowance. Make sure to use a smaller seam allowance than the one you are sewing the main parts of your dress with.

c) Press the pocket pieces away from the dress.

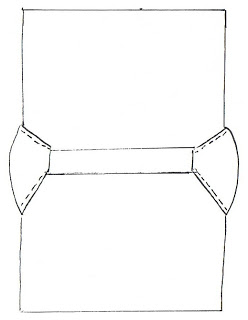
d) Pin your sides of the front to the sides of the back of your dress lining up the pockets. Sew your side seams together also sewing around the edge of the pocket as you go with a 1/2" seam allowance. See diagram. Finish seams with either a zig zag stitch or trim with pinking shears. Turn dress right side out and press the pocket inside and the outer edge of your dress.

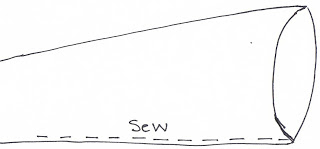
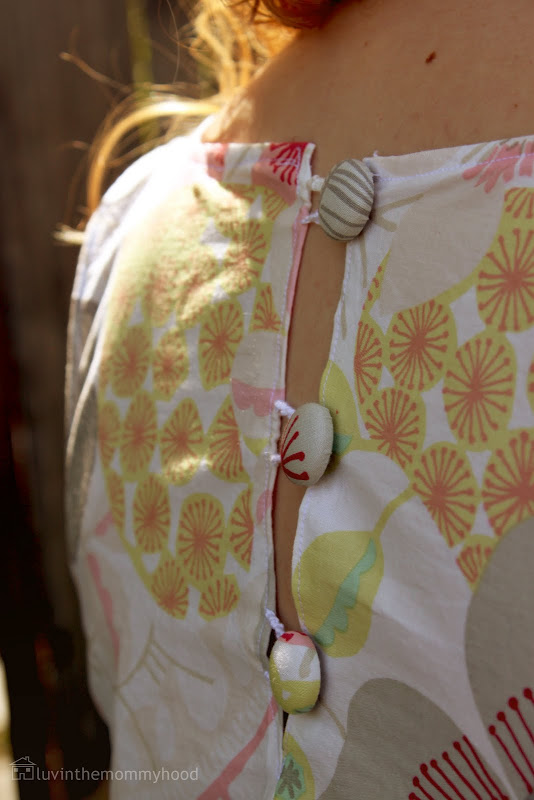
7) Pin your two inner back piece edges together. Mark with your fabric pen where you would like your back opening to start. Mine was 6" down from the top. With right sides together, sew the back body pieces together making sure to stop at mark for where you would like your back opening to end. Finish seams with either a zig zag stitch or trim with pinking shears. Press open.

8) Try on your dress again. You're looking fab!!! Pin and adjust where you would like your straps. Also mark where what length you would like to hem your dress too. Take your dress off, turn inside out and sew along the strap edge. Finish this seam as well with either a zig zag stitch or trim with pinking shears. Press your seam open.


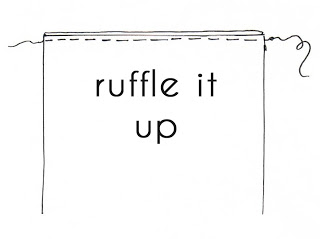
9) Now we're going to hem the dress. Using the measurement for length you took earlier and the marking you just made as a guideline for your hen length. I prefer to hem using a double fold hem or clean finish hem. You don't have to worry about unfinished edges and it always looks nice and clean. Here's a link to a great tutorial showing a double fold hem as well from Sew4Home.

a) With wrong side facing simply fold (press as well) your unfinished edge up 1/4".
b) Then fold (and press again) another 1/2"-1" depending on your hem allowance.
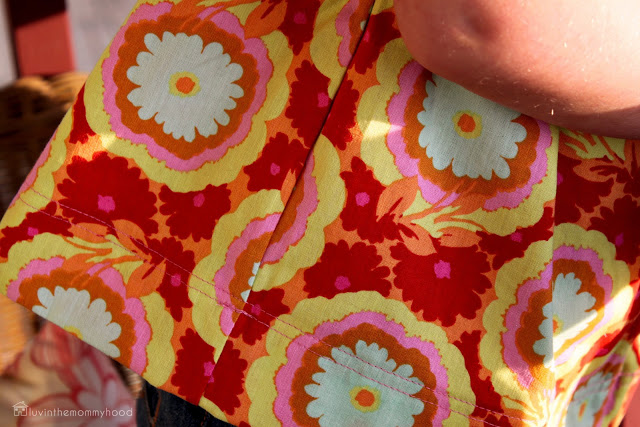
c) Topstitch along the hem. I topstitched mine twice for a double seam because I liked the look.


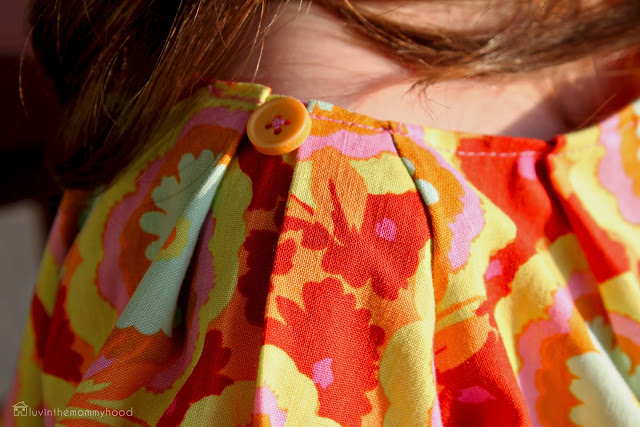
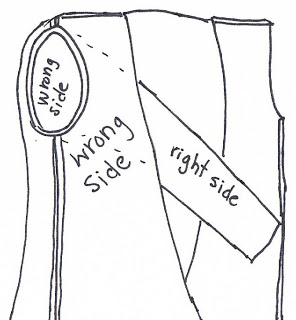
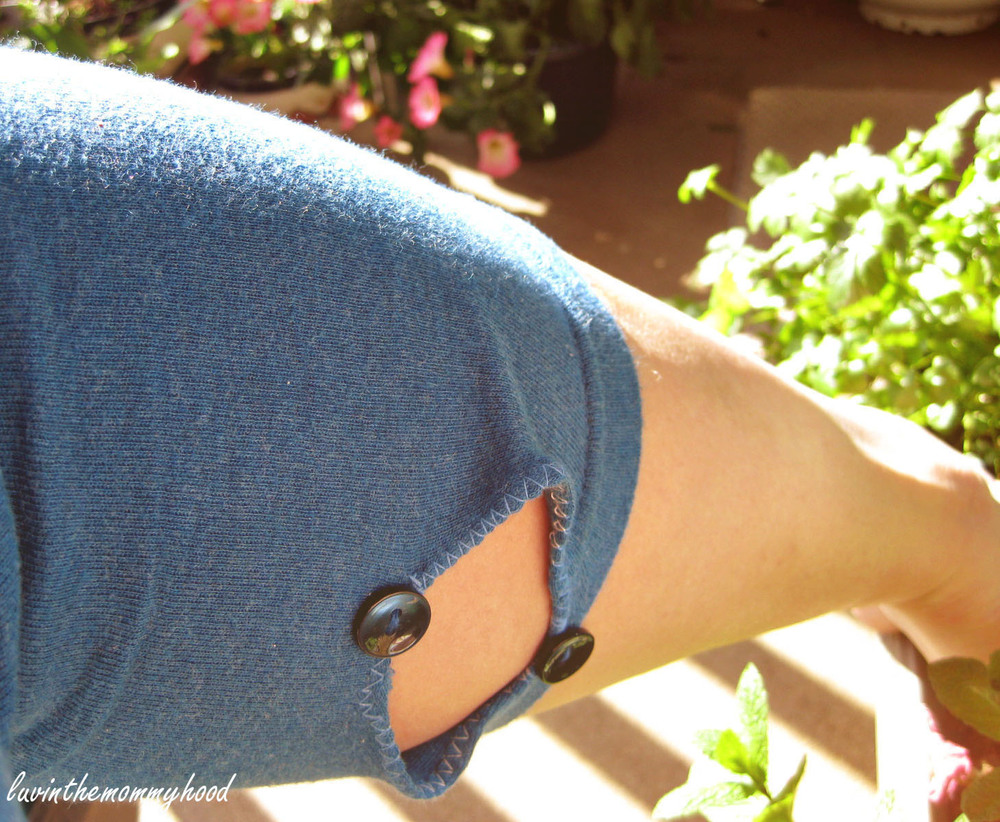
10) Press the rest of your fabric for your back opening. Trim edges with your pinking shears. We're now going to make your button loops. I love this tutorial from the talented knitting designer Ysolda Tseauge. It adds such a pretty and feminine touch to the dress. I sewed my loops through the underside of the pressed edge so this would be hidden when we sew down the seam. (You could make this using coordinating or contrasting fabric as well or just forgo the buttons totally and sew up the rest of your back just take care to double check based on the neckline you cut if the dress can be put on over the head without an opening.)


11) Cover your buttons with your fabric that you set aside (or use buttons of your choice). Mark placements of buttons making sure they line up with the loops you have made and sew them on. I am hopelessly addicted to fabric covered buttons so I did mine to match my dress.


11) Sew down the outer edges of the back opening stopping at the bottom of the opening.

12) We're now going to finish off the edges of our neck and armholes.

Option A) It's time to make some bias tape. You can choose to finish with a different color or coordinating colored bias tape or you can simply make your own. I like to use this tutorial from Smashed Peas and Carrots as a guideline for sewing bias tape. I recently bought a bias tape maker and it's fun to use! Just remember to hold it up slightly while using to keep the ends folded nice and close and press as you go. You can see more on making your own bias tape over on a great post on Made.


Option B) Use the bias tape but have it not show. I love this method! It's fun and oh so easy to do and I like the finished look. You don't have to make your own bias tape and it's fast and easy to attach. I like to use the technique used on this tutorial from the lovely ladies over on Prudent Baby. I chose to do Option B for my dress.

13) Press all seams and trim lose threads. Add on a label if you like to as well. Try on your dress! You're done!!! Wasn't that fun? You look gorgeous! Enjoy :)

 you can find the free, printable & downloadable pdf of the tutorial above by clicking here.

***Copyright 2010 www.luvinthemommyhood.com
All rights reserved. For personal use only. Please do not sell items made from this tutorial unless permission has been given.

Which way would you wear The MODify Dress? With a belt? With heels or flats? As a tunic or dress? With sleeves or without? I can't wait to see what you all come up with!!! Make sure to add your creations to the

Everest: The Ultimate Knitting Needle Organizer


so excited to finally reveal my newest tutorial to you all!!!!!!!! it's been killing me keeping it on the down low for so long! this project was near and dear to my heart and has quite the little tale to go with it. wanna hear the story? wanna make one of your own? i hope so! go head on over to one of my favorite, favorite, favorite crafty sites whipup!!! that's right!!! i'm thrilled to be guest posting for kathreen over there today! i did a major happy dance around my condo when she asked me. i'm so honored! i hope you all enjoy it!


go pop over, show her some mommyhood love and leave me a comment telling me what you think!!!!! let's hear it for getting all of our knitting needles organized! you can use everest as a tote and carry her along to your next knitting club meeting, hang her like a travel bag organizer in your craft room, or simply have her sitting all pretty on your shelf like i do. whatever your choice this tutorial was designed for you guys to be able to customize and organize and get those needles under control :) this giant, yet portable knitting needle organizer keeps all your needles in place with flaps, velcro and special pockets and sections for all your knitting needs. no more rolling up your needles only to have them fall out again!


a big giant thank you to my own mom for helping me along the way and for her part in the design process. love ya mom! happy monday everyone!


p.s. stay tuned......i'm over on MADE today for celebrate the boy and the post will be up here and on MADE this afternoon!!! what a day!

Pattern Pieces for the Eco-Friendly Placemat to Bib Tutorial!


does she look familiar? awww, how time flies. the "eco-friendly placemat to bib tutorial" was one of my earlier ones and mackenzie was so tiny....it makes me cry just looking at it. seems so weird that she's gonna be 4 in a few months :( it's also sad that it's taken me this long to scan in the bib pieces so you guys can just print it out and cut. this is a really easy and fun bib to make and very, very cheap to buy supplies for. we use ours all the time, in fact i need to make some more.

click here for the original tutorial and here's the pattern pieces:

Top of bib

Bottom of Bib

Sides of Bib

feel free to ask any questions if you have them :)

have you made any of these bibs? don't forget to add your pic to our flickr group - i'd love to see them!

Sew Comfy Wristwarmers Tutorial


Who says wristwarmers or fingerless gloves need to be knit? I've been knitting a few pairs of wristwarmers/fingerless gloves (whatever you like to call them) for xmas pressies and the other day I got to thinking that it would be way faster to just sew a pair up. So this sleep deprived mama said to heck with all the other items on my to do list it's time for a tutorial!


If you follow me on facebook or read yesterday's post you know I fought and I mean fought for the light to take the pics of these sewn wristwarmers. I had to wait until 2:30 or so again and then mad woman dashed around the house sweating and sewing and racing around to get at least a few decent shots for you folks. So bear with me if the pics are not my best shots ever, I hope they at least get the message across. Please feel free to ask me any questions in the comments or to email questions my way. I'm more than happy to clarify any oopsies I may have made in my lack of sleep and over caffeinated haze :)


Sew Comfy Wristwarmers Tutorial:

Materials:

- Fabric approximately 22"L x 12"W for wristwarmers outer lining. I used flannel. Make sure your fabric is pre-washed and shrunk before starting project, it sucks to have to do this, but it's very important.
- Fabric for wristwarmer inner lining approximately 22"L x 12"W. I used an old t-shirt.
- Any supplies you would like to use to snazz up or personalize your wristwarmers.
-needle and thread
-scissors

*All seam allowances 1/2"

**Copyright 2010 www.luvinthemommyhood.com
All rights reserved. For personal use only. Please do not sell items made from this tutorial, it's bad karma :)

1. Download and print the pattern template for the wristwarmer. Adjust width or length as necessary for your arm/hand size.

Bottom Wrist Warmers

Top Wrist Warmers


If you choose not to print the pattern piece out here's another way for you to all whip one up as well:

1. Using a knit wristwarmer as a guide for shape, trace the outline on a piece of paper and then flip the wristwarmer to the right and continue tracing. Doing this makes an open version (unseamed) of your knit wristwarmer. This will be your starting guide. From this shape add at least 2 inches all around to make up for the lack of stretch in your outer lining fabric. Mine was about 9 inches wide at the bottom and tapered in smaller at the top. See the picture above & blelow as an example. Where the fabric curves in is approximately where your wrist will go. Remember the top part should be a smaller width than the bottom as your hand (width of your 4 fingers - not your thumb base) is not as big as your forearm.


2. Pin template to your fabric placing pattern piece fold along the fabric fold edge. Cut out 2 of these using your outer fabric. Cut out 2 more of these with your lining fabric. I used flannel for my outer (oooohhh comfy) and a soft t-shirt for the lining.


3. Pin the outers to the inners with right sides facing each other. Imagine the nice print of your fabric kissing the nice soft side of your cotton t-shirt. You should have two wristwarmers pinned and ready to go visit your machine :)

4. Sew all four sides using a zig zag stitch making sure to leave at least a 2" opening to pull your wristwarmer through later on. I used a zig zag stitch due to the fact that I used a stretch fabric and also because I wanted a little give in the glove area for my thumb to move around without ripping the seam open. Be patient with the sewing and be sure to pin well. The stretch moves a bit but if you hold it just right and don't pull or stretch the t-shirt material while sewing they match up quite nicely together.


5. Time to pretty it up. Trim your edges as close as you can get to your zig zag stitch without cutting it. Make sure to cut your corners as well so your edges are nice and pointy when turned right side out. Turn the wristwarmer right side out by pulling it through the 2" opening you left unsewn. Using a sharp object push out your corners and iron the wristwarmer nice and flat, then pin your opening shut. Using an invisible stitch hand sew the opening closed (ignore the fact that mine isn't in the pics below i was racing the light and was desperate to get my pics done).


6. Fold the wristwarmer in half with your outer fabric facing each other. Slip your arm inside and mark with a pic or fabric marker where you would like the opening for your thumb. You want to mark the base of your first finger sort of where the webbing of your thumb starts if you stick your thumb out sideways and also make a mark at the starting point of your wrist. *You will not be sewing this area. Pin the rest of the way down the wristwarmer and also pin the area between your first mark and the top of the wristwarmer. The areas that are pinned are where you will be sewing.

7. Bring the wristwarmer back to your machine and again using your zig zag stitch start sewing from the top of your wristwarmer down stopping at your first mark making sure to backstitch at the beginning and end of your seam a few times. This will help to make the seam nice and strong. You are going to be wearing these lovelies a lot :) This is a thick amount of fabric and it will feel weird at first to sew with this. Make sure you use an appropriate needle for your machine for the thickness and type of fabric you decide to use to make your wristwarmers. I had to tug mine a tad to get it going at first but it made it over the hump.

8. Starting at your 2nd mark sew again with a zig zag stitch down to the bottom of your wristwarmer again using a zig zag stitch. My wristwarmer is 9 1/2" L x 4"W when sewn up.
And then....


GOOD JOB! You're done! Yippee! Wasn't that soooo easy? Super fast and so much fun! I decided to add some buttons on to mine because, well....I love buttons. These wristwarmers are a great basic way to have a starting point to go all willy nilly with! Use your creativity! Make them reversible, or make them foldable to shorten the length sometimes. Add ruffles or applique. Embroider fun sayings on them or quilt them. Do patchwork with shapes or strips..heck the world is your oyester. All I know is that these have not come off since I made them. So comfy and warm for the winter months and even better when worn while sipping some yummy coffee or tea!


*Terms of use: This tutorial is for personal use only. Please do not sell items made from this tutorial - it's bad karma :) Thank you.*

Happy wristwarmer making! Hmmmm...I feel another Comfy Sews VS Cozy Knits coming on..haha. How about making one of our Infinity and Beyond Scarves to go with your fun new wristwarmers? Have you made sewn wristwarmers before? Come join our flickr group and show off your handmade goodies! Click here to join.

Infinity & Beyond Scarf Tutorial


i'm so excited to share this with all of you! this scarf has been on my mind for a long time now. i've sketched it a few times, daydreamed about it, dreamt about it at night and finally, finally found the time to make it happen (thanx jer). i've been drooling over the infinity scarves out there right now but just couldn't find one i loved enough to buy. i knew i wanted something warm, comfy and snuggly. i also knew i didn't want a knit one and that i wanted to be able to wear it a few ways.


i wear my pj's a lot when i'm at home, what can i say - i'm just a jammy girl. i figured what better material to use than a soft flannel that reminds me of a fave pair of jammies. how comfy would that be! i thought the flannel would still be soft enough to drape, but strong enough to hold the buttons and loops i wanted to use to be able to style this scarf the way i had imagined.


in total so far i have styled this scarf 13 different ways and show them all in this post, but i'm sure there are tons more. i repurposed an old elastic headband for the loops and some old buttons to add a sublte pop of color. this infinity scarf is designed to be worn a variety of different ways, use the loops and buttons and get creative! as moms we don't always have time to change our outfits during the day but we can have fun with our accessories and whip this scarf into a new style and instantly change our look. it will keep you warm, stylish and it's also fun to wear. i know if i spotted one of you lovely ladies in a grocery store line up with this on i would ask you where you got it.


there are a lot of possibilities for you to add your own personal touch to this scarf. applique, fabric choices, button picks, loop style and placement, heck if i had more time in my day a ruffled one would be gorgeous as well. i hope you all enjoy it and let's see if we can give cozy knits a run for her money this week and thanks to my gorgeous baby sister camille, for modelling for me even though she was sick with a cold - luv ya!


Infinity & Beyond Scarf Tutorial

Materials:
-Material for scarf. I used flannel. Make sure your fabric is pre-washed and shrunk before starting project, it sucks to have to do this, but it's very important.
-Elastic headband, or (3) hair ties or elastic/fabric/etc to be used as loops for buttons.
-3 buttons
-needle and thread
-scissors and pinking shears (optional)

*All seam allowances 1/4"

**Copyright 2010 www.luvinthemommyhood.com
All rights reserved. For personal use only. Please do not sell items made from this tutorial.


1. Lay your material out flat and cut the length you would like your scarf to be. I cut my scarf to be 10"w (when folded & cut like pic above - 20"w if layed out flat) x 64 1/2"l. To style the infinity scarf in the styles shown in this post I recommend using this length. I cut my fabric as shown incorporating the fold into the scarf so my lazy self didn't have to sew up 2 side seams. I also trimmed my short sides with my pinking shears to help prevent unravelling for us non-serger gals (more on that later).


2. Fold your material right sides facing each other (you will see your wrong sides). Pin along long edge. I like to pin as shown in the pic due to it being so easy to remove pins as you sew, but it's not the only way to pin.


3. 1) Grab your elastic headband & buttons. I wanted a simple, quick way to do the button loop & even though I love elastic headbands they look horrible on me and always slide off my head so I was happy to cut mine up!
2) Try a corner of your elastic headband around your button to determine the size you need to cut your loops. My loop was 1 1/2" long.
3) Hold onto where you made your loop test and cut along the base. Cut (2) more of lengths of elastic the same size. You will have (3) pieces of elastic now.
4) Next determine where to pin your elastic loop onto your scarf. I placed the button card near the end of my scarf & then simply placed the loop onto the scarf to see where I wanted it. I wanted a bit of stretch to the loop so I made my button loop a bit bigger than I normally would have. Pinch your fingers on the loop where you want to pin on the edge of scarf.

4. Now place (sandwich) the loop in between your two pieces of folded fabric like in the photo. When you sew your side seam this cute little loop will be hidden inside just waiting to pop out after and say hi! It feels weird to pin it this way but trust me, it will turn out ok.

5. Pin all loops onto your fabric as shown in the picture above. Make sure your pin goes through both sides of your fabric and also through both pieces of your loop. It's a bit tricky but I used a long pin and it worked out ok. I pinned the left and right loops 1 1/2" from each edge and the middle loop approx. 4.75" from long edge.

6. Bring scarf to machine and sew only this short side. It was a bit tricky to get the hair elastic under the needle but a gentle push of the fabric helped to give it that extra oomph to make it through. I backstitched over them a few times as well for extra strength.


7. Now sew the long side seam. Now if you aren't lucky enough to have a serger like me, when you are done sewing the seam simply trim along it with your pinking shears to help with unravelling. I know it's going to be inside the scarf, but I plan on washing mine and can't stand the idea of all these unravelling threads inside it. If you don't have pinking shears you could also zig zag stitch along this as well.

ok...we're almost there......

8. Before you sew up the final short edge, you are going to turn the scarf right side out and admire it, pet it if you like...maybe wrap it around you for a minute, ahhhh, so warm :) Ok, back to work. Now while wearing your soon to be new scarf, mark where you would like your buttons to go with a washable fabric pen/pencil. Sew your buttons onto only one side of the scarf making sure not to go through both pieces of material. *Remember to use a button that is raised so you can actually loop around it. Make sure to place the buttons far enough away from the edge that you have room to actually machine sew your seam closed.

9. Turn the scarf inside out again (right sides facing together) Pin your short seam closed. Sew this seam making sure to leave a 2" opening to pull your scarf through. Clip your corners so that you can have nice clean points for your scarf. Ok...pull that lovely scarf through, gentle now, we don't want to rip it. Get out whatever handy little notion you would like to use to push your corners out, even the end of a ball pin will do or the point of a knitting needle. Once right side out simply hand stitch your opening closed using an invisible stitch. If need be, gently iron the scarf and then...voila!!!! you are ready to go....TO INFINITY & BEYOND!!!!!


If anyone is interested in learning how to wrap all 13 styles shown in this post, let me know and i may just put together a pdf with instructions.

**Ok, ladies, a PDF has been requested, glad you all want to learn how to wear it! I've been busy working on it but it's taking a while to get it all put together. Bear with me and hopefully I'll have it ready in the next few weeks :)

*Terms of use: This tutorial is for personal use only. Please do not sell items made from this tutorial. Thank you.*

make sure to add pics of your projects inspired by the tutes below to our flickr group! i love seeing all of your creations!

so, what do you think? you like? are you gonna make one? what's your fave way to wear it? i heart the scoodie version. i can't wait to see yours! hope you all had a great, comfy, cozy weekend and stay tuned this week for more tutorials, giveaways and round 3 of our comfy sews VS cozy knits! fun!

**all images copyright luvinthemommyhood

pj's to summer tunic tutorial!

i have been spotting all the cute tunic shirts with a drawstring lately and decided that i wanted to make one of my own. after i couldn't find a pattern that i could actually understand i decided to wing it - my fave thing to do! the result was a pair of my favourite jammies providing me with inspiration, a splash of fun colour and an easy way to make a stylish, customizable tunic, romper, or dress! so go get out your fave pj’s or raid La Senza and sew your way to a stylish summer must have!

(the pics for this post were tricky - they don't do the shirt justice. i'll post better pics later if get some.)

for those of you new to the "newbie sewing series" we provide a tutorial geared towards anyone who sews, but mostly for those who are learning, like me. you get a pdf download of the tutorial and also a handmade video of lil'ol me making them. there may not always be the correct terminology, or the best process, but that's what it's all about when you are learning to sew, it's not always perfect, but it's sure fun.


click here for the pdf download


and here for the video tutorial.

let's have some fun and think outside of the box. we all have tons of interesting materials at home that can be refashioned into something we want to wear and love again. your favorite pair of jammies don't need to be turned into cleaning rags or donated, why not use the much loved fabric to make something you are sure to wear for the summer and with a cute cardigan for the fall. our creativity is a powerful thing that we can all use together to fight the effects of the economy and the environment.

so whip out the sewing machines and show me your creativity in full swing! make sure to join our luvinthemommyhood flickr group and share those projects that you have refashioned! happy sewing!

{all images luvinthemommyhood}

the placemat to bib tutorial!

i've been on the hunt for new and safe bibs for mackenzie and kept finding myself reluctant to spend over $10/Cdn for one bib. I spotted some great tropical placemats (PEVA & eco-friendly) at walmart a few weeks ago and bought them for about $1 each not knowing what i was going to do with them. after my search for a new bib replacement ended up fruitless, i remembered my new placemats and the bib idea was born.

this is a super easy repurposing craft that can be hand stitched with an upholstery needle or sewn on the machine like i did. have some fun with it. go wild with the placemat patterns, add a pocket or fancy trim, you're sure to get a lot of wear out of these handy little placemat bibs and all for a great price - you can't go wrong with that!


click below for the pdf tutorial:


and you can also download the pattern pieces here. we've been having lots of fun with our bibs at home and i have to say these things repel food! it's been great - no fussy clean up, running dye, stinky odour and they wipe down easily. happy bib making :)

***Copyright 2009 www.luvinthemommyhood.com
All rights reserved. For personal use only. Please do not sell items made from this tutorial unless permission has been given.


please add any pics of bibs you make to our flickr group! we love seeing what you are making!

shirt sleeves to yoga capris - the tutorial

i'm really excited about the newest tutorial in the "newbie sewing series" called "shirt sleeve to yoga capris". yes, that's right, i made pants from a pair of sleeves. nuts? nope. fun? you betcha! i got so many comments about the first tutorial in this series (click here for the tute) stating that they wished they could make pants in an adult size, that i couldn't stop thinking about it. i remembered one day a week or so ago that my hubby had thrown this soft, blue cotton polo in his donation to my sewing pile and a light bulb went off in my head. the sleeves stretch! they could fit around my thighs, ok, possibly fit, so i tried them on. mackenzie had a great laugh, jer thought i was nuts, but i persevered. i love how they turned out.


this tutorial requires you to think outside of the norm. we usually wear pants with a seam that goes from front to back in the middle of our bodies, well not these pants. they go from side to side from the inseam outwards. i find it super comfortable and kind of like a pantie line you are allowed to see! during the process i realized that having the seam go on an angle upwards was a leg lengthening trick that is used on bathing suits and with the low rise waist, they could be great for yoga or just lounging in. the best surprise is that they turned out be a great maternity pant as well. no, i'm not pregnant, but i can easily see someone who is being able to wear these around the house during the whole 9 months and after. they are easily adjustable due to a drawstring hidden in the inner waistband and no constricting or tight fabric. i swear i lived in a pair of jammie bottoms that fit almost like this during my whole pregnancy.

so raid your closets, hit up the thrift stores and try a pair. go wild with it. open up your imagination and make yourself your own pair of comfy, fat day, bloat day, live on the couch and eat ice cream, meditate and do sun salutation day pants.

for those of you new to the "newbie sewing series" we provide a tutorial geared towards anyone who sews, but mostly for those who are learning, like me. you get a pdf download of the tutorial and also a handmade video of lil'ol me making them. there may not always be the correct terminology, or the best process, but that's what it's all about when you are learning to sew, it's not always perfect, but it's sure fun.

***Copyright 2010 www.luvinthemommyhood.com
All rights reserved. For personal use only. Please do not sell items made from this tutorial unless permission has been given.


click here for the pdf download

(please let me know if you have a problem downloading, we were having technical difficulties last night. that's why there is no preview here.)

and here for the video tutorial.


so come along for the ride, use your creativity and remake, repurpose or refashion something into these comfy capris and then lounge, meditate, stretch and pose your little heart out! these pants are made to be custom fit to you!

send us your pics! we would love to see if you make any of the projects in the "newbie sewing series" - please email your creations to luvinthemommyhood@yahoo.ca it's inspiring to see what all of you have been making!